[Fix] Windows 10 WiFi Keeps Turning Off (100% Working)

If the WiFi connection keeps turning off in your Windows 10 and reconnecting, then you’re not the only one experiencing this problem. This issue is being reported by a large number of Windows 10 users.

The source of this could be a variety of issues, including an expired USB driver, a faulty router program, as well as an optimal power management configuration in Windows 10. 

Your WiFi continues breaking and you are trying to find a solution, then you are in the correct place. In this blog, I’ll explain to you simple procedures to troubleshoot your wireless network connection.

Windows 10 wifi keeps turning off

Reasons Why WiFi Keeps Disconnecting

There can be several reasons why your WiFi may keep disconnecting. Here we’ve pointed out some most common reasons for this issue-

WiFi Sense is Enabled

WiFi Sense is now a new function introduced in Windows 10 that detects wireless networks and tries to connect them automatically. this feature may force your operating system to disconnect from your WiFi networks as a result of an attempt to connect to a new network available nearby.

Battery Saver is Enabled

Microsoft has included a variety of actions to minimize power consumption to improve the battery performance of devices. While this option is enabled, it is likely to shut off your Wireless internet router, leading your system to break away from the internet regularly.

Outdated or Corrupted Drivers

If your drivers are now out of date or corrupted, they will not function properly, resulting in issues.

Faulty Settings

The settings of your WiFi Adapter may have been change and in the new settings, the channel frequency, bandwidth detection and frequency are wrong. It can lead issues wile WiFi keeps turning off automatically. 

Faulty Router

This can happen if the router is also not operating correctly, which might result in you losing connection to the Wi-Fi connection.

Methods to Fix WiFi Keeps Turning Off Problem

There are a variety of reasons why the internet connection keeps disconnecting every often. So, you need to apply various methods until you successfully fix the issue.

To resolve this WiFi problem on your own if you properly follow the methods below –

  • Method 1: Update WiFi Adapter Drivers Manually
  • Method 2: Modify the Power Management Settings
  • Method 3: Perform The Network Adapter Troubleshooter
  • Method 4: Update The Driver For Your Network Adapter Automatically
  • Method 5: Reset Your Wi-Fi Autoconfig Program On Your Computer.

Method 1: Update Your Wifi Adapter Drivers Manually

The majority of Desktop users have stated as this one is the best effective solution they have seen for the wifi constantly disconnecting trouble on their system. To upgrade the wifi drivers by manual process, properly follow the instructions outlined below:

Step 1: First, type Windows + R keys simultaneously, and in the Run box, type devmgmt.msc.

Step 2: On the device manager, extend the network adapters part, and locate your WiFi network adapter.

Step 3: If you don’t know which one is your WiFi network adapter, then navigate to the control panel > network and sharing center > change adapter settings > and right-click on the WiFi, select Properties and learn the name of your WiFi network adapter.

Step 4: Now that you know the driver’s name, you can right-click on it and select “Update Driver”.

Step 5: Then select Browse my computer for driver software from the drop-down menu.

Step 6: Choose Let me pick from the list in there.

Step 7: You can now look for driver models that are comparable to yours. If there is just one official title and one Microsoft edition, select the first one.

If it does not resolve your issue, proceed to the next step.

Method 2: Modify the Power Management Settings

To resolve the WiFi connection issue, please follow the steps below: 

Step 1: After tapping the Windows key, type “control panel” into the search bar, and open the control panel on your computer.


Step 2: Access the control panel, and there select Network and Sharing Center. 

Step 3: After that, Right-click on the WiFi network you are using, select Properties from the drop-down menu and select Configure.

Step 4: Continue by selecting Power Management and unchecking the option that says “Allow the computer to turn off this device to save power.” Now, close the window.

Step 5: Restart your computer by clicking OK.

Method 3: Perform the network adapter troubleshooter

Windows has shown to be a useful fixer in such situations. The network adapter fixer can help you figure out how to resolve this wifi issue. 

Step 1: Navigate to Control Panel.

Step 2: The upper right corner contains small and large icons that allow you to choose whatever perspective you want to see.

Step 3: Now, you have to choose to troubleshoot

[Fixed] WiFi keeps turning off problem windows 10

Step 4: After that, select View All from the drop-down menu, which will display all of the issues you are experiencing with the Windows system.

Step 5: Find “Network adapter” then right-click the Run to start the recovery process. After that, simply follow the on-screen instructions.

Step 6: After that, restart your computer & check to see whether it’s working or not.

Method 4: Update the Driver for Your Network Adapter Automatically

Here’s what to do to have the proper network adapter drivers installed automatically: 

Step 1: In the pop-up window, press Windows + R then type devmgmt.msc.

Step 2: When it opens, check for network adapters then expand this item, and then search for the wifi network adapter you are using inside the list that appears.

Step 3: Once you’ve located your wifi network adapter, you have to right-click on this and select uninstall from the context menu.

Step 4: Once your system has been restarted, it will start installing the most current edition of your network adapter that is currently available.

Method 5: Reset your Wi-Fi AutoConfig program on your computer.

After trying all of the previously mentioned solutions, try the following steps to restore your Wi – fi access: 

Step 1: Press the Windows symbol key + R then type services.msc into the popup window that appears.

Step 2: Now locate the WLAN (Wireless Local Area Network) AutoConfig program and then, double-click on this to activate it.

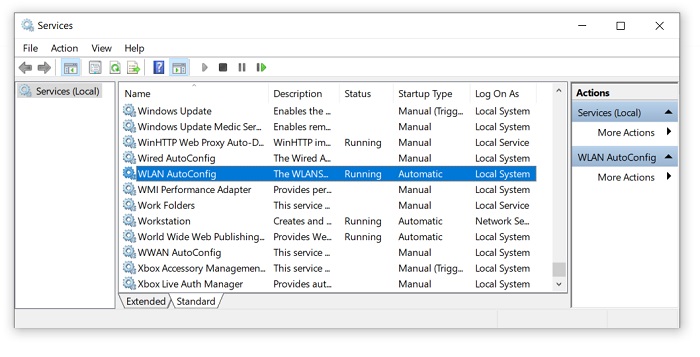
Step 3: Select Automatic as the startup type, and then hit Apply then Okay for saving all the settings changes.

Reboot your pc and check to see whether you have become capable of connecting to WiFi as you normally would.

Conclusion

Hope these methods will help you to fix the Wifi turning problem. You have to follow the steps of the methods properly. There are several fixing ways, so, if one method doesn’t work, move to the next method to solve the error.

Leave a Reply