
Downgrade Windows 10 Pro to Home | Switching Methods Showing
Who does not want to use an upgrade version of technology like Windows or others? In contrast, sometimes you may need to downgrade from upgrade technology too. Even downgrading Windows 10 pro to home is a common thing that many Windows users want.
But, the process isn’t an easy one. Because if you install the Windows through normal clean boot, you won’t get the accurate setup that your PC has now. Or you might lose your important data while switching to Windows 10 Home from the Pro version.

So, what to do to downgrade to the Home version successfully without compromising with the current PC setup or losing any data?
From this article, you will get the answer. I will describe the downgrading process in ins and outs.
How to Downgrade Windows 10 Pro to Home?
Before diving into the details process, you need to ensure a couple of things first. These are-
- Backup the Important Files
- Windows 10 Home Edition license key
We will include the backup process in this article. But you must have the Windows 10 Home edition license key either already you have access or you need to purchase a new one.
Task 1: Keep Backup in Windows 10
Before starting the main downgrade process, you can apply the following steps to keep a backup of your data.
Step 1
Tap the Windows and ‘I’ keys together. According to the result of the action, you will see the ‘Settings’ interface on the screen. From here, you need to select the ‘Update & Security’ section.

Step 2
After that, you have to choose the ‘Backup’ option from the left sidebar of the newly appeared interface.

Step 3
While clicking on the ‘Backup’, you will see some backup options including the ‘Back up using File History’ portion. Under the portion, there will be a ‘Add a drive’ option.
You have to click on it and choose an external drive to keep the backup. You can also keep it in a network location.

After that, you have to move forward to the main process. I will describe the process in detail with several steps.
Task 2: Work with Registry Editor
The process keeps you in the same position both before and after. This means you can downgrade Windows 10 Pro to Home without compromising the PC setup. The process is given below.
Step 1
Tap the Windows and ‘R’ Keys together to get access to the ‘Run’ window. Then type regedit into the ‘Open’ box and press ‘Ok’.

Step 2
Consequently, the ‘Registry Editor’ window will appear on the screen. You need to copy the below path and paste it to the window’s address bar.
‘Computer\HKEY_LOCAL_MACHINE\SOFTWARE\Microsoft\Windows NT\CurrentVersion’

After that, you have to hit the ‘enter’ button.
Step 3
From here, you need to click on the ‘CurrentVersion’ from the left menu bar and then look at the right sidebar.
You will find the ‘EditionID’ option with a variety of options. You have to double-click on it.

Step 4
Then the ‘Edit String’ interface will become evident. You need to change the ‘Value data’ to ‘Core’. The remained data might be ‘Professional’.
You have to press ‘Ok’ after executing the input of data.

Step 5
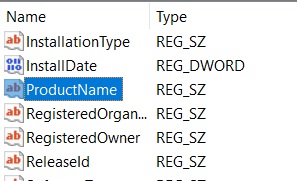
Again, you need to work with ‘CurrentVersion’. Find out the ‘ProductName’ option from here. While seeing, double click on it.

Step 6
As a result, a related ‘Edit String’ window will appear on the screen. From here, you need to change the ‘Value data’ into ‘Windows 10 Home’ from the ‘Windows 10 Pro’.
In the end, you have to press ‘Ok’ to complete the submission.

Step 7
In this Step, you need to copy the below direction path and paste it to the address bar of ‘Registry Editor’ as you do in Step 2.
‘Computer\HKEY_LOCAL_MACHINE\SOFTWARE\WOW6432Node\Microsoft\Windows NT\CurrentVersion’

You have to press ‘enter’ to get access to the path to make some changes.
Step 8
Click on the ‘CurrentVersion’ and look at the right sidebar. You need to find out the ‘EditionID’ from here. While finding it, you have to double click on it.

Step 9
Here, you need to input ‘Core’ as ‘Value data’ inside the newly appeared ‘Edit String’ window. Then hit on the ‘Ok’.

Step 10
After that, you need to find out the ‘ProductName’ option from the ‘CurrentVersion’ section. While seeing, double click on it.
Step 11
Consequently, the ‘Edit String’ window will become evident. You have to change the ‘Value data’ into ‘Windows 10 Home’ by typing.
In the end, you have to click on ‘Ok’ and close the ‘Registry Editor’ then.

If you apply the upper steps, you will reach the endpoint of the main process. Next, you have to install the Windows 10 Home. I am going to brief the download & install process with several steps that you can try.
On the other hand, you can install windows with your existing boot device. In this case, you may avoid the below process.
Task 3: Download and Install Windows 10 Home
The process will have two major sections. One is downloaded and the other is installed. We will explain them chronologically.
Step 1
Firstly, you have to download the ‘Windows Creation Tool’. To do so, you can follow the below link. The link will take you to the Microsoft official platform.
While opening the link, you will get the ‘Download tool now’ option. Click on it to download the tool.
Step 2
After completing the download, click on the file to install the tool. While clicking on it, ‘User Account Control’ will ask your permission. Once you press ‘Yes’, the tool’s installation process will take place.
Step 3
At this stage, you have to wait for a couple of minutes. The ‘Windows 10 Setup’ window will give you the on-screen direction, you need to follow it.

Step 4
Click on ‘Accept’ to continue the process.

Step 5
Here you have to choose the ‘Create installation media (USB flash drive, DVD, or ISO file) for another PC’ option. Then hit on the ‘Next’.

Step 6
After that, you need to checkmark the ‘Use the recommended options for this PC’ box and press ‘Next’ then.

Step 7
Consequently, ‘Choose which media to use’ interface will appear. From here, select the ‘ISO file’ option and click on ‘Next’.

Step 8
Next, select a path where you want to keep the download file. While selecting it, tap the ‘Save’ option.

Step 9
You have to wait for several minutes until the progress of creating Windows 10 media will complete. Whenever the progress reaches 100%, click on the ‘Next’ tab.

Step 10
Hopefully, the download process will be completed successfully. After getting the confirmation, you need to click ‘Finish’.

Step 11
From here, the windows installation process will start. So, you need to go to the folder where the downloaded file exists. Right-click on the file and select the ‘Mount’ option.

Step 12
Then you have to click on the ‘setup’ application from the existing file.

Step 13
At the beginning of the Windows setup, you need to choose whether you want to get important updates or not. We would recommend you select the Not right now option. After that, tap the Next option.

Step 14
Next, you have to click on ‘Accept’ to start the Windows installation process.

Step 15
Now you have to tap the Install option.

Step 16
The installation process may take several minutes to complete. So, you have to keep patience until it will finish. Here, your PC will restart several times too.

Step 17
Finally, you will reach the end of the installation process. Check if your PC has successfully gotten the Windows 10 Home.
Accomplishing all three tasks will definitely let your PC have and run the fresh Windows 10 Home.

Frequently Asked Questions(FAQs)
Q: What is the main difference between Windows 10 Home and Windows 10 Pro? According to Microsoft, there are two main things that can differ between the Home and Pro. These are- ‘BitLocker device encryption’ and ‘Windows Information Protection (WIP)’. You can not get access to these options in Windows 10 Home whereas it can be accessible if you use Windows 10 Pro. There are some other functions that are not available in the Home.
By the way, IT professionals always prefer Windows 10 Pro instead of Windows 10 Home. On the other hand, Windows 10 Home is a handy one for general users.
Q: Can I downgrade to Windows 10 Home from Windows 10 Pro without losing data?
Of course, you can downgrade to Windows 10 Home without losing any data. For so, I would recommend you to follow the ‘Before Applying the Process: Keep Backup in Windows 10’ portion described upper of this article to be in a safe position.
Q: Can I use Windows 10 Home key for the Pro version?
No, you can’t use the Home version’s key for the Pro version. But you can downgrade to Home from Pro.
Final Words
Therefore, no more misleading to downgrade Windows 10 Pro to Home. For that, you should apply the main process step by step. Whether before and after sessions can be applied in some different ways.


