
The Operating System Did Not Shutdown Cleanly (100% Working)
Many Intel Optane system users have reported that their computer is showing an error informing them that the operating system did not shut down cleanly after an unexpected shutdown.
This error normally occurs if the system crashed, or stopped responding. If you are facing the same problem, then you are just in the right place where you can get proper solutions to this issue.

Reasons Why ‘the Operating System Did Not Shutdown Cleanly’ Occurs?
There are a few things that can be happened if you see an error that the operating system did not shut down cleanly which are:
- Your system has stopped responding.
- Your system has crashed.
- A power loss occurred to your system.
- You have performed a force shutdown.
- You are using two RAM sticks on your computer.
Whatever the reason is, you can fix this problem easily by following some easy methods.
How to Fix ‘the Operating System Did Not Shutdown Cleanly’ Error?
If you are receiving the following message on your screen, then the solutions given here will be able to fix it:
“the operating system did not shut down cleanly.”
Reconstructing cache Metadata.
Please do not interrupt this process.”
You are recommended to apply the following methods one by one to fix the problem.
Method-1: Restore UEFI Firmware Settings
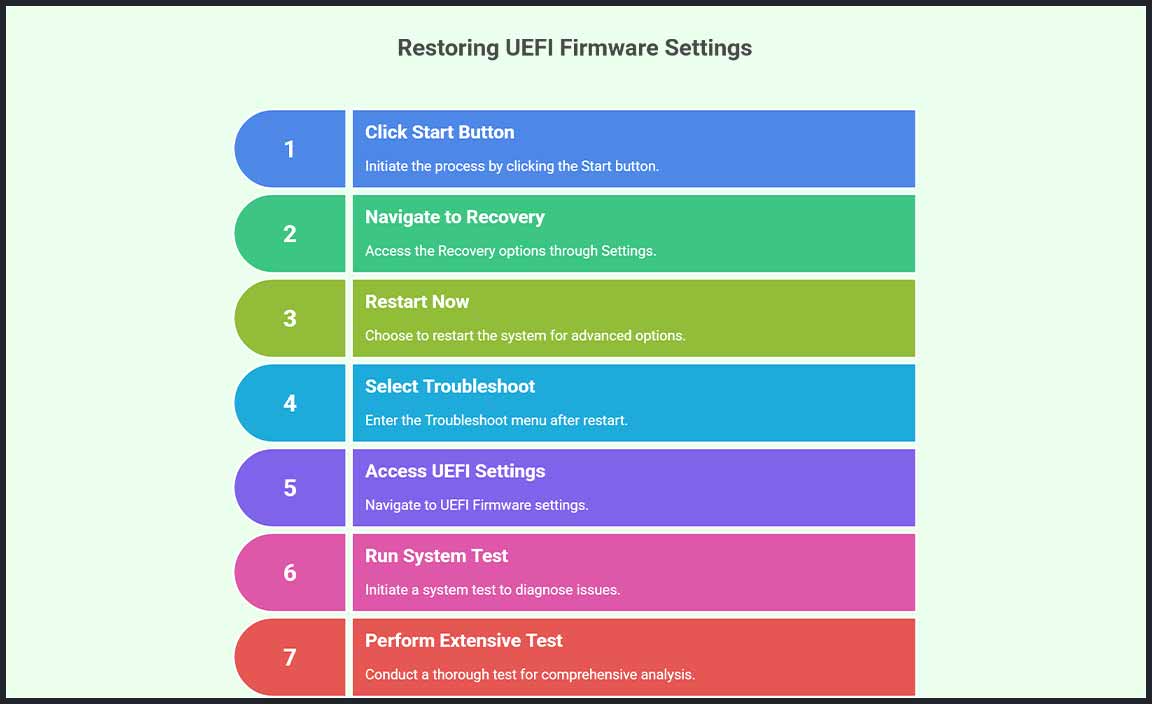
To fix the above-mentioned error, you’ll need to restore the UEFI Firmware Settings. Here is the instruction on how to restore UEFI Firmware –
Step 1: Click on the Start button.
Step 2: Then, navigate to Settings > Update & Security > Recovery.
Step 3: Click on Restart now under the Advanced startup option.
Step 4: After your PC restarts, click on Troubleshoot from the options on your screen and then go to Advanced options > UEFI Firmware settings.
Step 5: Now, click on System Test, and finally, click Extensive Test.
If this doesn’t fix the issue, then try the following method below.
Method-2: Change Default BIOS Settings
Sometimes changing the Default BIOS Settings can fix faulty setup with the BIOS and can also fix the above-mentioned error. Here is the instruction on how to change the Default BIOS Settings
Step 1: Press and hold the power button of your computer until the unit completely shuts down.
Step 2: After that, press the Novo Button using an unfolded paperclip or similar things to it.
Note: If your PC doesn’t have any Novo Button, repeatedly press the F1 or F2, Shift + Power button (FN+F1 or F2) during the startup to enter the BIOS setup.
Step 3: Then, from the menu that appeared on your screen, choose the BIOS setup.
Step 4: Now, go to the EXIT tab and click on Load Default Settings.
Step 5: Finally, Click on Save & Exit changes.
Hopefully, it will solve the issue if it was related to your BIOS. If you still face the issue, then you can continue to another method.
Method-3: Run Hardware Diagnostic

The problem is also can be related to hardware flaws. So check your hardware and fix it if any faults are found. Here are the steps to diagnosis hardware to help you perform this:
Step 1: Click on the search icon from your taskbar and type Diagnostic.
On the Diagnostic window, click on the Simple Scan notions.
Step 2: It will operate the system scan and inform any flaws or errors on your screen.
Step 3: You can take your CPU to a technician to replace the faulty hardware and the error will be solved automatically.
Method-4: Remove the Extra RAM

Sometimes two RAMs can conflict and create such issues as the mentioned error. So, if you have installed two RAM sticks on your motherboard, then you can try removing one of those sticks and then start your computer.
Many users have fixed the same error as yours using this method. So, it is worth trying at least once. If it doesn’t fix the issue, then put back the RAM into the slot and remove the other one.
Conclusion
Many users have encountered and reported an error message that says the operating system did not shut down cleanly after an unexpected shutdown and most of them have fixed the issue using the above solution. Apply the above solutions one by one and hopefully, you will be able to fix the issue on your own.
Frequently Asked Questions
How Do I Fix Windows Preparing Automatic Repair?
To fix Windows preparing Automatic Repair issue, hard reboot your computer first. Then, boot into the Safe Mode as We described how previously. Next, click on Disable Automatic Repair. After that, Reset the PC. Finally, fresh Install Windows 10 on your PC.
How Do I Fix Automatic Repair Couldn’t Repair My Computer?
Here is what you can do to fix the automatic repair on your computer-
You can rebuild the Boot Configuration Data (BCD) & Repair the Master Boot Record (MBR). Open the Run box and type chkdsk. If that won’t work, then go to Safe Mode and run SFC and use the DISM Tool. Disable your installed anti-malware protection and the Automatic Startup Repair option. If none of this work, restore the registry from the RegBack directory & Reset your computer.
Resource:
-
Understanding BIOS and UEFI Settings: https://www.howtogeek.com/56958/htg-explains-how-uefi-will-replace-the-bios/
-
Diagnosing Hardware Problems in Windows: https://support.microsoft.com/en-us/windows/use-a-tool-to-check-for-memory-problems-00ca4887-2cb9-43c9-9c5c-772b0f50474d
-
What Happens During Forced Shutdowns: https://www.makeuseof.com/what-happens-when-you-force-shutdown-windows/
-
How RAM Configuration Affects System Stability: https://www.crucial.com/articles/about-memory/does-adding-more-ram-increase-performance


![[Fix] Display Connection Might Be Limited](https://i2.wp.com/wingeek.org/wp-content/uploads/2026/06/fix-display-connection-might-be-limited-768x469.webp)


