
[Fix] Display Drivers Failed to Start Error (100% Working)
Your Windows may encounter several driver-related errors and display driver error is one of them. You have probably complained about popping up a message saying that “Display Driver Failed to Start” especially when you click on a high-end game to play or a high resource demand software to work with. Clearly, here your graphics drivers face some errors or malware or these are just outdated.
This kind of situation resists you from using any sorts of graphics-oriented activities with Windows although you still may be able to carry out simple tasks. However, this display driver error is irritating and we need a solution. In this article, 5 different solutions to graphics card-related issues have been compiled so that you can try one after another and ultimately find the one that resolves the issue in your particular system.

5 Solutions to ‘Display Drivers Failed to Start’ Error
Display driver fails to start for various reasons. One of your installed graphics cards may be corrupted or outdated. If other drivers are not updated along with the graphics card, there may arise syncing issue, hence one or two drivers fail to start. Even outdated Windows can be the root cause of this type of problem.
Again, the game or software that you want to open may be heavy GPU demanded and your display driver is just not good enough. In this case, you have to find a more powerful graphics card to resolve the issue. However, what happens frequently is that the display driver is OK but malware or some internal error causes it to work improperly.
The solutions provided in this article should be helpful for any display driver’s failure. Although the figures are given here taken from Windows 10, the users of the other versions can also follow the post just by tweaking one or two things.
Solution 1: Update Display Driver
Step 1: Open your Windows search bar and search for the ‘Device Manager’; click on the best result that you see.

Step 2: Expand the ‘Display Adapters’ from a list of devices.

Step 3: You will find your device’s graphics card there whether it be Intel or NVidia or multiple ones. Right-click on the graphics card that you think causing trouble.

Step 4: Select the ‘Properties’ option.

Step 5: A separate window will pop up and you will go to the ‘Driver’ tab from this graphics window.

Step 6: Hit the ‘Update Driver’ button.

Step 7: Click on the ‘Search automatically for updated driver software’ option. The computer will look for available drivers according to your system’s specifications. Wait for a while until the display driver is updated. Then, restart the device to affect the change.

On the other hand, if you have the display driver software previously downloaded on the hard drive, then you might want to alter procedure in the step 7. Instead of telling the computer to look for updates automatically, select the option ‘Browse my computer for driver software’. Locate the driver and install it manually.

Select the drive where the file is located and tap on the ‘Let me pick from a list of available drivers on my computer’ option.

Select the driver that you want to install and click on the ‘Next’ button. Your graphics driver will be updated after the restart.

Remember one thing, it is always recommended to download and install drivers from the original manufacturers’ websites. Choose the driver that you require for your Windows version, PC model, and manufacturer. However, in case you do not feel confident in choosing the right one, use utility software like ‘Driver Easy’ to update the outdated drivers. Open the software and scan to pinpoint the outdated drivers. The software will recommend available display drivers; you should just select and install one of them. Updating the display driver often eradicates errors inside the driver.
Solution 2: Adjust Performance of the System
Search for the ‘Performance Monitor’ on the Windows search bar and then click on the best result.

You will be directed to the performance window where you can adjust the performance of the system. Click on the ‘Adjust for best performance’ option.

Hit the ‘Apply’ button. This will make sure that GPU and CPU change and alter resources in order to run the high-end applications efficiently. Hence, showing display driver failed to start error may be fixed. However, if the issue persists, then move on to the next solution. You have to try different solutions until you get the correct one.

Solution 3: Update Windows Regularly
Updating display drivers while using outdated Windows is not a good practice. All the resources of the system- drivers, software, Windows, etc., should conform to each other. To update Windows, you can follow these steps.
Step 1: Click on the Windows logo which can be found on the bottom left corner of the screen. Then click on the ‘gear’ icon i.e. Settings of the computer.

Step 2: Tap on the ‘Update & Security’ from a list of settings options.

Step 3: The device will check for available updates. Wait until updating of Windows is finished. Make sure that your PC is connected to the internet and update Windows regularly.

Solution 4: Roll Back Display Driver
Up and till now, the article has been focusing on updating drivers and Windows to resolve the discussed issue. However, you should be reminded that erroneous updates can also be the reason for the problem. Hence, you would want to revert to the point when the display driver used to work properly. To do this, follow the instructions of solution no. 1 until hitting the update driver button. Instead, click on the ‘Roll Back Driver’ button and follow the instructions from thereon.

Solution 5: Tweak Registry Editor
Step 1: Open ‘Registry Editor’ by searching from the Windows search bar.

Step 2: Press the ‘Yes’ button.

Step 3: Expand the ‘HKEY_LOCAL_MACHINE’ in the registry editor window.

Step 4: Expand the ‘System’ file.

Step 5: Expand the ‘CurrentControlSet’.

Step 6: Expand the subfolder ‘Control’.

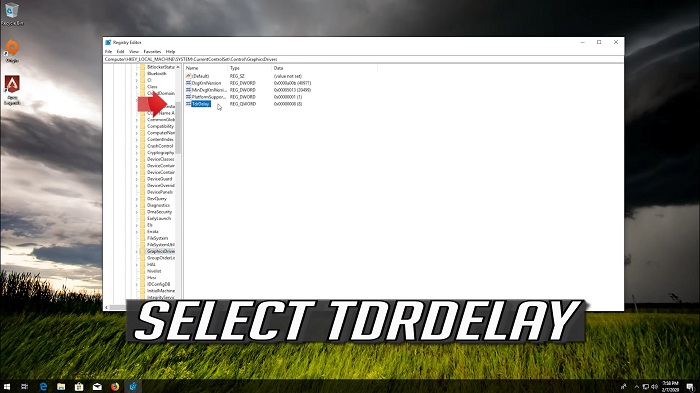
Step 7: Select the ‘GraphicsDrivers’ folder.

Step 8: Select the ‘TdrDelay’ file.
Step 9: Right-click it and click on the ‘Delete’ option. Deleting the display driver file from the registry editor will help to resolve the error.

Conclusion
The above-mentioned solutions should be good enough to fix the display drivers’ failed to start error. Additionally, you should scan the system with good quality anti-virus software and remove malware that may also be responsible to start driver-related errors. That’s it for today; hopefully, you got the answer that you were looking for.


