[Fix] It Looks Like We Don’t Support This File Format (100% Working)
From your side, while trying to open an image file like ‘.jpg’ or ‘.jpeg’ through the ‘Photos’ app, an error message prompts on the screen that it looks like we don’t support this file format.
Now the big question is, what to do with the error?
I am writing this article to guide you to fix the error. So, you don’t need to be worried. I promise you will be able to open the image file after following this guideline.

Reasons Why the Error Message Notification Appeared
Who doesn’t know about the ‘.jpg’ and ‘jpeg’ file formats? Even these are the most used image file format. But, one of the file formatted images couldn’t open through the Microsoft Photos app.
It can happen to you for a couple of reasons. These are-
- File Corruption
- App distraction
- Default apps selection

How to Fix the ‘It Looks Like We Don’t Support This File Format’ Error
Trying other photo viewers can be the first option for you to fix the error. According to your move, there will be a couple of situations you may face.
If you still aren’t able to open the image with other photo viewers, the problem may occur for the image file corruption.
In this case, you need to try a couple of options to solve the error.
Firstly, check the problematic file properties. If you see that the image consumes 0 KB, you will have to recollect the file from the main source.
In contrast, if the image consumes hard-drive spaces, you will need to use a third-party image repair tool.
On the other hand, if the error message appears for all images, you may try the below fixes.
Fix 1: Change the Default Apps
Some ‘Settings’ options can be the cause behind the error. So, making changes in the ‘Settings’ can be the solution for you to recover. Let’s check the first try.
Step 1: Firstly, you need to tap the Windows and ‘I’ keys together to get the ‘Settings’ window access. You also may try other options to get access. Depending on your command, the ‘Settings’ window will become evident on the screen. You have to select ‘Apps’ from here.
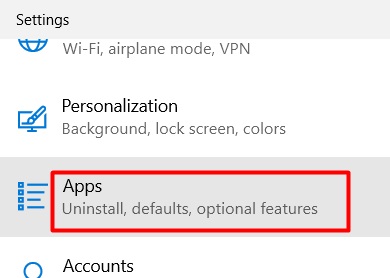
Step 2: Look at the left sidebar. You will see the ‘Default apps’ section here. You have to click on it.

Step 3: Next, you will get a related newly appeared interface at the right sidebar of the ‘Settings’ window. You have to scroll down and find out the ‘Choose default apps by file type’ option. While finding it, you need to enter inside the option.

Step 4: Consequently, you will see a list of various kinds of files on the left side and default apps on the right side in the same line.
You have to scroll down and find out the ‘.jpg’ and ‘.jpeg’ file names. To make the search easy, the names will be accommodated alphabetically.
After you find out the files, you have to change the default app into ‘Photos’ from the same-lined right sidebar.

In the end, if the ‘Photos’ is already set as default apps, you won’t need to do anything else and have to reset the ‘Photos’ app. I will attach the reset process in the next fix.
Fix 2: Reset ‘Photos’ App
In some cases, you may fix the error by resetting the ‘Photos’ app. I will include the process step by step below.
Step 1: Again you need to work with the ‘Settings’ window. So, press the Windows and ‘I’ keys together. Then scroll down and find the ‘Apps’ from the appeared ‘Settings’ interface.

Step 2: Next, you need to select the ‘Apps & features’ section from the left side menu bar.

Step 3: Then look at the right sidebar. Here, you have to scroll down to search the ‘Microsoft Photos’ preface from the apps and features list. While getting it, you need to click on the preface. Consequently, the ‘Advanced options’ will be visible just below the preface. Hit the option.

Step 4: Next, scroll down at the bottom of the interface, you will see the ‘Reset’ option here. You have to click on it.

Step 5: In this step, you need to confirm the executive command by hitting on the ‘Reset’ option again.

Step 6: After that, you have to wait for a couple of seconds to complete the process. In the end, you will see the tick mark just beside the ‘Reset’ option as the success remark.

Hopefully, you will be able to open the problematic image file.
Frequently Asked Questions
Why Is the JPG Format Not Supported?
If you get an error saying the JPG format is not supported while opening the image on your computer, then either the photo viewer doesn’t support the JPEG format or the photo is corrupted. Try renaming the photo with the correct extension. You can try opening the photo with Paint and changing the format by clicking “File > Save As”.
How Do I Fix the File Format Not Supported on My Laptop with Windows 10?
To fix the File Format Not Supported error on your laptop, you can try converting the file into the supported format using the Windows Codec Pack or try a different media player. If none of them work, then repair the corrupted file. You can also try downloading and installing third-party video codecs such as the “K-Lite Codec Pack” on your PC to get rid of this problem.
Final Words
Therefore, you may not get the ‘It looks like we don’t support this file format‘ error message for ‘.jpg’ or ‘.jpeg’ file formats only. It can happen to other image file formats too.
In this case, I would like to request you to check whether the ‘Photos’ or other photo viewers will support the format or not.
If it supports, you can apply the entire guideline. But if not, you need to use the related software to open the image file.


![[Solved] The Itunes Could Not Connect to This iPhone 0xe80000a Error (100% Working)](https://i2.wp.com/wingeek.org/wp-content/uploads/2021/11/How-to-Fix-the-iTunes-could-not-connect-to-this-iPhone-0xe80000a-Error.jpg)