
10 Fixes of Kernel Auto Boost Lock Acquisition With Raised IRQL Error (100% Working)
Are you facing a Blue Screen of Death (BSOD) crash including kernel auto boost lock acquisition with raised IRQL?
Trust me, you are not alone who facing the error. And it is solvable. So, no need to worry.

In fact, I am writing this article to assist you to fix the error. Here, I will also include the possible reasons behind the error. Let’s explore.
Why the BSOD Error Occurs?
The BSOD crash occurs for a couple of reasons. Before describing the fixes, I am going to include these reasons briefly. It will help you to be conscious of the error.
- In most cases, the error occurs for the wireless adapter. Mismatch in the communication while transferring the signal without the wire can be responsible for the error. In this case, you can recover your PC from the error by disabling, updating, or uninstalling the wireless adapter.
- The error also occurs for Bluetooth devices like mice, keyboards, headphones, and so on. Here you may need to roll back the related driver to fix the error.
- The BSOD crash may take place for the Boot Configuration Data Corruption. If it is so with your PC, you have to rebuild the BCD.
- Another unexpected reason for occurring the error can be an external device. The operating system may fall into trouble with the interruption of an external device. So if the discussed BSOD error happens to you for the external device, you will need to remove the device and disable the related driver.

How to Fix the ‘Kernel Auto Boost Lock Acquisition with Raised IRQL’ Error
The error is not unrecoverable. By observing ins and outs of the error, I compile 10 possible fixes to resolve the error. These will be easy to apply yourself. Let’s have a glimpse at the list first.
- Fix 1: Check Disk Through Command Prompt
- Fix 2: Update Driver
- Fix 3: Disable Wireless Devices
- Fix 4: Roll Back Mouse Bluetooth
- Fix 5: Uninstall the Wireless Device
- Fix 6: Check for System Update
- Fix 7: Removing External Hard Drive
- Fix 8: Disable Bluetooth from BIOS
- Fix 9: Rebuild the Boot Configuration Data
- Fix 10: Perform a System Restore
Fix 1: Check Disk Through Command Prompt
Firstly, you can run the ‘chkdsk’ to fix the error. It may be enough to fix the error. You can follow the below steps to do so.
Step 1
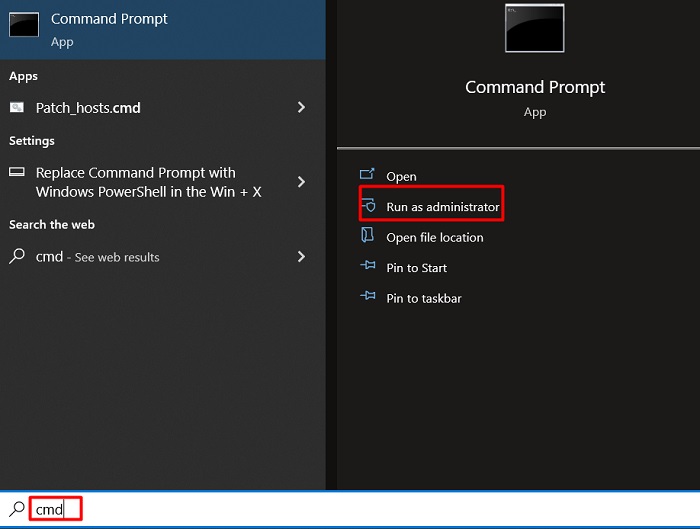
Tap the Windows key and type ‘cmd’. Consequently, you will see the ‘Command Prompt’ preface on the appeared interface. You have to look at the top right side and click on the ‘Run as administrator’.
Step 2
Then you have to click on ‘Yes’ to allow the ‘User Account Control’ to access the administrative power of the ‘Command Prompt’.

Step 3
As a result, the ‘Command Prompt’ window will appear on the screen. You have to copy the below text and paste it into the window.
‘chkdsk /f’

Next, hit the ‘enter’ button.
After completing the scan, you need to restart the computer and check the error. Will it happen again or vanish? If still exists, you can follow the next fix.
Fix 2: Update Driver
Sometimes, an outdated driver can create the error. So, you need to update the related wireless device driver. I will include the update process below.
Step 1
Right-click on the ‘Start’ menu and click on the ‘Device Manager’ from the appeared list.

Step 2
Accordingly, the ‘Device Manger’ window will be visible. You need to scroll down to find the ‘Network adapters’ section. Expand the section while finding it.

Step 3
Then right-click on the wireless device option. Consequently, you will get some options to choose from. ‘Update driver’ will be one of them. You have to click on it.

Step 4
Then, you need to select the ‘Browse my computer for drivers’ to continue the process.

Step 5
Next, you have to click on the ‘Let me pick from a list of available drivers on my computer’ option.
Step 6

Here, you need to select the device that needs to be updated. Then press the ‘Next’ tab.

Step 7
Accordingly, the update process will start. It may take a couple of seconds. After a while, you will get a success notification.

Finally, you have to restart the computer and check the issue. If it still exists, you will need to disable the device. The process will be given in the next fix.
Fix 3: Disable Wireless Devices
Disable wireless devices can solve the error. You can easily apply the fix. Firstly, you have to follow the first two steps from the previous fix to get the ‘Device Manager’ window access.
After that, you need to find out the ‘Network adapters’ section and expand it. Then, right-click on the wireless adapter and select the ‘Disable device’ from appeared function list.

You have to confirm the execution. Finally, place a trial usage of your PC and observe the error. Will it occur or not?
If it occurs, you will not need to worry. Still, several fixes will be available in hand to fix the error.
Fix 4: Roll Back Mouse Bluetooth Driver
Sometimes, rollback can be a solution instead of updating the driver. You can try the fix if the error isn’t solved even by applying the upper fixes. I will include the process step by step below.
Step 1
Access the ‘Device Manager’ window again. To do so, right-click on the ‘Start’ menu and click on the ‘Device Manger’. While the window appears, you have to scroll down and find the ‘Mice and other pointing devices’ section.

Step 2
Expand the section. Then, you have to right-click on the Bluetooth Mouse option. Select ‘Properties’ from the appeared list.

Step 3
Consequently, a new window will appear on the screen. You will see the ‘Driver’ tab among others. Tap on it.

Step 4
After that, you will get ‘Roll Back Driver’ in the middle of the window. Click on it. Then confirm the execution.

Finally, you have to restart the PC. Then check the existence of the error. If it still exists, you should uninstall the wireless device directly. The process will be given in the next fix.
Fix 5: Uninstall the Wireless Device
If update and rollback are not able to fix the error, you will need to uninstall the device directly. To do so, you can follow the below steps.
Step 1
Again you have to go to ‘Device Manager’ and find the ‘Network adapters’ section.
Step 2
While finding it, you have to expand the section. From here, right-click on the wireless device option.
Step 3
Accordingly, you will get the ‘Uninstall device’ option from the appeared list. You have to click on it. In the end, you need to confirm the process execution.

Finally, restart your PC and observe the error’s visibility. In case, if it still lives, you will need to follow some other fixes.
Fix 6: Check for System Update
In some cases, a system update can simply solve the issue. Here will be a reminder that you may avoid this fix if your PC is always up-to-date.
Step 1
Tap the Windows and ‘I’ keys together. Accordingly, you will get the ‘Settings’ window. Then, you have to scroll down to the bottom to select the ‘Update & Security’ section.

Step 2
Look at the left sidebar and click on the ‘Windows Update’.

Step 3
After that, give your concentration at the right sidebar. Here you will get the ‘Check for updates’ option. Click on it.

You have to wait for a while to complete the checking process. Then follow the next on-screen direction if needed.
Fix 7: Removing External Hard Drive
Sometimes, an external hard drive may create the error. Most of the time, a wireless or Bluetooth adapter could be responsible. If it happens to your PC, you will need to remove the device from the PC.
Fix 8: Disable Bluetooth from BIOS
If none of the upper fixes work for you, you will need to disable Bluetooth from BIOS. In order to disable Bluetooth, you have to enter into the BIOS setup.
So, restart your PC and press the specified key to enter the BIOS setting. Generally, the key is specified by the PC manufacturers.
After entering the BIOS menu, you will need to look forward to finding the Bluetooth option. Commonly you will get it under the ‘Security’ tab, but it may differ. While finding, you will get two options. From here, you have to choose ‘Disabled’.

Finally, save the change. Open the PC in normal mode. Then observe the screen. Will the BDOS crash error appear or not? If you still face the error, you need to mover to next fix.
Fix 9: Rebuild the Boot Configuration Data
In rare cases, BCD corruption can be the reason for occurring the error. If so, you need to rebuild BCD. I will attach the process below.
Step 1
Inject an installation device and restart your PC. Then press any key at the starting phase. Consequently, you will get the ‘Windows Setup’ window access. While it appears, you will see the ‘Repair your computer’ option at the left bottom. You have to click on it.

Step 2
Consequently, the ‘Choose an option’ window will be visible. From here, you have to select ‘Troubleshoot’.

Step 3
After that, choose the ‘Advanced options’ from the appeared ‘Troubleshoot’ interface.

Step 4
Then, you will see all the advanced options. ‘Command Prompt’ will be one of them. Click on it.

Step 5
As a result, the ‘Command Prompt’ window will become evident on the screen. You have to copy the below text and paste it into the window.
‘bootrec /rebuildbcd’

Next, hit the ‘enter’ key. It will take a couple of times to complete the BCD (Boot Configuration Data) rebuilding.
Finally, restart the PC and verify the solution. Will it fix the error or not? If it isn’t able to fix somehow, you will have the last option to apply.
Fix 10: Perform a System Restore
If none of the upper fixes work for you, a system restore can be the final way to resolve the BSOD error.
To perform a system restore, you have to follow the first three steps
from the previous fix. While the ‘Advanced options’ window appears on the screen, you need to apply the following steps.
Step 4
You have to click on the ‘System Restore’ option from the ‘Advanced options’ interface.

Step 5
Consequently, the ‘System Restore’ window will appear on the screen. From here, you need to select a point where you want to restore. Then click on the ‘Next’ option.

Step 6
In the end, you have to confirm the restore point and process execution. In order to confirm your submission, click on the ‘Finish’ option.

Finally, the system restoration will start. It may take several times. So, you have to wait until the process complete. Hopefully, the blue screen error will not happen to you again.
Final Words
Therefore, the chance will be 50-50 that the fix no. 1 will help you in first apply if the kernel auto boost lock acquisition with raised IRQL.
However, if you are in a hurry, you can apply the fix no. 3. I assume that it will give you an outstanding result. In case, if it fails somehow, you need to follow the fix no. 2 and 5.
In the end, I would like to remind you that if all fixes fail to solve the error, you have to apply the fix no. 10.


