
[Fixed] USB xHCI Compliant Host Controller (100% Working)
Suppose you’ve opened your computer and noticed that the ‘USB xHCI Compliant Host Controller’ isn’t starting. Consequently, none of the USB ports could work. So, what to do now?
You can fix “XHCI USB host controller is not working” issue in Windows 10, you have to run the “Hardware and Devices” troubleshooter, uninstall the “USB xHCI” driver, or disable the “USB selective suspend setting“.
If you don’t know how to troubleshoot the mentioned issue, no need to be worried. All the possible solutions to this problem are contain in this article. By following the fixes, you will get rid of the error.

What Is USB xHCI Compliant Host Controller?
Before we move to the solution, we need to understand what USB xHCI Compliant Host Controller is.
xHCI as known as eXtensible Host Controller Interface is a computer interface specification that –
- Polls the devices using a polling interval determined by the device,
- Defines a register-level description of a host controller for Universal Serial Bus (USB),
- Directs the USB bus
If USB xHCI stop working, individual devices will be unable to arbitrate for the bus. Means, the interfacing between the device and USB 1. x, 2.0, and 3. x compatible devices will be stopped.
What to Do If ‘USB xHCI Compliant Host Controller’ Cannot Start
There are a couple of fixes that you can apply from your side to solve the error. I compile the fixes in detail. Before diving into the deep, let’s take a glimpse of the list first.
- Fix 1: Run ‘Hardware and Device’ Troubleshooter
- Fix 2: Check for Available Windows Update
- Fix 3: Reinstall the driver
- Fix 4: Disable ‘USB selective suspend setting’
- Fix 5: Customize Registry Editor
Fix 1: Run ‘Hardware and Device’ Troubleshooter
‘Hardware and Device’ Troubleshooting can be the first choice to fix the error you face. But, you may not run the troubleshooter like the usual troubleshooting process. Here I brief the process step by step below.
Step 1
Right-click on the ‘Start’ menu. You have to find the ‘Windows PowerShell (Admin)’ option from here. While finding the option, click on it.
Step 2
Consequently, the Windows PowerShell administrator command prompt will appear on the screen. You need to copy the below command and paste it into the prompt.
‘msdt.exe -id DeviceDiagnostic’
In the end, you have to hit the ‘enter’ button.
Step 3
As a result, the ‘Hardware and Devices’ troubleshooter will become evident. You have to click on ‘Next’ to execute the troubleshooting.
Step 4
It may take several seconds to detect problems. So, you have to wait for a while.
Step 5
After the diagnosis, you will get two options. Either you have to choose the ‘Apply this fix’ option to solve the error automatically. Or choose ‘Skip the fix’ to apply the finding manually and continue the troubleshooting.
Step 6
After finishing the process, you will receive a confirmation message. Then follow the on-screen command according to the troubleshooting result.
If the problem still exists, you will move to the next fix.
Fix 2: Check for Available Windows Update
Windows update will be another fix you can try to resolve the error. I will describe the way below.
Step 1
Firstly, press the Windows and ‘I’ keys together to access the ‘Settings’ window. After that, scroll down to the bottom and select the ‘Update & Security’ section.
Step 2
Then look at the left sidebar of the newly appeared interface and click on the ‘Windows Update’ option.
Step 3
Next, give your concentration on the right sidebar. Here you will get the ‘Check for updates’ option. You have to click on it to check the availability of Windows updates. To apply this, you need an internet connection.
On the other hand, if your PC always has an internet connection, Windows will automatically download the update. And complete the installation. But, if you stop the update download option, you will have to do it manually.
Check the problem after updating the Windows. If this system issue does not solve the error, you need to apply some settings and driver-related fixes.
Fix 3: Reinstall the Driver
You can reinstall the problematic driver to solve the error. To do that, you have to uninstall it first. The process will be given below.
Step 1
Right-click on the ‘Start’ menu again. This time you have to find ‘Device Manager’ from the newly appeared interface. While you see the category, click on it.

Step 2
Consequently, the ‘Device Manager’ window will be visible. You need to scroll down to the bottom. Here you will get the ‘Universal Serial Bus controllers’ option. Expand it.

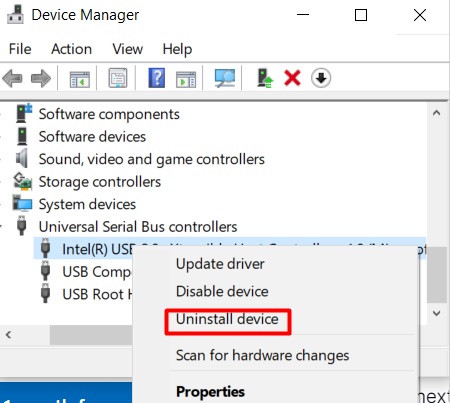
Step 3
Then you will find the problematic USB device. You have to right-click on it. As a result, the ‘Uninstall device’ option will be visible inside the newly appeared interface. Click on it.
Step 4
After that, you have to restart the PC.
Step 5
Next, you have to download the Windows 10 display driver from the PC manufacturer’s website. Then install the driver by following the on-screen direction.
Finally, check the problematic device. If the error still exists, you need to follow the next one.
Fix 4: Disable ‘USB selective suspend setting’
Windows system has the ‘USB selective suspend setting’ option. You may need to disable it to fix the error we discuss. I will describe the disable process below.
Step 1
Tap the Windows key and type ‘edit power plan’. As a result, you will get the same-named ‘Control panel’ on top of the newly appeared interface. You have to click on it.

Step 2
Then you will see the ‘Edit Plan Settings’ window. Look at the left bottom and click on the ‘Change advanced power settings’ option.

Step 3
Consequently, the ‘Power Options’ window will become evident. You have to scroll down to find the ‘USB settings’ section. While finding it, you need to click on the plus icon box.

Step 4
Next, the ‘USB selective suspend setting’ option will be visible. You have to disable it. To do so, toggle down the dropdown menu and select ‘Disabled’. Here you will get two categories. One will be ‘On battery’, and the other will be ‘Plugged in’. You have to choose ‘Disabled’ for both.

Step 5
In this step, you need to confirm the submission. To do so, tap the ‘Apply’ tab and press ‘Ok’ at the end.

Finally, restart your PC and check the existence of the error. If still, you face it somehow, you will need to follow the last fix.
Fix 5: Customize Registry Editor
The last option you can try will customize ‘Registry Editor’ to fix the error you still face. The full process will be given below.
Step 1
Firstly, tap the Windows and ‘R’ keys together. As per the command, the ‘Run’ window will become evident. Type ‘regedit’ into the ‘Open’ box and click on ‘Ok’.

Step 2
Consequently, the ‘Registry Editor’ will appear on the screen. Then copy the below direction and paste it on the address bar.
‘ComputerHKEY_LOCAL_MACHINESYSTEMCurrentControlSetServicesUSBXHCI’

After that, you have to hit the ‘enter’ button.
Step 3
Next, look at the right sidebar of the window. You need to right-click on the blank space. Then expand the ‘New’ section and choose ‘DWORD (32-bit) Value’.

Step 4
Here you have to rename the newly created DWORD as ‘DisableSelectiveSuspend’. Then double-click on it.

Step 5
As a result, you will get the ‘Edit DWORD (32-bit) Value’ window. Here you need to put ‘1’ into the ‘Value data’ box. Select the ‘Hexadecimal’ as the ‘Base’. And then click on ‘Ok’ at the end.

Finally, close the ‘Registry Editor’ and check the error. Hopefully, you won’t face the problem anymore.
Final Words
In addition, I assume that you will get a fruitful direction by applying fix no. 1 while the ‘USB xHCI Compliant Host Controller’ Cannot start. Then you can follow fix no. 2, 3, and 4 one after another until you solve the error. Furthermore, you need to apply fix no. 5 rarely.


