
How to Fix If Windows 7 Update Stuck at 35
Does Windows 7 update stuck at 35% disturb you a lot?
Truly, it is one of the common errors that Windows 7 users face. You are one of them. However, you need the exact solution right now. Don’t worry. You have come to the right place indeed. I am writing this article to assist you to get rid of the error. Here I also include the possible reasons. Let’s explore.
Why Windows Update Stuck
Windows Update can be stuck for a couple of reasons. These are-
- The Windows Update-related System may be corrupted somehow.
- Some internal functions may interrupt the Windows Update service
- The Windows Update downloading process may not be completed properly.
Whatever the reason is, the issue is solvable. So, don’t worry and continue reading the article to get the solution.

What to Do If Windows 7 Update Stuck at 35
Windows Update stuck doesn’t mean it is unsolvable. You will get the all possible solution to get rid of the issue from the article. Before jumping into the details, let’s have a glimpse at the list first.
- Fix 1: Use Related Troubleshooter
- Fix 2: Use System File Checker
- Fix 3: Change Service Setting
- Fix 4: Customize the DNS server
- Fix 5: Download Windows Update Manually
Fix 1: Use Related Troubleshooter
The use of a troubleshooter is always the firsthand solution to any Windows-related issue. If the Windows update is stuck from your side, you can run the Windows Update troubleshooter to resolve the issue. I will discuss the process below.
Step 1
Tap the Windows key. Then type ‘troubleshooting’ into the search bar. Accordingly, you will see the ‘Troubleshooting’ option in the appeared list. You have to click on it.
Step 2
Consequently, a new interface will become evident with the ‘Troubleshoot computer problems’ heading. Here, you will find the ‘Fix Problems with Windows Update’ option under the ‘System and Security’ section. You have to select the option.

Step 3
After that, the Windows Update Troubleshooter window will be visible. From here, you need to click on blue colored ‘Advanced’ option.

Step 4
Next, you have to mark the ‘Apply repairs automatically’ box. Then click on the ‘Run as administrator’ option.

Step 5
In this step, you have to press the ‘Next’ from the appeared interface to run the Windows Update Troubleshooter to resolve the discussed problem.

It may take some time to complete the troubleshooting process. You will get a possible solution from the diagnosis either you solve it manually or leave it to be held automatically.
Finally, try to update Windows and observe the issue. Will it appear again or not? If it appears, you will need to follow the other fixes.
Fix 2: Use System File Checker
System File Checker, as well as SFC, is a useful process to find and resolve any System error. You can run an SFC scan if you are stuck while updating Windows. The process will be given below.
Step 1
Tap the Windows key and type ‘cmd’ into the search box. Accordingly, the ‘Command Prompt’ preface will be visible on the appeared interface. Right-click on it and select the ‘Run as administrator’ option.

Step 2
Consequently, the ‘Command Prompt’ window will appear with the administrative access. You have to copy the below command and paste it into the window.
sfc /scannow
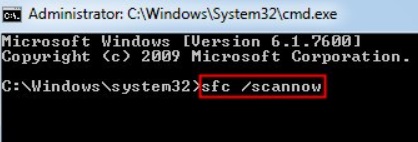
Then hit the ‘enter’ button. It may take a little time to complete the operation.
Finally, check the issue. Will it still exist or not?
Fix 3: Change Service Setting
The problem may hide behind the Windows Update service settings. If so, you need to make some changes to service settings. Let’s explore the changing process.
Step 1
Tap the Windows and ‘R’ keys together. Accordingly, ‘Run’ window will appear. You have to type ‘services.msc’ into the ‘Open’ box and press ‘Ok’.

Step 2
Consequently, the ‘Services’ window will become evident. From here, find and right-click the ‘Windows Update’ service. Then choose the ‘Stop’ option from the appeared list.

Step 3
After that, click on the ‘File Explorer’ icon from the Taskbar. When the ‘File Explorer’ opens, you have to copy the below direction and paste it into the address bar.
C:\Windows\SoftwareDistribution\DataStore

Hit the ‘enter’ button then. At the end of the step, delete all the files from ‘DataStore’.
Step 4
Next, copy the below direction and paste it into ‘File Explorer’s address bar.
C:\Windows\SoftwareDistribution\Download

Then hit ‘enter’ and make the ‘Download’ folder empty.
Step 5
Again, open the ‘Services’ window. Then find and right-click on ‘Windows Update’. After that, select the ‘Start’ from the appeared list. As a result, the service will restart.

Finally, check the existence of the issue.
Fix 4: Customize the DNS server
Windows Update can be stuck to the sudden interruption of the DNS server. In this case, You can easily solve the issue by customizing the DNS server labels. I will include the process below.
Step 1
Open the ‘Run’ window again. To do so, press the Windows and ‘R’ keys together. Type ‘control’ into the ‘Open’ box of the ‘Run’ and click on ‘Ok’.

Step 2
Next, you will get the ‘Control Panel’ window access. Here you have to choose ‘Category’ as the ‘View by’ option. Then click on the ‘View network status and tasks’ option. You will see the option under the ‘Network and Internet’ category.

Step 3
Then look at the left side menu. Here you will see the ‘Change adapter settings’ option. You have to click on it.

Step 4
After that, right-click on the ‘Local Area Connection’ and select ‘Properties’ from the appeared list.

Step 5
Accordingly, ‘Local Area Connection Properties’ window will appear on the screen. From here, you have to choose the ‘Internet Protocol Version 4 (TCP/IPv4)’ item.

Step 6
Next, mark on the ‘Obtain an IP address automatically’ circle. Then mark on the below ‘Use the following DNS server addresses’ circle. Change the ‘Preferred DNS server’ into ‘8.8.8.8’ and the ‘Alternate DNS server’ into ‘8.8.4.4’.

At the end press ‘Ok’ and restart the PC.
Finally, try to update Windows again. Somehow, if you aren’t able to update Windows errorlessly, you will have to do it manually through the below process.
Fix 5: Execute Windows Update Manually
If you need to execute a Windows update manually, you will have to follow four consecutive parts. To make it easy, I will attach the full procedure part by part with the possible steps below.
Part 1- Check the System Type
You need to work with the ‘Command Prompt’ window to check the System type.
Step 1
Press the Windows and ‘R’ keys together to open the ‘Run’. Then, type ‘cmd’ into the ‘Open’ bar and click on ‘Ok’.

Step 2
Accordingly, the ‘Command Prompt’ window will appear. You have to type ‘systeminfo’ into the appeared window and hit the ‘enter’ to execute the command.

Finally, you get the info about System. Here X86-based PC will stand for 32 bit Windows, and X64-based PC will stand for 64 bit Windows.
Part 2: Check the Update History
In this part, you have to find out the position wherever the update process is stuck.
Step 1
Tap the Windows key and type ‘windows update’ into the search box. Accordingly, you will see the ‘Windows Update’ option in the appeared list. You have to click on it.

Step 2
Then, look at the left side menu and select the ‘View update history’ option. Here you will check the position where the Windows Update getting stuck.

Part 3: Download the related Update Manually from the Catalog
At this stage, you will have the System info. You will also acknowledge the stuck position. So, you have to move forward.
Step 1
Visit the below web address.

Then search for the update according to your finding.
Step 2
Download the required update file from the appeared list.

Part 4: Install the Downloaded Update
At the end of the fix, you have to install the downloaded update. To do so, click on the downloaded file and follow the on-screen direction to complete the process. It may take a couple of moments to complete.
Hopefully, your PC won’t stack anymore in the middle of the Windows Update process.
Final Words
Therefore, troubleshooting will be enough if the Windows 7 update is stuck at 35. So, my recommendation is to first follow fix no 1 carefully while facing the issue. If somehow it fails then follow the other fixes. In the end, if no other fix works for you, you will have to update Windows manually.


