
How to Fix C Stage 2 Windows 10 Issue
Are you stuck on the Fixing (C:) Stage 2 windows 10 issue?
Or do you face it each time you open the PC?

Whatever the situation is, you need the applicable method to fix the issue. In this perspective, you have come to the right place. Here I will describe the fixes details in this entire article.
Methods of Fixing C Stage 2 Windows 10
Before jumping to the solution, let’s know about the possible reasons behind the issue. It happens with the old windows system. Switching from Windows 7 to Windows 10, in the meantime, the issue occurs, is the most common fact. In a rare case, the issue may create, whenever the PC has been shutting down improperly.
However the reasons are, you need a proper solution. I will describe two possible methods to solve the issue. Let’s have a look.
Basic Method: Manually Shut Down the PC
Hold the power button for several seconds until it shut down. Then you have to wait for a couple of seconds. After that, press the power button again to restart the PC.
By any chance, if the disc checking is going to run again, you need to skip it before facing the described error. Then you have to work with the Registry Editor to fix the error permanently. Otherwise, it will happen each time you open the PC.
Advanced Method: Stop the Fixing C Stage 2
In most cases, you may need to apply the advanced method. I will brief the process in detail below.
Step 1
Firstly, you need to press the Windows and ‘R’ keys together to access the ‘Run’ window.
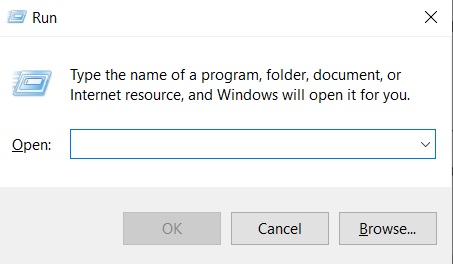
Step 2
Then type ‘regedit‘ on the ‘Open-box and tap the ‘Ok‘ tab.

Step 3
Consequently, the ‘Registry Editor’ window will become evident. You have to copy the following direction label and paste it on the window address bar. Then press ‘enter‘.
‘Computer\HKEY_LOCAL_MACHINE\SYSTEM\CurrentControlSet\Control\Session Manager’

Step 4
Next, look at the right sidebar and find the ‘BootExecute‘ option. While seeing, double click on it.

Step 5
Then you will see the ‘Edit Multi-String‘ interface on the screen. Here you need to set ‘Value data‘ to ‘autocheck autochk /k:C *’ from the default ‘autocheck autochk *’.
After that, press ‘Ok‘ to confirm the submission.

Finally, you have to restart the PC to check the existence of the fixing issue.

Final Words
My assumption, you will not face the fixing C stage 2 Windows 10 issue anymore. But in case, if the issue still pokes you continuously, you need to stop the automatic check disk process.


