6 Methods to Resolve Microsoft Family Features Pop Up Issue
Microsoft Family is one of the best useful features of tech giant Microsoft. While using it, Microsoft family features pop up to assist you. But it can be a reason for disturbance whenever the pop-up appears more and more.
Many Microsoft users claimed the issue. It might happen to you also. But how can you get rid of the pop-up issue?

Yes, you have come to the right place to get the answer. In the entire article, I am compiling six fixes for you. Let’s explore.
How to Stop Microsoft Family Features Pop Up
The issue you have faced while using a child or adult account under a Family admin account. In rare cases, it may occur whether you have no connection with the Microsoft family. Whatever the cause is, you can apply the described fixes to solve the issue in both cases. Let’s have a short look at the fixes list first-
- Fix 1: Change the Date of Birth Manually
- Fix 2: Remove the Child Account
- Fix 3: Reset the Family Group
- Fix 4: Disable Parental Control
- Fix 5: Rename the Root File From SystemApps
- Fix 6: Switch From A Local Account to Microsoft Account
Fix 1: Change the Date of Birth Manually
The pop-up can appear for the birthdate like you may reach the adult age, but somehow Microsoft doesn’t update it. So, the first thing you can apply is to change the date of birth manually to fix the issue. I will provide the process description step by step.
Step 1
Firstly, you have to ensure that you sign in with your problematic Microsoft Account. Here you will see the ‘Your Info‘ tab on the top of the web page. Tap it.

Step 2
Then you will see the ‘Profile info‘ section from the appeared ‘Your Info‘ interface. On the top right side of the section, you will find the ‘Edit profile info‘. Click on it to change ‘Date of birth‘ manually.

Step 3
Then you need to verify your identity through the email by which you created your Microsoft account.
Step 4
After verifying the identity, you will see the ‘Personal Info‘ interface. You have to edit the ‘Birthdate‘ from here.

Finally, check whether the features still pop up or not. If still, you have to apply the next fix.
Fix 2: Remove the Child Account
You might be a child member of the family group. For what, the pop-up appears on the screen in terms of restriction. In this case, you can solve the issue by removing the child’s account from the Microsoft family group.
To do so, you have to go to Microsoft Family first. Then select the child account you want to remove.
After that, you will find ‘More options‘. While clicking on it, ‘Remove from the family group’ will appear. You have to confirm the command.

Once the account is removed, you need to restart your PC. Finally, inspect the error. If it even now exists, you have to apply the next fix.
Fix 3: Reset the Family Group
You can reset the Family Group from your Microsoft Family to fix the issue. Here is a soft reminder that you can only do it if the group is created from your Microsoft account.
Before the reset, you have to check the information you want to reserve. If any, transfer the info to OneDrive storage.
You have to work with the Microsoft family again to reset the Family Group. Consistently, remove all child accounts and adult accounts also.
Then select right-click on your account and press the ‘Leave family group‘ option. Once you do it, the reset will be completed by default.

After that, restart your PC. Hopefully, no pop-up will disturb you anymore.
If the features pop up again, it might be a Microsoft bug. To resolve the bug, you have to work with Widows settings directly.
Fix 4: Disable Parental Control
In some cases, you may solve the issue from the Windows System service by disabling the parental control. Here I will describe the process below.
Step 1
Tap the Windows key and type ‘services’. Then you will see the ‘Run as administrator’ option on the right sidebar of the appeared interface. Click on it.

Step 2
Consequently, the ‘Services‘ window will open. You have to scroll down to find out the ‘Parental Controls‘ function. The good thing is, the services list accommodates alphabetically.
While finding the service, you need to right-click on it. Then, you will see the ‘Properties‘ among other options. Select the option.

Step 3
After that, the ‘Parental Controls Properties‘ window will be visible. You need to select ‘Disabled‘ from the ‘Startup type’ portion and confirm that the ‘Service status’ should be ‘Stopped’.
Then, click on the ‘Apply‘ to keep the setting change and press ‘Ok‘ to confirm.

Step 4
From this step, you have to work with the ‘Task Manager’. So, tap the Windows key and type ‘task manager‘.
While the app icon prompt on the right sidebar, select the ‘Run as administrator‘ option.

Step 5
As a result, the ‘Task Manager‘ window will become evident. Then you have to scroll down to find out the ‘Family Safety Monitor‘ option.
After finding it, you have to right-click and select the ‘End task‘ command consequently.

The success ratio of the fix is high. I assume that it will work for you too. Although, we have some other options to fix the issue.
Fix 5: Rename the Root File From SystemApps
Renaming the Microsoft Family-related root file from SystemApps will be one of the easiest fixes of the pop-up issue. Here you can follow the below three steps to do that.
Step 1
Firstly, you need to enter into ‘This PC‘. Then copy the below text and paste it into the address bar.
‘C:\Windows\SystemApps’
Then you have to press ‘enter‘.

Step 2
Consequently, ‘SystemApps‘ will appear on the screen. Next, scroll down and find the ‘ParentalControls_cw5n1h2txyewy’ folder.

Step 3
While finding it, you have to right-click on it. Select the ‘Rename‘ command from here. Finally, change the name into anything.

The recorded percentage of the fix is 50-50. So, you may need to follow the next fix.
Fix 6: Switch From a Local Account to Microsoft Account
Fix no. 6 will be the last possible fix of the issue you faced. Here I will show from the beginning like creating a local account to finish like switching the local account to Microsoft account.
Step 1
Firstly you need to work with the ‘Computer Management‘ app. To access it, tap the Windows key and type ‘computer management‘. Then, click on the ‘Run as administrator.

Step 2
Consequently, the app will appear on the screen. You have to find the ‘Local Users and Groups’ section from the left sidebar. Whenever you find it, you need to select the section. Then the ‘Users’ and ‘Groups‘ options will be visible on the right sidebar.

Step 3
After that, right-click on the ‘Users’ and select ‘New User…’ from here.

Step 4
A separate window will become evident. You have to fill up the ‘User name‘, ‘Full name’, ‘Password’ and ‘Confirm password’ spaces.
You also have to uncheck the ‘User must change password at next logon and check the ‘User cannot change password’ & ‘Password never expires’ boxes.
At the end of this step, click on the ‘Create’ tab. Finally, a new local account will be created.

Step 5
From this step, you need to work with the ‘Settings‘. So, right-click on the ‘Start‘ menu. Select ‘Settings’ from here.

Step 6
Then scroll down the newly appeared window and select the ‘Accounts‘ section.

Step 7
After that, you will see the ‘Family & other users‘ on the left sidebar. Click on it.

Step 8
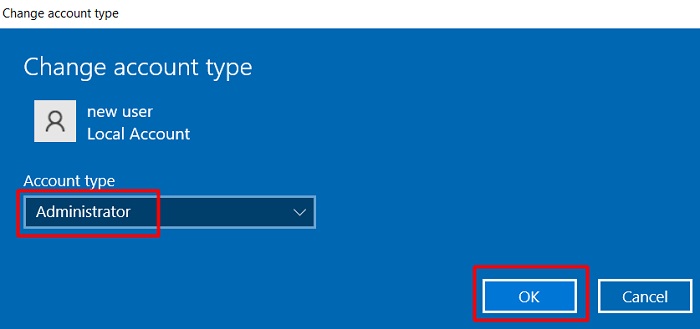
Look at the right side of the appeared interface. You need to scroll down and select ‘Other Users’. Under this option, you will see the newly created local account. Click on it. A new option named ‘Change account type’ will be visible. You have to select it.

Step 9
Here you have to choose ‘Administrator‘ as the ‘Account type’. And press ‘Ok‘ then.
Step 10
After that, you have to sign out from the problematic Microsoft account. While completing the sign-out process, you need to delete it from Windows System.
Step 11
Next, you have to open the ‘Accounts’ window again from the ‘Settings‘. Then select the ‘Your info‘ section.

Step 12
Then, look at the right side. You will find an option ‘Sign in with a Microsoft account instead’ with blue-colored text. You have to select it.

Step 13
In this section, you need to sign in with a Microsoft account.
You may have to create a new account if you do not have any alternate account. Fortunately, you will see the ‘Create one’ option. You just need to follow the on-screen direction.
After signing in to the Microsoft account, you will see the ‘Sign into this computer using your Microsoft account’ statement. Here you have to put the local administrator account password, Then press ‘Next’ to complete the account transformation.
It may take a couple of times to complete. You have to wait for it.

Step 14
After that, you need to verify the new Microsoft account. Consequently, you will get a notification with the ‘Verify‘ option. Once you click on it, Microsoft will send a link to your email. You have to click on the link.

Finally, your local account will switch to Microsoft account. And hopefully, Microsoft Family features will not pop up anymore.
Frequently Asked Questions
How Do I Enable Microsoft Family Features?
To enable Microsoft Family feature, navigate to Settings > Accounts > Family and other users and sign into or create your Microsoft Account. After that, create a family group by adding email or phone number of a family member. Finally, connect devices, choose settings, and enable Family Safety features on the following on-screen prompt.
How Do I Disable Microsoft Family Features Pop-up Windows 11?
To disable the Microsoft Family feature pop-up, go to family.microsoft.com and sign into your Microsoft account. Then select the profile under the child’s account and, under “More Options,” click on “Remove from family group”.
How Do I Stop Microsoft Family Features Pop-up Spam?
To stop Microsoft family pop-up spam, the only option in your hand is to remove the account from the family group. You can remove your account from the Microsoft Family Safety page.
Final Words
In addition, fix no. 1 is the easiest one and has the best success rate compared with the other fixes. On the other hand, fix no. 6 is the toughest and longest solution. Hopefully, you will resolve the Microsoft family features pop-up issue easily.