
[Fix] Session PerfDiag Logger Stopped Due to The Following Error 0xc0000188 (100% Working)
Currently, you are facing a delay in starting the PC. For so, whenever you have checked the Event Viewer, it is showing the message that ‘Session “PerfDiag Logger” stopped due to the following error: 0xC0000188′.
This is an OS (Operating System) component issue that commonly arises for some anonymous reasons. And if you are facing the same, you’re not alone. We’re here to help you.
You can easily solve this issue. In fact, I am writing this article to assist you fix the issue. Let’s explore this in details below.

Session PerfDiag Logger Stopped Due to The Following Error 0xc0000188
Whenever the issue happens, you can apply a couple of things to fix it. Before diving into the details, let’s check the list of fixes first.
- Fix 1: Enable Superfetch Service
- Fix 2: Run DISM Health Scan
- Fix 3: Maximize Startup Event Trace Sessions File Size
- Fix 4: Recreate ‘setup.etl’ File
- Fix 5: Execute A Clean Boot
Fix 1: Enable Superfetch Service
When you face the issue, you can enable the Superfetch service. It will help you to get rid of the issue. I will attach the process below with some chronological steps.
Step 1: Tap the Windows key and type ‘services’. Accordingly, the app preface will be visible. You have to click on it.

Step 2: Consequently, the ‘Services’ window will appear. You have to find the ‘Superfetch’ from the services list. While finding, double-click on it.

Step 3: As a result, you will get the ‘Superfetch’ properties window. Here, you have to change ‘Startup type’ into ‘Automatic’. Then click on the ‘Start’ if the ‘Service status’ remains ‘Stop’. After that, press the ‘Apply’ tab and ‘Ok’ then.

In the end, close the ‘Services’ window and restart the PC.
Finally, check the error. Will it exist or not? If the fix doesn’t match your PC condition, you will have some other fixes to apply.
Fix 2: Run DISM Health Scan
Another way to resolve the issue is to run the DISM (Deployment Image Servicing and Management) health scan. You can try the process. I will attach the details below.
Step 1: Tap the Windows key and type ‘cmd’. Accordingly, the app preface will appear with some options. You have to click on the ‘Run as administrator’.

Step 2: Consequently, the ‘Command Prompt’ window will appear. You need to copy the below commands one by one and paste them into the window. You have to hit ‘enter’ each time you paste a command to execute it.
DISM.exe /Online /Cleanup-image /Scanhealth
DISM.exe /Online /Cleanup-image /Restorehealth
The process may take a couple of moments to complete successfully. After completing it, you have to restart the PC as soon as possible.
Fix 3: Maximize Startup Event Trace Sessions File Size
Maximizing the ‘Startup Event Trace Sessions’ file size can fix the issue. The process will be given below.
Step 1: To apply the fix, you need the help of the ‘Command Prompt’ window. To do so, you need to follow the step 1 from the previous fix. Whenever you access the ‘Command Prompt’ window, type ‘perfmon’ into it. Then hit the ‘enter’ button.

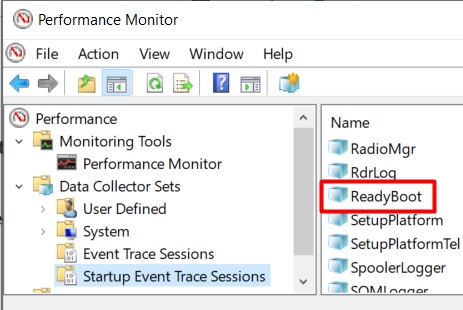
Step 2: Consequently, the ‘Performance Monitor’ window will become evident on the screen. Here, you have to expand the ‘Data Collector Sets’ from the left menu pane.

Step 3: Then you have to click on the ‘Startup Event Trace Sessions’ option from the appeared list.

Step 4: After that, look at the right pane. From here, you have to find out the ‘ReadyBoot’. While finding it, double click on it.
Step 5: As a result, you will get the ‘ReadyBoot Properties’ window on the screen. Here you need to tap the ‘Stop Condition’ tab from the upper menu.

Step 6: Next, you need to change the ‘Maximum Size’ into ’40’ MB. Then, click on ‘Apply’ first and ‘Ok’ at the last.

In the end, close the ‘Performance Monitor’ and ‘Command Prompt’ windows.
After that, you have to restart the PC and check the existence of the issue.
Fix 4: Recreate ‘setup.etl’ File
The fix is rare but may work better for you. You need to follow the process step by step and be sincere while applying. I will include the process below.
Step 1: Tap the Windows and ‘R’ keys together. As a result, the ‘Run’ window will appear. You have to copy the below path and past it into ‘Open’ bar.
%windir%panther
Then click on ‘Ok’.

Step 2: Consequently, you will reach the path destination. From here, you have to find out the ‘setup.etl’ file and rename it ‘setup.old’.

Step 3: After that, restart the PC. Accordingly, a new ‘setup.etl’ will be created automatically ignoring the ‘setup.old’ file.
Finally, check the issue. If somehow you still face it, the last option you will have in hand to resolve it.
Fix 5: Execute A Clean Boot
You have to execute clean boot to identify the reason and recover the issue permanently when none of the upper fixes work for you. You can follow the below steps to do so.
Step 1: Tap the Windows key and type ‘msconfig’. Accordingly, you will see the preface of the ‘System Configuration’ app with a couple of options. You have to click on ‘Run as administrator’.
Step 2: As a sequence, the ‘System Configuration’ window will appear. From here, you have to tap the ‘Services’ tab that stays on the top of the window. Then tick mark on the ‘Hide all Microsoft services’ box. After that, click on the ‘Disable all’ option.
Step 3: Next, tap the ‘Startup’ tab. From here, click on the ‘Open Task Manager’ option.
Step 4: While the ‘Task Manager’ appears, you need to tap the ‘Startup’ tab. Then, disable all the existed items from the list. After completing the task, close the window.
Step 5: As a result, you will be back on the ‘System Configuration’ window. Press ‘Ok’ to confirm the changes.
In the end, restart the PC.
Frequently Asked Questions
What Is Code 0x C0000188?
The error message 0xC0000188 is known as the Windows-specific error that commonly happens in Windows 10. It mainly happens due to a system error. You can fix this error by maximizing the file size of Startup Event Trace Sessions or by performing a clean boot.
What Is the Max File Size for Perf Diag Logger?
Max File Size for PrefDiag Logger is a Kkernel-Event Tracking error that can be found into the Event Viewer. You may find there that the Maximum file size for Pref Diag Logger is currently set to 209715200 bytes.
Final Words
Hopefully, the ‘Session “PerfDiag Logger” stopped due to the following error: 0xC0000188′ issue won’t arise anymore. I would like to request that you have just keep calm and apply the fixes one after another until success comes.


![[Fix] Chromebook Administrator Has Blocked Developer Mode](https://i2.wp.com/wingeek.org/wp-content/uploads/2026/06/fix-chromebook-administrator-has-blocked-developer-mode-768x469.webp)

