
[Solved] Windows Online Troubleshooting Service Is Disabled (100% Working)
To fix a PC problem by troubleshooting is easy. But, how to fix the trouble of troubleshooting if a message- ‘windows online troubleshooting service is disabled’ appears on your computer screen while using a troubleshooter?
In the entire article, I will discuss the 7 fixes of this trouble of troubleshooting.

What to Do if – ‘Windows Online Troubleshooting Service Is Disabled’
Troubleshooting is a popular method for all Windows Operating System users. Often, they use it to find and even fix various types of errors. But, which method can fix the troubleshooting error?
This article belongs all possible answers. Let’s have a glimpse of fixes before starting in detail-
- Fix 1: Windows Update
- Fix 2: Clean up Files
- Fix 3: Run the System File Checker (SFC) utility
- Fix 4: Run Deployment Image Servicing and Management (DISM) Command
- Fix 5: Turn on Scripted Diagnostics Policy
- Fix 6: Customize Software Publishing Through Registry Editor
- Fix 7: Check Local Services
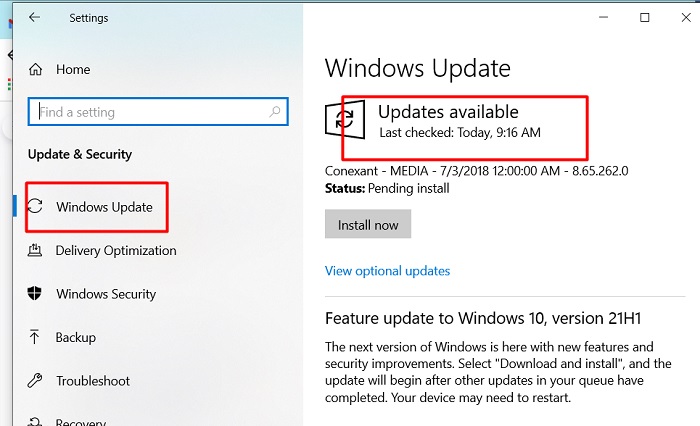
Fix 1: Windows Update
If the message becomes evident, I would recommend checking the windows update first. You can check it by following the below steps one by one-
Step 1
Firstly, you have to press the Windows and ‘X’ keys together. Consequently, the ‘Settings’ interface will appear on the screen. You have to click on it.

Step 2
Next, the ‘Update & Security’ option will be visible at the bottom of the ‘Settings’. You would enter inside the section.

Step 3
Here, you will find the ‘Windows Update’ option. You need to check the update from the right bar. If any update is available, a notification will appear. Upon the notification, you would take the possible step. It may take several minutes to update the Windows.
If you find the windows updated already, you may skip to the next fix.
Fix 2: Clean Up Files
People are less aware of the junk and temporary files of the PC. You may do so. But, these unwanted files may cause troubleshooting disabled.
Whatever, do you never clean up your PC? So what. You can apply the following steps. These might be easy.
Step 1
Firstly, you have to open the ‘File Explorer’ and click on ‘This PC’.

Step 2
Then, you need to right-click on the drive wherever the operating system is installed. Consequently, ‘Properties’ will appear with some other options. You have to click on it.

Step 3
A new interface will appear on the screen. Here you need to select the ‘General’ tab. Then, you have to click on the ‘Disc Cleanup’ option.

Step 4
After that, you need to click on ‘Clean up system files’ and press ‘Ok’ then.

Step 5
In the end, restarting the computer would be a better option.
However, if you still get in trouble, you would follow the next fixes as well.
Fix 3: Run the System File Checker (SFC) Utility
Run SFC (System File Checker) scan is the most recommended fix. You can apply it following some easy steps.
Step 1
Firstly, you would type ‘Command Prompt’ on the Windows Search Bar

Step 2
You will find some options to work with the command prompt. ‘Run an Administrator’ will be one of them. You have to click on it.

Step 3
Here, you need to type ‘sfc /SCANNOW’ command and press ‘enter’.
Step 4
After completing the process, you have to restart your computer.
Finally, you need to check it. If the windows online troubleshooting is enabled, it will be great. But if not, you have to try other fixes.
Fix 4: Run Deployment Image Servicing and Management (DISM) Command
In this stage, you would run the DISM (Deployment Image Servicing and Management) command to solve the issue. Here I describe the process step by step.
Step 1
You need access to the ‘command prompt’ again. So, here you have to follow steps 1 and 2 from the ‘Run SFC’ solution described previously.
Step 2
In this step, you have to type the following command and press ‘enter’ each time.
Dism /Online /Cleanup-Image /CheckHealth
Dism /Online /Cleanup-Image /ScanHealth
Dism /Online /Cleanup-Image /RestoreHealth
Step 3
Finally, you would restart the computer. However, if the message still prompts on the screen while troubleshooting, you may try the next one.
Fix 5: Turn on Scripted Diagnostics Policy
In some cases, the ‘Scripted Diagnostics Policy’ could turn off. It might be a reason for the troubleshooting error.
Step 1
Firstly, you would press the Windows and ‘R’ keys together for getting access to the ‘Run’. On the ‘Open’ box, you have to type ‘gpedit.msc’ and press ‘ok’.

Step 2
Following the command, the ‘Local Group Policy Editor’ interface will appear on the screen.

Step 3
Next, you need to follow the direction one after another to turn on ‘Scripted Diagnostics Policy’.
Computer Configuration > Administrative Templates > System > Troubleshooting and Diagnostics > Scripted Diagnostics
Step 4
After that, you will find an option – ‘Troubleshooting: Allow users to Access Online Troubleshooting content on Microsoft Servers from the Troubleshooting Control Panel’ on the right sidebar.

Step 5
Here, you have to double click on it. Consequently, a window will appear on the screen. Then, you need to check the ‘Enabled’ box and click on ‘Apply’. To finish the process, you have to press ‘Ok’.

Finally, you would restart the PC and check the troubleshooter either works or not.
If the answer is no, I would recommend following the next.
Fix 6: Customize the ‘Software Publishing’ Through Registry Editor
After applying 5 fixes, you need to go deeper to customize the ‘Software Publishing’ through registry editor to enable the troubleshooter. To do so, let apply the following steps-
Step 1
Firstly, you would press the Windows and ‘R’ keys together for getting access to the ‘Run’ and type ‘regedit’ on the open box and click on ‘Ok’.

Step 2
Then, you have to copy and paste the following path in the Registry Editor’s address bar-
Computer\HKEY_CURRENT_USER\Software\Microsoft\Windows\CurrentVersion\WinTrust\Trust Providers\Software Publishing

And press ‘enter’.
Step 3
REG_DWORD state will appear on the right sidebar. You have to double click on it and change the value data to 23c00.


Step 4
Finally, you need to restart the computer and check will it work or not.
Fix 7: Check Local Services
In the last fix, you can check the ‘Services’ section by following described steps.
Step 1
Firstly, you would press the Windows and ‘S’ keys together and type ‘Services’ in the search box. The app will appear. You have to click on ‘Run as administrator’ from the right sidebar.

Step 2
As a result, the ‘Service’ interface will become evident. You have to find ‘Background Intelligent Transfer Service’ option inside the interface. While finding, you would check the status.

If it is running, you need to restart it from the top left bar. On the other hand, if the status is blank, you have to start it.
Hopefully, windows online troubleshooting service is enabled.
Final Words
Commonly, you may take advantage of troubleshooting whenever confronting any software-based computer problem. But, the message- ‘Windows online troubleshooting service is disabled’ has perplexed you. Hopefully, the issue is over now by applying the fixes.


