Usually, the LocalServiceNoNetworkFirewall service consumes low CPU and Memory power. But it may consume high CPU usage instead. In that scenario, it is a problem indeed.
We understand that you are currently facing this pain issue and searching for an immediate solution.
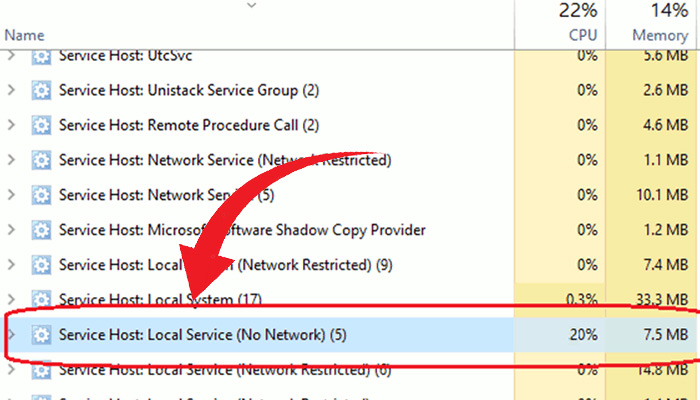
Don’t worry. We are writing this article for you. Here you will get all possible fixes. You will also know about the service and why it may turn into a pain issue for you. Let’s explore.
What is Local Service No Network Firewall Service?
The Service is a part of the Windows Security Firewall. The Windows Defender used it to operate the function. Generally, it does not consume a high CPU and Memory. But, it turns into a problem when it starts consuming high CPU or Memory.
Why Does the Service Consume High CPU Usage?
The consuming high CPU & Memory usage issue can be created for many reasons. These are-
- The issue may take place because of the Windows Firewall settings corruption. In this case, you can solve the issue by making some settings-related changes.
- It can happen for an extreme amount of firewall rules and policies. So, you may need to delete the unusual rule and policy.
- The conflict between Windows and third-party firewalls is a big reason that causes the issue most. If you use two firewalls parallelly, it will happen in most cases.
- If you use a third-party security app, installing a corrupted one may be a reason. So, when the issue occurs with you, you may need to execute a clean install of the third-party security firewall.
What to Do If Local Service No Network Firewall Consumes High CPU Usage
As consuming high CPU usage by the service is unusual, and if you face it, you will need to take proper steps to solve it. Before jumping to the details, let’s have a glimpse at the list first.
- Fix 1: Reenable The Windows And Third-Party Security Firewall
- Fix 2: Restart the WinDefend service
- Fix 3: Check for Latest Windows Update
- Fix 4: Roll-back Driver Update
- Fix 5: Restore Firewalls to Default
- Fix 6: Delete the Firewall Policy
- Fix 7: Reinstall Third-party Security App
Fix 1: Reenable The Windows And Third-Party Security Firewall
As the conflict between the Windows and third-party security firewall is the major reason behind the issue creation, the first thing we would recommend you to reenable the two firewalls. We will attach the process in detail below.
Step 1
Right-click on the Start menu. Find out the ‘Task Manager’ from the appeared list. While finding, click on it.

Step 2
Accordingly, the ‘Task Manager’ window will appear. From here, you need to right-click on the running third-party security firewall app and press the ‘End task’ option. In the end, close the ‘Task Manager’.

Step 3
Next, tap the Windows key and type ‘windows defender firewall with advanced security’. Consequently, the app preface will appear on the interface. You need to click on the ‘Run as administrator’.

Step 4
Then, you need to find and select the ‘Windows Defender Firewall Properties’ option.

Step 5
In this step, you need to tap the ‘Domain Profile’, ‘Private Profile’, and ‘Public Profile’ tabs one by one. You have to turn their ‘Firewall State’ into ‘Off’. Then, press the ‘Apply’ and ‘Ok’. In the end, close the appeared window.

Step 6
You have to follow step 3 to step 5 again. Here, the exception only will be to turn the ‘Domain Profile’, ‘Private Profile’, and ‘Public Profile’ sections’ ‘Firewall State’ into ‘On’.
Step 7
Finally, launch the third-party security firewall and check the existence of the discussed issue.
In most cases, the fix is enough to get rid of the issue. By any chance, if it does not work for you, there will be several options that still exist.
Fix 2: Restart the WinDefend Service
After failing to resolve the issue in the first attempt, you can restart the
WinDefend service from task manager. You will get the direction step by step below to execute the fix.
Step 1
Right-click on the Start menu. Then select ‘Task Manager’ from the appeared list.

Step 2
Consequently, the ‘Task Manager’ window will become evident. You have to tap the ‘Services’ tab. You will find it on the top menu.

Step 3
After that, scroll down to the bottom to find out the ‘WinDefend’. It will be listed alphabetically.
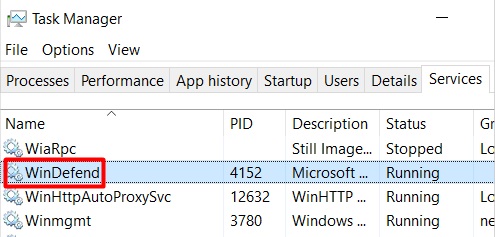
Step 4
Right-click on the ‘WinDefend’ service. Then click on the ‘Restart’ option. As a result, it will complete the process within a moment.
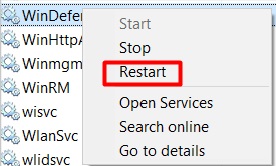
Finally, check the issue. By any chance, it still exists, you will have to follow the next fixes.
Fix 3: Check for Latest Windows Update
You can solve the issue by checking for the latest Windows Update. The process will be easy to apply. You need to follow the below steps.
Step 1
Tap the Windows and ‘I’ keys together. Accordingly, you will get the ‘Settings’ window access. From here, you have to find out the ‘Update & Security’ category and click on it.
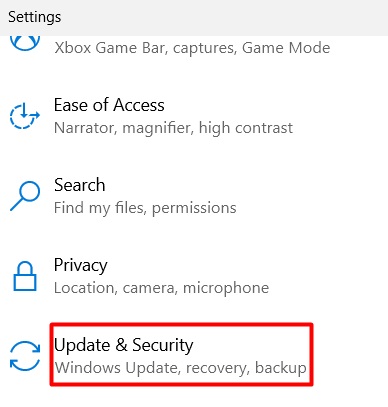
Step 2
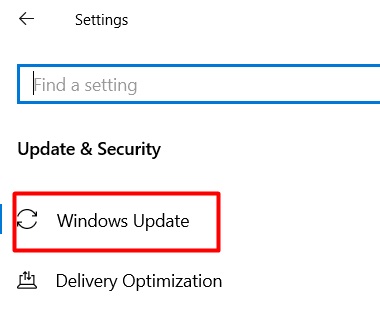
After that, select the ‘Windows Update’ section from the left side menu.
Step 3
Then look at the right portion of the appeared interface. Here you will see the ‘Check for updates’ option. You may also see the recommended Windows Update status. Whatever, you need to take action as on-screen direction.
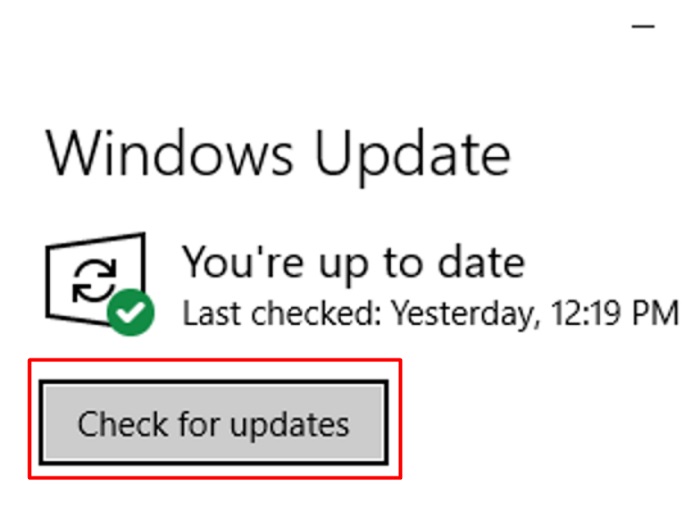
After completing the checking and executing process, you need to cross-check the issue.
Fix 4: Roll-back Driver Update
The issue may arise from the latest driver update of any device. So, to solve it, you can revert the recent driver update. We will include the process below.
Step 1
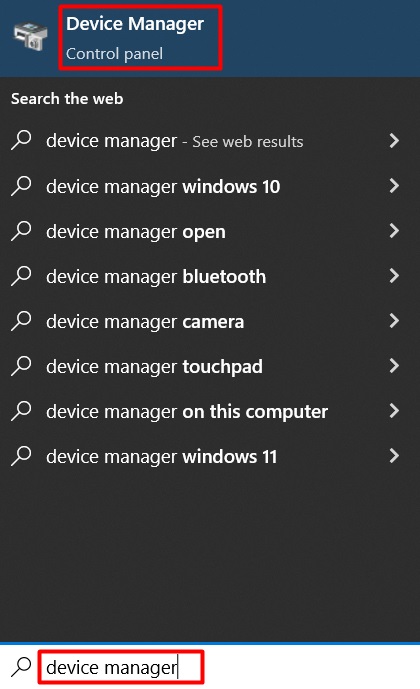
Tap the Windows key and type ‘device manager’. Accordingly, the ‘Device Manager’ control panel preface will appear on the interface. Click on it.
Step 2
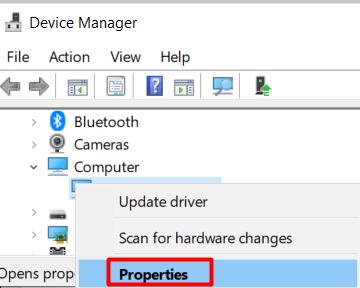
Consequently, the ‘Device Manager’ window will appear. From here, find your targeted device. While finding it, you have to right-click on it. Then select the ‘Properties’ option from the appeared list.
Step 3
After that, the ‘Properties’ window will appear. You have to tap the ‘Driver’ tab from the top menu bar. Here you will find a couple of options. The ‘Roll back Driver’ will be one of them. You have to click on it to revert the driver update.
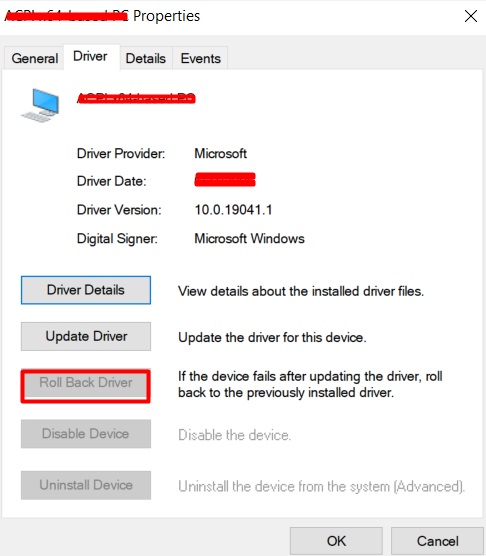
In the end, you need to check the existence of the issue. If the fix doesn’t work for you, you will need to follow the other fixes as well.
Fix 5: Restore Firewalls to Default
If none of the upper fixes are able to solve the issue, you will need to reset the firewall into default condition. We will include the restoration process below.
Step 1
Press the Windows and ‘I’ keys together. Consequently, the ‘Settings’ window will appear on the screen. You have to choose the ‘Update & Security’ category from here.
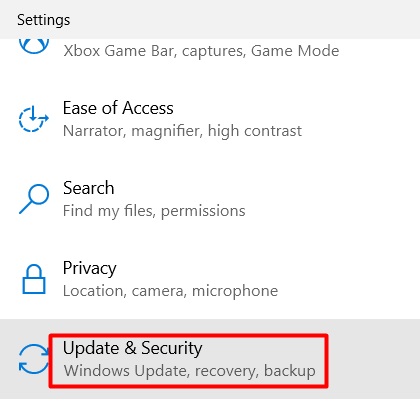
Step 2
Then select the ‘Windows Security’ tab from the left side menu.
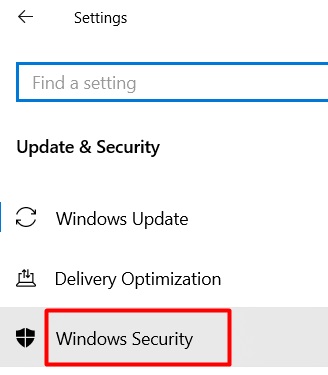
Step 3
After that, look at the right portion of the interface. Here you will see the ‘Open Windows Security’ option. Click on it.

Step 4
Accordingly, an individual interface of Windows Security will become evident. You have to choose the ‘Firewall & network protection’ from the left menu bar.
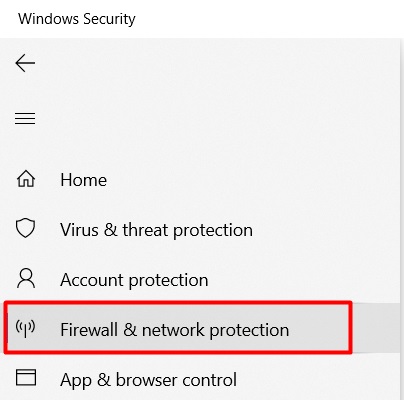
Step 5
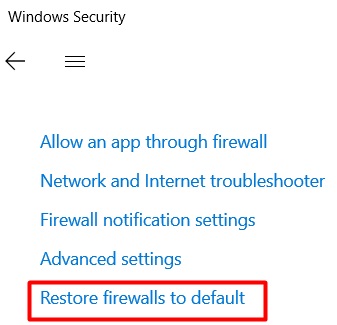
Then you have to give your attention to the right portion. Here you will find a ‘Restore firewalls to default’ named option. Click on it and follow the on-screen direction to complete restoration.
Step 6
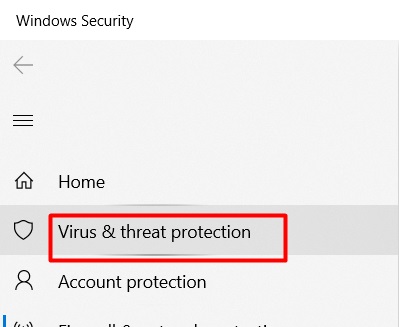
After that, tap the ‘Virus & threat protection’ tab from the left side menu.
Step 7
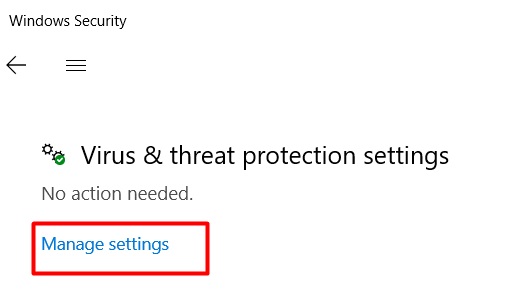
Next, click on the blue-colored ‘Manage settings’ option from under the ‘Virus & threat protection settings’ section.
Step 8
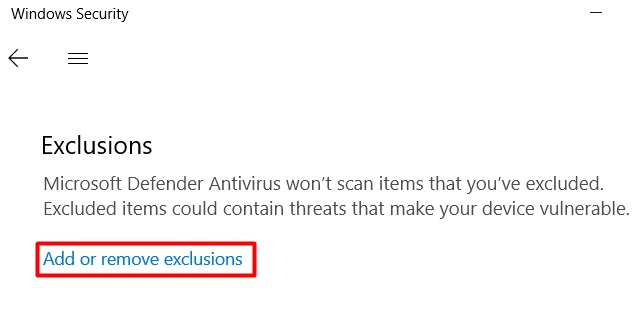
Then you have to look for the ‘Exclusions’ section. From here, click on the ‘Add or remove exclusions’ option.
Step 9
After that, tap the ‘Add an exclusion’ tab and choose ‘Folder’ from the appeared list.
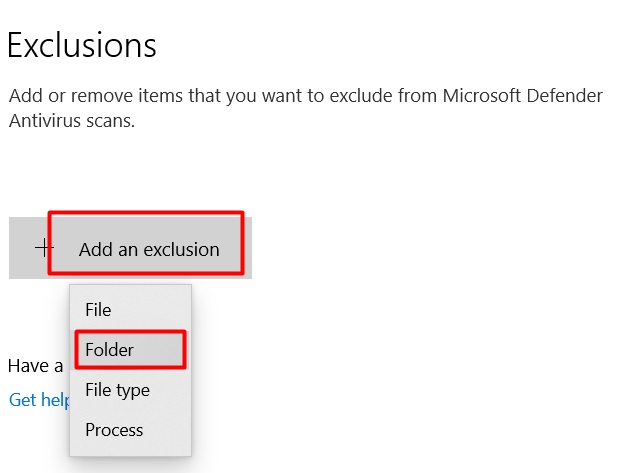
Step 10
In this step, you have to select the folder. To do so, copy the below direction and paste it into the Address Bar.
‘C:\ProgramData\Microsoft\Windows Defender\’

Then hit the ‘enter’ key and confirm the submission.
Step 11
In the end, you will see the ‘Folder’ location under the ‘Exclusions’ section. Then close the ‘Windows Security’ window and restart the computer.
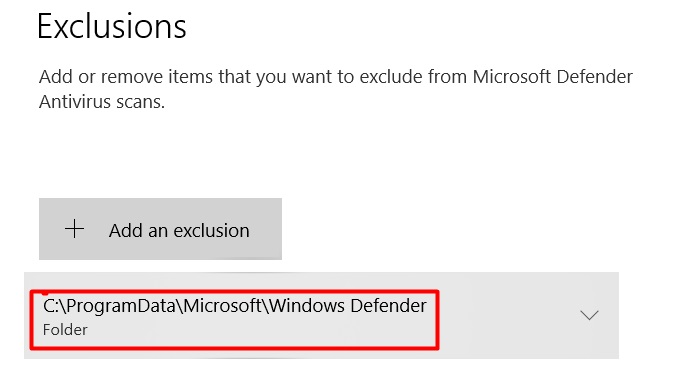
Finally, check the issue again.
Fix 6: Delete the Firewall Policy
In rare cases, firewall rules and policies may create the issue. It can happen to you too. So, deleting some of the rules and policies can solve the discussed issue. We will include the deleting process below.
Step 1
Tap the Windows key and type ‘windows defender firewall with advanced security’. Consequently, a related app preface will appear on the interface. You have to click on the ‘Run as administrator’ option.
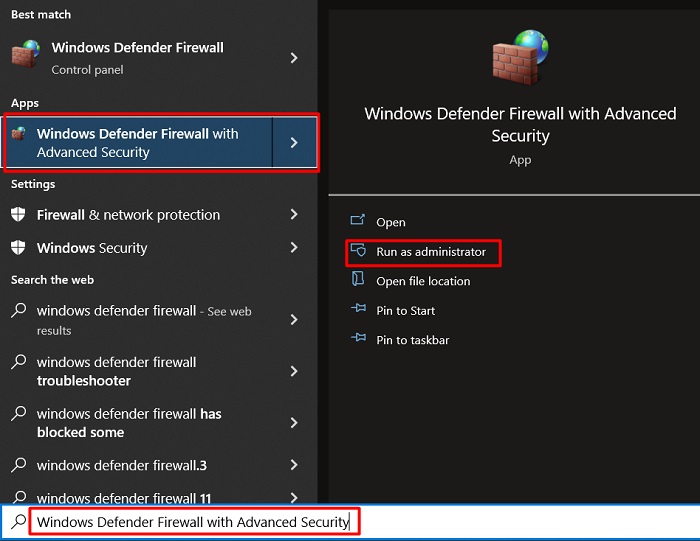
Step 2
As a result, the ‘Windows Defender Firewall with Advanced Security’ window will appear. For your safety, you may export the existing policy. To do so, look at the right pane of the appeared window and click on the ‘Export Policy’.
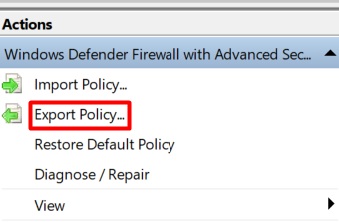
Step 3
After exporting the policy, select the ‘Inbound Rules’ and delete the rules one by one that you want to delete. You need to do it for the ‘Outbound Rules’ section also.

In this step, We would like to aware you are careful about deleting the rules. Take time and don’t delete any important files.
Step 4
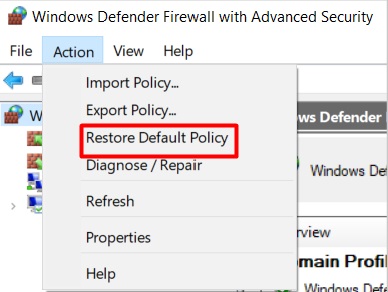
Alternatively, you may restore of default policy directly. To do so, click on the ‘Action’ tab. It will stand on the left top menu bar. Here you will find the ‘Restore Default Policy’ option. Click on it to execute the restoration.
To execute the fix, you need the system’s administrative power. Even you may need to enable Safe Mode too.
Fix 7: Reinstall Third-party Security App
If you use a third-party security app and the issue has not been solved yet, you can try this fix. The process will be easy to apply by yourself.
Step 1
Right-click on the Start menu. Then choose the ‘Apps and Features’ from the appeared list.

Step 2
Then look at the app list. From here, you have to find out the third-party security app that you have installed before. While finding the app, click on it. Consequently, you will get the ‘Uninstall’ option. You have to press it. The process may take several times, and you need to follow the on-screen direction to uninstall the app.

Step 3
After that, go to the app website or insert the related disk. Then execute a clean installation.
Hopefully, the issue won’t appear anymore.
Final Words
To sum up, We would notify you that the LocalServiceNoNetworkFirewall service consumes high CPU and Memory power for the conflict between the Windows and third-party security firewalls in most cases. So, fix no. 1 will have the probable high-rated success percentage to resolve the issue. Somehow, if it fails to fix the issue, you may follow the other fixes as well.
