
[Fixes] Scanning And Repairing Drive Stuck at 100%
Is the process of scanning and repairing drive stuck at 100% for a long time?
The error happens while booting your PC. It also can occur while starting the PC after an improper shutdown or unplugging the power of the running PC.

However, the cause behind the error is not a big thing to consider whereas, the error that happens with you is the main thing to solve. In the entire article, I am going to do so.
What to Do If Scanning And Repairing Drive Stuck at 100%
When you are stuck on the error, the very first thing you can apply is to restart the PC manually before applying the other possible fixes. Here restarting the PC is a kind of simple process. To do so, you have to follow the below direction.
Step 1
You have to hold the power button until it turns off. It may take around 5 seconds.
Step 2
Again press the power button to open your PC. Consequently, two possible things might happen. Either the error has been solved or it still exists.
If the error vanishes, it will be a great notch. But if it still exists, you have to follow some fixes to recover your PC from being stuck. The list of possible fixes is given below.
- Fix : Utilize Error Checking
- Fix : Check Drive Status
- Fix : Check System File Errors
- Fix : Run ‘repair-volume -driveletter’ command
Fix no. 1 & 2 should be applied on the Windows Normal Mode. On the other hand, to apply Fix no. 3 & 4, you need to access your PC to ‘Safe Mode. You can follow the below steps to activate the ‘Safe Mode‘.

How to Turn the PC to ‘Safe Mode’
You have to follow some irregular processes to activate the ‘Safe Mode’. I will include it here to save your time from searching the process here and there.
Step 1
You have to restart the PC manually 3 times. Means, hold the power button for a couple of seconds. After the PC will turn off, you need to press the power button again. And you have to hold the power button again whenever the PC is going to be started. You have to do it two more times.
Step 2
Consequently, your PC will be preparing for automatic repair. You have to wait until finishing the PC diagnosing.

Step 3
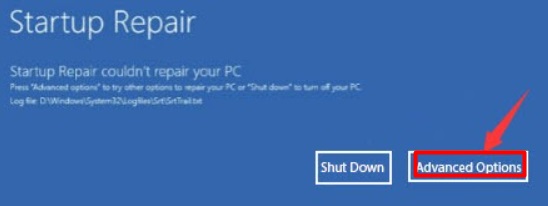
After completing the diagnosis, the ‘Startup Repair‘ interface will appear on the screen. From here, you have to tap the ‘Advanced Options‘ tab.
Step 4
Then you will see the ‘Choose an option’ interface. Select the ‘Troubleshoot‘ option.

Step 5
Next, you have to select ‘Advanced options‘.

Step 6
While a new interface will appear, you need to click on ‘Startup Settings‘ option.

Step 7
As a result, the ‘Startup Settings‘ interface will become evident. You have to click on the ‘Restart‘ option.

Step 8
Consequently, a new interface of ‘Startup Settings’ will be visible. You have to press ‘4’ to enable the ‘Safe Mode‘. Then you can apply the fix no. 3 & 4.

Before that, let’s apply the fix no. 1 & 2 first in normal mode.
Fix 1: Utilize Error Checking
Error Checking‘ is always a good tool to check the drives and devices. If you are stuck on the error, you can use the tool. The utilization process will be given below.
Step 1
Firstly, you need to click on the ‘File Explore‘ icon.

Step 2
Then you have to find and select ‘This PC’ option. While clicking, you will see the ‘Devices and drives’ at the right sidebar.
Right-click on the drive wherever Windows is installed. Consequently, a box with some command options will appear on the screen. From here, you have to click on ‘Properties‘.

Step 3
After that, tap the ‘Tools‘ tab first. Then click on the ‘Check’ option. You will find it under the ‘Error checking‘ section.

Step 4
Then two probable options either ‘Repair drive’ or ‘Scan drive‘ may appear on the screen.
If Widows found any error, ‘Repair this drive’ will be visible. Then you have to repair it.

On the other hand, if Windows cannot find any error, the interface will prompt the message ‘You don’t need to scan this drive’.
Furthermore, you may execute ‘Scan drive’ option from here to do an advanced scan and repair the drive as well.

Step 5
After completing the scanning and repairing process, you have to reboot the PC. Finally, check the error. Will it exist or vanish?
Fix 2: Check Drive Status
You can check the Drive status if you face the stuck issue. I will brief the checking process below.
Step 1
Firstly, you have to access the ‘Control Panel‘. To do so, tap the Windows key and type ‘control panel. As a result, you will see the ‘Control Panel’ app. Click on it.

Step 2
Consequently, a new interface will appear on the screen. Then you need to change the ‘View by’ option into ‘Small icons‘ from the top sidebar.
After that, scroll down and find the ‘Security and Maintenance‘ section to open.

Step 3
While the ‘Security and Maintenance’ section will appear on the screen, look at the right sidebar. Here you will find the ‘Maintenance‘ option.
Expand the drop-down icon. From here, you have to check the ‘Drive status’. If there is any error in the drive, it will show a list of issues with links. You can use this link to repair the drive.
Otherwise, the Status will show a message- ‘All drivers are working properly.

Note: If the previous actions in normal mode do not fix the stuck error, you need to apply the fix no. 3 & 4. But here is a reminder for you that, you must activate ‘Safe Mode’ before applying the fixes.
Fix 3: Check System File Errors
The possible reason can hide behind the system file errors. You can check this by following the below steps.
Step 1
Tap the Windows key and type ‘cmd‘. Consequently, you will see the ‘Command Prompt’ app option on the interface.
Right-click on the option and select the ‘Run as administrator.

Step 2
After the ‘Command Prompt’ window will appear on the screen, you have to type the following command.
‘chkdsk c: /f’

Then press ‘enter‘ to check system file error if any.
After completing the process, you have to reboot the PC. Finally, check whether the error will be solved or not.
Fix 4: Run ‘repair-volume -driveletter’ command
The last fix you can apply to get rid of the stuck error is to run a command into the Windows PowerShell administrator window.
Step 1
Right-click on the ‘Start’ menu. Consequently, you will see some options including ‘Windows PowerShell (admin)’. You have to click on it.

Step 2
As a result, the ‘Windows PowerShell’ administrator window will become evident. You have to copy the following command and paste it into the window.
‘repair-volume -driveletter c‘

Next, you have to tap ‘enter’. Then the command will be run automatically. You have to wait for several seconds to complete the process.
Finally, reboot the PC again. Hopefully, the windows will not be stuck on the Drive scanning and repairing.
Final Words
In addition, manually restarting the PC can be enough when the scanning and repairing drive stuck at 100%. But in case of the error complexity, you can try the fixes 1 to 4. But you should activate ‘Safe Mode’ before applying the fix no. 3 & 4.


![[Fix] Another Installation Is in Progress (100% Working)](https://i2.wp.com/wingeek.org/wp-content/uploads/2025/12/fix-another-installation-is-in-progress-100-working-768x469.webp)

