
Every computer needs a little care, just like a car. When you install programs or save files, your computer can get messy. This mess can slow down your Windows 10 system. Have you ever noticed your computer running slower than normal? It can be frustrating.
Using disk management for Windows 10 helps you tidy up that mess. It gives you tools to organize, format, or even delete files. Imagine how nice it would be to find exactly what you need without digging through tons of folders!
Did you know that many Windows users don’t know about these tools? They might miss out on a faster computer. In this article, we will explore how disk management can change your computer experience. Are you ready to learn how to make your Windows 10 system run smoother?
Disk Management For Windows 10: Maximize Your Storage Space

Accessing Disk Management in Windows 10
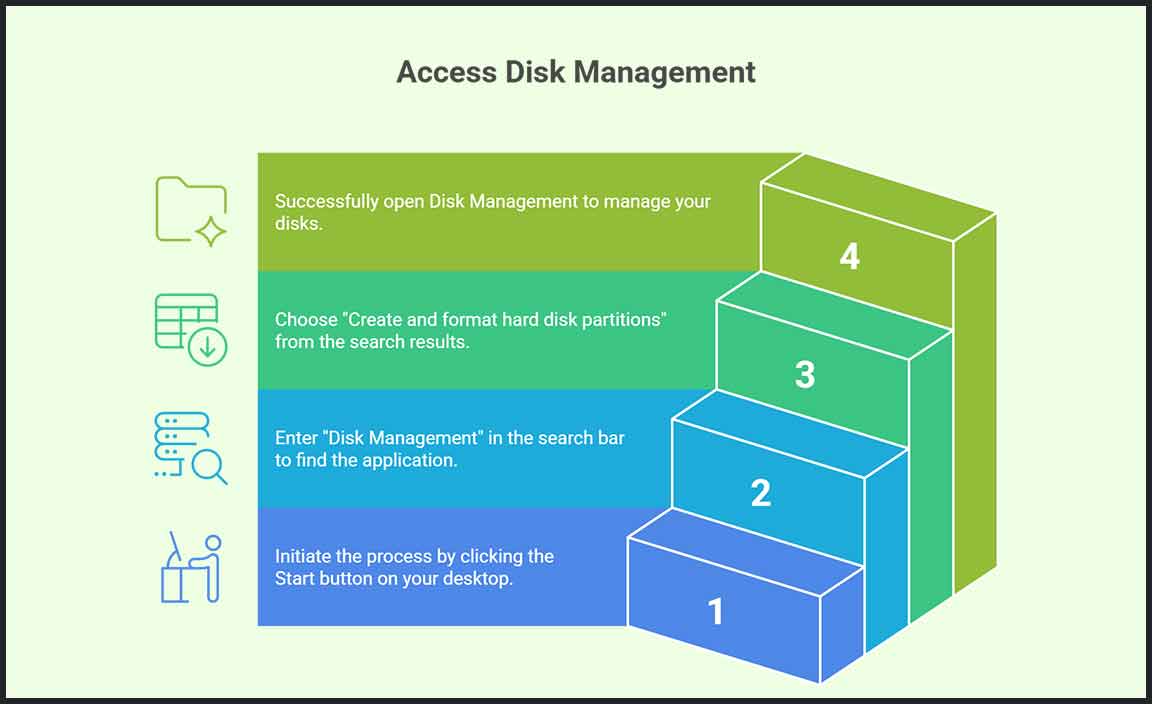
Stepbystep guide to open Disk Management. Alternative methods to access Disk Management.
Need to find Disk Management? No problem! Here’s how to open it step by step. First, click the Start button and type “Disk Management.” Then, click on Create and format hard disk partitions from the results. Easy peasy! If you’re feeling adventurous, you can also right-click the Start button and select Disk Management directly. Now you’re ready to manage those disks like a pro!
| Method | Description |
|---|---|
| Start Menu | Type “Disk Management” in the search bar. |
| Right-click Start | Click on Disk Management. |
With these tips, you’ll navigate Disk Management like a seasoned explorer in a digital jungle. Remember, your disks are waiting to be managed, so don’t keep them waiting too long!
Common Functions of Disk Management
Creating and deleting partitions. Formatting drives and changing drive letters.
Disk management in Windows 10 helps you organize storage easily. You can create and delete partitions to keep files tidy. Formatting drives prepares them for use, making sure everything works smoothly. Changing drive letters helps you find your files faster. Here are some key functions:
- Create and delete partitions for better file management.
- Format drives to use them properly.
- Change drive letters for quick access.
What can I do in disk management?
You can create partitions, delete them, format drives, and change drive letters. This allows you to keep your files organized and easy to access.
Managing Disk Space Efficiently
Resizing partitions without data loss. Merging and splitting partitions.
Is your computer feeling a bit cramped? Don’t worry! You can easily resize partitions without losing any precious data. Imagine merging two partitions like making a giant sandwich—bigger and better! Need to split? It’s as easy as slicing that sandwich in half. With some simple tools, you can manage your disk space efficiently, making your computer feel brand new again. Here’s a quick overview:
| Action | Description | Fun Fact |
|---|---|---|
| Resize | Change partition size safely. | Like playing with clay! |
| Merging | Combine smaller spaces into one. | More room for cat videos! |
| Splitting | Divide big spaces into smaller ones. | Perfect for organizing your files! |
Remember, managing disk space can be fun and easy, making room for everything you love!
Handling Dynamic Drives
Differences between basic and dynamic disks. How to convert a basic disk to a dynamic disk.
Basic disks are your straightforward friends in the world of storage. They use partitions for organizing data and are best for simple setups. Dynamic disks, on the other hand, are like the superheroes of storage. They allow you to create volumes that span multiple disks and offer features like mirroring and striping.
To turn your basic disk into a dynamic one, follow these easy steps. First, open the Disk Management tool. Then, right-click the basic disk you want to change and choose Convert to Dynamic Disk. Click next, then finish. Voila! You now have a dynamic disk ready for action!
| Feature | Basic Disk | Dynamic Disk |
|---|---|---|
| Data Organization | Partitions | Volumes |
| Complexity | Simple | Advanced |
| Flexibility | Limited | High |
Using Disk Management for Troubleshooting
Identifying and resolving disk errors. Recovering lost partitions using Disk Management.
Disk Management can help find and fix problems on your disks. You might face disk errors, which show that something is wrong. Here’s how to fix them:
- Look for the problem disk in Disk Management.
- Check if the disk shows errors or is missing.
- Try to recover lost partitions using the tool.
It’s like searching for a lost toy! You look in the right places to find it and then fix it. This way, your computer can work better.
How can I fix disk errors in Windows 10?
You can fix disk errors by using Disk Management to check the disk status and repair issues.
Advanced Disk Management Techniques
Configuring RAID setups via Disk Management. Utilizing virtual hard disks (VHDs) for additional storage.
Disk Management in Windows 10 offers advanced tools to boost your computer’s storage abilities. One option is configuring RAID setups. This helps protect your data and improves speed. Another great feature is using virtual hard disks (VHDs). VHDs act like extra drives, giving you more space without buying hardware. You can create and manage them easily. Let’s look at how to set these up:
- Choose RAID level: 0, 1, 5, or 10 for your needs.
- Create a new VHD through Disk Management.
- Format the VHD to prepare it for use.
- Link the VHD to your files for quick access.
What are RAID setups and VHDs?
RAID setups combine multiple disks for speed or safety. VHDs are files that act like separate drives, giving you extra space.
Disk Management Best Practices
Tips for regular maintenance of disks. Importance of backup before making changes in Disk Management.
Keeping your disks healthy is important. Regular maintenance helps your computer run smoothly. Clean up files you don’t need. Use tools like Disk Cleanup to clear temporary files. Backup your important files often, especially before making any changes. This way, you won’t lose anything important. Here are some tips:
- Check your disk for errors.
- Free up space regularly.
- Defragment your hard drive.
Always remember: a backup can save the day!
Why is backing up important?
Before making changes in Disk Management for Windows 10, always back up your files. If something goes wrong, you won’t lose your data. It’s like having a safety net!
Frequently Asked Questions (FAQs) about Disk Management
Answers to common user queries. Troubleshooting advice for frequent issues.
Many users have questions about managing disks on Windows 10. One hot topic is where to find space when things start to get tight. If you ever see that dreaded “Low Disk Space” warning, don’t panic! You can use the built-in tool to check what’s taking up room. Another common issue is when partitions don’t show up. To solve this, rescan for drives or try a good old reboot. Here’s a quick table of common questions and their answers:
| Question | Answer |
|---|---|
| How do I free up space? | Use Disk Cleanup to remove unused files! |
| Why can’t I see my drive? | Check if it’s connected properly or boot your computer! |
| Can I resize my partitions? | Yes, use the Disk Management tool to adjust sizes! |
Remember, managing disks can be like organizing your room. It’s messy sometimes, but a little cleanup goes a long way! So roll up your sleeves and dive in!
Conclusion
In summary, disk management for Windows 10 helps you organize your storage effectively. You can create, delete, and format disk partitions easily. By using this tool, you ensure your computer runs smoothly. Explore the built-in Disk Management tool or read more online to enhance your skills. Keep your files organized and enjoy a faster system.
FAQs
How Do You Access The Disk Management Tool In Windows 10?
To open the Disk Management tool in Windows 10, first, click on the Start button. Then, type “Disk Management” in the search box. You will see “Create and format hard disk partitions” in the list. Click on that, and the tool will open up.
What Steps Are Required To Create A New Partition In Windows Disk Management?
To create a new partition in Windows Disk Management, first, you need to open Disk Management. Right-click the Windows Start button and select “Disk Management.” Next, find the area labeled “Unallocated space.” Right-click that space and choose “New Simple Volume.” Follow the instructions to finish creating your new partition. Make sure to give it a name that you will remember!
How Can You Extend A Volume Using Disk Management In Windows 10?
To extend a volume in Windows 10, first, open Disk Management. You can do this by right-clicking the Start button and choosing “Disk Management.” Next, find the volume you want to make bigger and right-click on it. Then, select “Extend Volume” and follow the instructions. Just choose how much space you want to add, and click “Finish.”
What Should You Do If You Encounter A “Disk Not Initialized” Error In Windows 10?
If you see a “disk not initialized” error, don’t panic. First, check if the disk is properly connected to your computer. You can do this by unplugging and plugging it back in. Next, open the Disk Management tool by right-clicking on the Start button and choosing “Disk Management.” If the disk shows as “unallocated,” you might need to create a new volume. Click on it and follow the steps to set it up. If you still have trouble, you may need help from an adult.
How Can You Safely Delete A Partition Using Disk Management In Windows 10?
To safely delete a partition in Windows 10, first, open Disk Management. You can do this by right-clicking on the Start button. Then, you will see a list of drives. Find the partition you want to delete. Right-click on it, and choose “Delete Volume.” Follow the prompts to complete the task. Be careful, as this will remove all data on that partition!
Resource:
-
Guide to File Systems: https://www.howtogeek.com/235596/whats-the-difference-between-fat32-exfat-and-ntfs/
-
Windows Disk Cleanup Tool Tips: https://www.microsoft.com/en-us/microsoft-365/windows/disk-cleanup-windows
-
Understanding RAID Levels: https://www.intel.com/content/www/us/en/support/articles/000005864/memory-and-storage.html
-
Backup Strategies for Windows Users: https://www.backblaze.com/blog/the-3-2-1-backup-strategy/