
Imagine getting a brand-new PC. It sits on your desk, shiny and ready. But how do you make it work best? Installing Windows 11 could be the key. Did you know it offers faster performance and exciting new features? But, what’s the best way to install Windows 11 on your new PC? Consider this: diving into an adventure isn’t always easy. Sometimes you need a guide. A helping hand can make sure everything goes right. We’ll show you the best way to install Windows 11. It’s easier than you think. Don’t worry, even if you’re not a tech whiz. Anyone can do it. Ready to start your journey? Let’s dive in together and see just how easy it can be!
Best Way To Install Windows 11 On New Pc: A Comprehensive Guide
Setting up a new PC is like unlocking a chest of endless possibilities. Imagine you’re about to step into a brand-new world with Windows 11. Want to know the best way to install Windows 11 on a new PC? Start with a bootable USB drive. It’s a bit like having a magic key. Plug it in, turn on the PC, and follow the simple steps on the screen. Before you know it, a fresh digital playground awaits. Make sure your device meets the system requirements; it’s like checking the height limit before a rollercoaster ride. Wondering about drivers? The installation will handle most of that for you.
System Requirements for Windows 11
Minimum hardware specifications. Compatibility check tools.
Before we dive into installing Windows 11, we must check if your computer is ready. Think of it like making sure your shoes are tied before starting a race. For Windows 11, your PC needs specific hardware, much like how your guinea pig needs that fancy wheel to run.
| Specification | Minimum Requirement |
|---|---|
| Processor | 1 gigahertz (GHz) or faster with two or more cores |
| RAM | 4 GB |
| Storage | 64 GB |
| Graphics Card | DirectX 12 compatible |
| Display | 720p resolution |
To make sure your computer meets these requirements, you can use compatibility check tools. Microsoft offers an easy-to-use PC Health Check tool. It’s like a magic wand that checks if your computer can handle Windows 11. Simply run the tool, and voilà, you’ll know if you can upgrade. Remember, a prepared PC is like a well-trained puppy—fewer surprises and more fun!
Preparing Your PC for Windows 11 Installation
Ensure system compatibility. Backup important data.
Before you start installing Windows 11, check if your PC can handle it. Go to Microsoft’s website and look for system requirements. Your PC needs to meet them. Next, save your important files. You can copy them to an external hard drive or use cloud storage. It’s like keeping your treasures safe. Once backed up, your files can be easily restored after installing Windows 11. Doing these steps ensures you won’t lose anything important.
How do I know if my PC can run Windows 11?
Check your PC’s compatibility by visiting the official Microsoft page. There, you’ll find a list of requirements needed. You may also use **Microsoft’s PC Health Check tool** to quickly verify if your system is ready. Ensuring compatibility avoids future problems during installation.
| Key Step | Description |
|---|---|
| System Requirements | Check CPU, RAM, and storage specifications against the recommended ones. |
| Backup Data | Save files externally or to the cloud. |
Choosing the Right Installation Method
Clean installation vs. upgrade. Pros and cons of each method.
Deciding how to install Windows 11? You have two choices: a clean install or an upgrade. Each method has its own benefits and drawbacks.
- Clean Installation: This gives you a fresh start. Your computer wipes everything clean. This means your files and apps will be deleted. But, you’ll have a fast and smooth system.
- Upgrade: This way keeps your files and apps. It’s safer and quicker. But, it might carry over old errors or slowdowns.
Which method is best? That depends on your needs. Want a fresh start? Try a clean install. Prefer keeping your files? An upgrade is better for you.
Why choose a clean install over an upgrade?
A clean install removes old troubles. It’s a fresh start. It’s like erasing a whiteboard. This can make your PC faster and more reliable. However, you must back up files first, as all data will disappear.
How do I prepare for a clean installation?
Before beginning, backup important files. Use a big USB drive or cloud storage. You will need a Windows 11 installation media, which you can create with Microsoft’s tool.
Essential Steps:
- Backup your data.
- Create installation media.
- Check system requirements.
Remember, whether you choose a clean install or an upgrade, always ensure your important data is safe. Happy installing!
Creating a Windows 11 Installation Media
Downloading Windows 11 media creation tool. Steps to create a bootable USB drive.
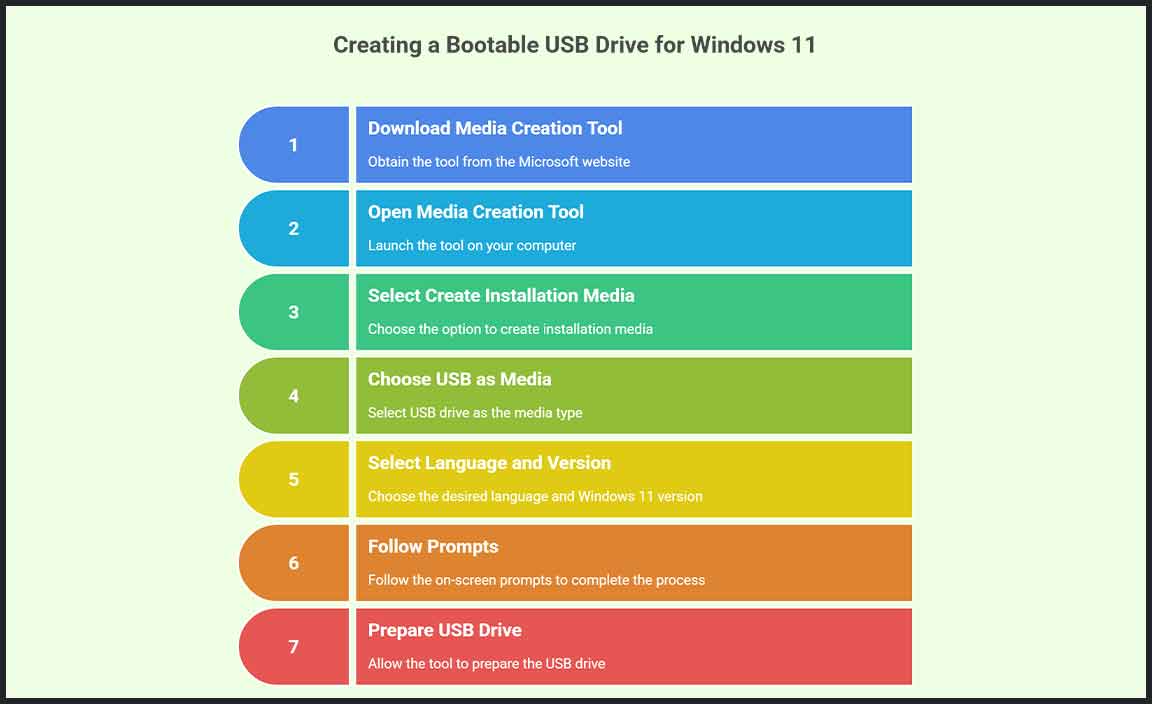
Before diving into the wonders of Windows 11, you need a tool to prepare its installation. This is where the Windows 11 media creation tool steps into the spotlight. First, download this tool from the official Microsoft website. Once it’s ready, it feels like setting up a magic wand of technology!
Now, let’s talk about making a bootable USB drive. Start the tool and choose “Create installation media (USB flash drive, DVD, or ISO file) for another PC.” Oh, don’t worry, it’s easier than teaching a cat to fetch! Pick USB drive as your media, select your language and version of Windows 11, and let it work its magic!
Here’s a little table to help you out:
| Step | Description |
|---|---|
| 1 | Go to the Microsoft website and download the media tool. |
| 2 | Open the tool, select “Create installation media.” |
| 3 | Choose USB as media, then select language and version. |
| 4 | Follow the prompts and let it prepare the USB. |
And voilà! You’re all set for the Windows 11 adventure. Remember, every tech wizard started as a beginner too!
Installing Windows 11 on Your PC
Booting from installation media. Navigating the Windows 11 Setup process.
To gear up for your Windows 11 adventure, begin by booting from your installation media. This is like starting a race with your shoelaces tied—essential. Use a USB flash drive or a DVD with Windows 11 ready to go. After inserting the media, restart the PC, and press the correct key to open the boot menu. Now, navigate the setup like a sailor finds their way with a compass. Follow each step, and soon, you’ll have a shiny new operating system. Remember, patience is key–even if your PC acts like it’s part of a slow motion scene.
| Step | Action |
|---|---|
| 1 | Insert USB or DVD |
| 2 | Restart and open boot menu |
| 3 | Follow setup instructions |
In this wondrous setup journey, don’t forget to personalize your settings to make the PC truly yours. A little advice: the user license agreement page is not the place for speed-reading champ. *“Computers are like air conditioners – they work fine until you open Windows.”* Who said tech setup can’t have a bit of whimsy?
Post-Installation Setup
Configuring essential settings. Installing drivers and updates.
After installing Windows 11, you’ll want everything to work smoothly. First, set up essential settings. This means choosing your preferred language, time zone, and connecting to Wi-Fi. These steps are important.
- Adjust display settings for your screen size.
- Set up security features like passwords.
Next, check for updates. Install drivers for your graphics card and sound. Updates fix bugs and keep your system safe. Microsoft regularly releases new features. Keep updating to the latest version. Windows prompts you when updates are available.
Why configure essential settings?
Essential settings ensure your computer functions correctly. They help personalize your experience and fast-track productivity. Setting up security options protects your data. Wi-Fi settings let you access the internet and other online services. It is like giving your PC a toolbox to enhance its performance.
Common Installation Issues and Troubleshooting
Resolving BIOS/UEFI errors. Fixing installation hangups.
Installing Windows 11 on a new PC can be tricky. Sometimes, you might meet BIOS/UEFI errors. To fix this, check your settings. Make sure the boot mode is correct. Switch between Legacy and UEFI if needed. Another issue is when the installation hangs. You can fix this by restarting and checking the USB drive for errors.
Why won’t Windows 11 install on my PC?
Sometimes, Windows 11 won’t install due to hardware compatibility. Ensure your device meets the system requirements. Check for enough free space on your hard drive. Lastly, ensure secure boot is enabled in BIOS.
How do I enable UEFI on my PC?
To enable UEFI, restart your PC and enter the BIOS setup. Look for the boot mode option. Change it to UEFI. Save the settings before exiting.
Customizing and Optimizing Windows 11
Personalizing desktop and settings. Tips for improved performance.
Imagine your new PC is like a blank canvas, ready for your creative touch! Windows 11 lets you paint that masterpiece with loads of personalization. You can spice up your desktop with new backgrounds or play with colors and sounds like a DJ mixing tracks. To boost performance, keep apps you need, like a superhero carrying just their essentials. Most PCs love freedom, so give them space—more memory equals a happy computer!
| Personalizing Tips | Optimization Tips |
|---|---|
| Change desktop background | Remove unnecessary apps |
| Customize themes | Clear cache |
| Adjust sounds | Upgrade memory |
Peek into your settings and find ways to tweak performance—it’s like giving your computer a vitamin boost! If all else fails, Google’s your best friend. Search questions like, “How do I speed up Windows 11?” and voila—instant wisdom!
Ensuring Security and Privacy on Windows 11
Setting up security features. Managing privacy settings.
Who knew keeping your PC safe could be as easy as pie? With Windows 11, start by setting up those nifty security features. Ensure your device is locked tighter than your cookie jar by using passcodes or facial recognition. Next, it’s time to manage privacy settings. Control who sees your data. Remember, your cousin doesn’t need to know your browsing history!
Here’s a little table for quick reference:
| Feature | Action |
|---|---|
| Password/Facial Recognition | Set Up for Entry |
| Privacy Settings | Review & Customize |
In short, boost your security and privacy with these steps, so your data remains as private as that secret ice cream stash! 🌟
Conclusion
To install Windows 11 on a new PC, ensure your hardware meets requirements. Download the installation file from Microsoft’s website. Follow the on-screen instructions carefully. Remember to back up any important files. For details, visit Microsoft’s support page. You can explore tutorials or videos to help you. Happy computing!
FAQs
What Are The Minimum System Requirements For Installing Windows On A New Pc?
To install Windows on a new computer, you need a few simple things. Your computer needs at least a 1 gigahertz (GHz) processor to run the brain of the computer. You also need 4 gigabytes (GB) of memory called RAM so the computer can think and work. For storage, you need at least 64 GB of free space to save the Windows files. Finally, your computer needs a graphics card that supports DirectX 12, which helps display pictures and videos smoothly.
How Can I Create A Bootable Usb Drive To Install Windows 11?
To create a bootable USB drive for Windows 11, follow these easy steps. First, get a USB drive with at least 8 GB of space. Plug it into your computer. Then, download the “Windows 11 Media Creation Tool” from the Microsoft website. Run the tool and follow the instructions to put Windows 11 on your USB drive.
What Steps Should I Follow To Perform A Clean Installation Of Windows On A New Pc?
First, plug a USB stick into another computer. Download the Windows Installation Tool and put it on the USB. Next, plug the USB stick into your new PC. Turn on the new PC and follow the steps shown on the screen. Finally, remove the USB stick when Windows tells you to do so.
Are There Any Recommended Settings Or Configurations To Optimize Windows After Installation?
Yes, you can make Windows faster. First, remove apps you don’t need. Next, update Windows to get the latest features. Also, check the settings to stop unnecessary programs from starting when your computer starts. Finally, adjust the power settings to “High Performance” for better speed.
How Can I Transfer Files And Settings From My Old Computer To A New Pc Running Windows 11?
To move your files and settings, use a USB drive to copy them. Plug the drive into your old computer, copy the files, and unplug it. Then, plug the drive into your new computer and copy the files there. You can also use OneDrive, which is a way to store your files online. Log into OneDrive on both computers and move your files easily.
Resource:
-
Microsoft’s PC Health Check Tool: https://www.microsoft.com/en-us/windows/windows-11#pchealthcheck
-
Step-by-step guide for using bootable USB drives: https://www.lifewire.com/how-to-boot-from-a-usb-device-2626091
-
Tips to optimize Windows performance: https://www.pcmag.com/how-to/17-tips-to-make-your-windows-11-pc-run-better
-
Understanding BIOS and UEFI Settings: https://www.intel.com/content/www/us/en/support/articles/000027726/boards-and-kits.html