
[6 Fixes] Prevent Computer From Locking Without Admin Rights
There will be times when you need to leave your pc suddenly and lock your computer without admin rights. Once you return to your work after taking a short pause, you may find your pc to be in a sleep state. The same thing can happen if you’re enjoying a video on your computer without using the controls for too long. When this option is selected, Windows will automatically shut down when a predetermined period has passed with no user interaction. In this article, I will show you some ways to prevent your pc from locking without admin rights.
How to Solve the ‘Prevent Computer From Locking Without Admin Rights’ Error
Here are some methods below to fix this error. You can choose a method and follow the steps properly to fix this.
Method 1: Making Control Changes
If you are using your pc off of battery power, you have the option of increasing these times so that your system will not activate the lock as frequently.
The risk remains that using this technique will cause your battery to die far faster than it normally would. It is possible that this is not the best option for you if you regularly work off of battery power.
The following steps will complete the tasks:
Step 1: Navigate to the Control Panel
Step 2: Simply select the Power Options menu.
Step 3: Choose the option to Change plan settings.
Step 4: Make sure that “Put the computer to sleep” is set to NEVER.
Step 5: Click on the Save Changes option.
Method 2: Disable the Sign-in Requirement
If you have configured your pc to prompt you for a password every time you boot it up or bring it out of sleep mode, Windows will stay locked in your computer anytime it enters sleep mode.
If you deactivate this feature, your computer will not lock without admin rights
The following are the procedures that need to be performed to deactivate such settings:
Step 1: First, access the Settings application by going to the Start menu, then clicking on the gear symbol.
Step 2: And then choose Accounts.
Step 3: Now, select your Sign-in-option from the list in the left column.
Step 4: Make the option Never in the box labeled “Require sign-in.”
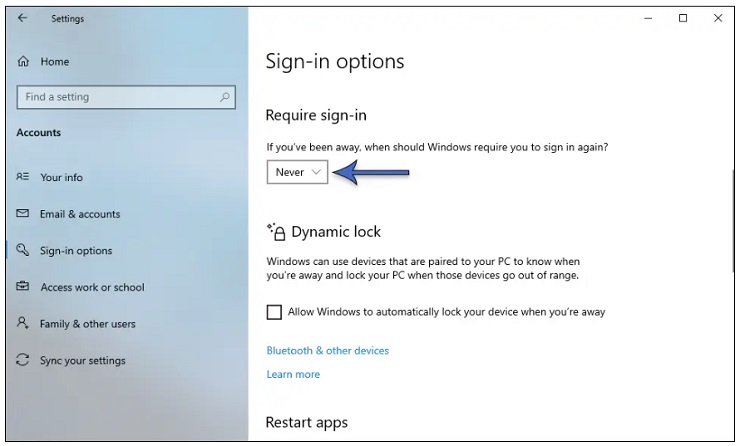
By following these procedures, you will be able to configure your system as it will not prompt you to sign there after waking up from idle mode.
Method 3: Modify the Screen Saver Settings
After you have changed the setting for “Require sign-in” to “never,” you will be able to directly access the screen saver options. Do the following to change the settings of the screen saver.
Step 1: First, go to the top right of the screen, there you will see a link that’s clickable as well as a marked Lock screen.
Step 2: Since for some cause the option isn’t shown there, you can look for it using the search box that is located inside this Windows Settings program.
Step 3: Now, you need to hit the Screen saver settings button on the following window. Once you’ve reached this location, a pull-down menu will appear, allowing you to make alterations to the screen saver.

Step 4: Next, you will see a checkbox just below this drop-down menu with the words “On resume, display log-on screen beside it.”
Step 5: If that box is ticked, you will need to uncheck it so that the pc does not show the log-on screen when you wake it up from sleep mode. Otherwise, the log-on screen will show automatically. You are free to keep things the way they are if the box in interest is unchecked.
Step 6: Finally, you can make additional changes to the parameters of your screen saver. Through the drop-down box, you have the option to set your screensaver to “None.” This will turn off the screensaver completely, but it may not always stop the pc from going into sleep mode or locking itself out.
Method 4: Disable the Auto-lock of Your PC
The power or sleep durations need to be adjusted in order to achieve the desired result, which is to prevent the system from locking up after a specified duration has expired. Changing the settings of your pc so that the display never goes into locking is one of the possible solutions. Even while it does not inactivate the auto-lock option in a direct manner, it is still an adequate solution if you do not wish for your pc to lock itself. To make changes to the configuration, proceed as follows:
Step 1: First, launch the Windows Settings app.
Step 2: Then, select Personalization.
Step 3: Now, click the Lock screen option located in the left side.

Step 4: Next, select the options for the screen timeout just next to the end of the display. Then, select Never from the timer’s drop-down menus for both the screen and the sleep settings, appropriately.
You also have the option of extending the period of time. When using battery power, its default time settings are typically only a few mins.
Method 5: Alter the System Unattended Sleep Timeout
Windows settings can sometimes be hard to process and adjust, as well as some users complain that even after making changes to numerous options, their system still locks up. If it applies to you, follow the steps below:
Step 1: First, you need to go further into your device’s settings.
Step 2: Then, perform these steps to enter the System’s automated sleep timeout configuration. Get to Settings by typing “Control Panel” into the search window in the bottom-right corner of your screen.
Step 3: Now, pick out the Hardware and Sound. Click Power Options, and select Change when the computer sleeps from the menu that appears.
Step 4: To change the advanced power options, hit the Change button.
Step 5: After that, to open the subfolder for Sleep, hit the plus sign (+) in the upper right corner. Hit the “+” sign that is located beside Sleep after and Hibernation after options.
Step 6: You can change the time to whatever value you wish, or you can enter 0 for Never on both settings to ensure that they are turned off.

Step 7: Finally, you also can minimum expand the period of time before your pc freezes by adjusting the times when it powers down and goes to sleep. Therefore, you won’t have to check in again if you’re simply going to be away from the workplace for a little amount of time.
Method 6: Ensure the Dynamic Lock isn’t Turned on
When your phone is synced to your computer through Bluetooth, the dynamic lock feature will automatically lock your computer if your phone gets out of range. If you leave the computer with your phone in your pocket, for example, the screen will automatically lock if you walk far enough away. Here’s what you need to do to double-check and turn off the dynamic lock function:
Step 1: First, launch the Windows Settings application.
Step 2: Then, choose Accounts. Click the Sign-in menu.
Step 3: Now, keep on scrolling until you reach the dynamic lock option. If the box is already ticked, you should uncheck it.

Step 4: Finally, restart your pc.
Conclusion:
If your pc is getting locked without admin rights, you can stop this by following the above methods. There are several ways to do this, but you have to check your operating system before applying any method. However, if you are not an administrator, you should download any third-party software directly from the company’s website and prevent your computer’s screen from going to lock.


