
How to Print the Images on Multiple Pages? Follow the Guidelines
Sometimes, users face trouble printing an image on multiple pages. But printing an image on multiple pages is very simple. You can do this on your Windows or in Mac. Even if the image is in a pdf, jpg, doc, or any format, you can easily print it on multiple pages.

How to Print the Images on Multiple Pages?
Word documents and Excel sheets are indeed the types of files that are not automatically divided into pages when they are opened. Furthermore, the printer does not know to separate it on its own. The good news is that you can print it on multiple pages.
Step 1: Even if it hasn’t been done, Convert your picture into a Pdf document using Adobe Acrobat Reader. (It can be printed as a Pdf document using the Chrome/Safari browser extensions or Windows.)
Step 2: Make a list of all of the things you want to do. Adobe Reader (and that is a free program) allows you to do the following:
- Selecting the poster choice will divide an image file into multiple pages.
- Increase the tile size, which will also result in it being divided into much more pages.
- To print a document, click on the Print option.
Step 3: You have to get it from a printer
Whatever the case, here it is what you have to do
- Printing an image is as simple as opening it in Paint and clicking on it.
- Select Print and go to the Page Setup (Windows Vista as well as 7) or go to File and then navigate to the Page Setup (in Mac OS X)
- Then choose Fit to from the Scaling drop-down menu and adjust to anything like “3 by 3 page(s)”
- Click on the OK
Using print, Print your image, make sure to set “All Pages” there in the Print dialog box.
And finally, you are completely done. Paint allows you to print a certain image on multiple pages by simply dragging it into the program. Inside the Page Setup, you also can make changes to the page margins just as you would like. It’s now just a matter of trimming the white boundary from the specific printed pages, pulling out the sticky tape, and getting to work.
You’ll get your large image printed as well as arranged on normal paper before you realize it.
A large picture or a big chart can be printed on multiple pages using a home printer. Whenever you can’t print the picture on multiple pages in such a specific store where this can be printed at the specified sizes, you can easily print any image on multiple pages using your printer.
you can also use a simple tool such as Microsoft Paint for printing big images on multiple pages using a basic operating system like Windows. The way it works is as follows:
Windows 7, Windows 8.1, as well as Windows 10 are all compatible with the procedures outlined in this user guide.
Step 1. Open the Microsoft Paint
To begin, launch the Paint program. Find the search function and type “paint.” in the search box.

Find Paint from the search result. You have to open the paint by clicking on it.

Step 2. Open the image in the Paint which one you have to print
To print the image, you have to first load it into the file. The File option on the toolbar can be accessed by clicking or tapping it. Open the file by selecting it and clicking or tapping on it.

If you’re using Paint, you can choose Open using the File menu.
Navigate to the image that you would like to print on your Desktop pc or laptop and select it. Click or tap the Open button when the option is selected.

Choosing the picture that you would like to print on multiple pages and clicking on it
You will now be able to see your image added in Paint.

Step 3: Select Paint for printing your high-resolution image
Now that you’ve received your image in the Paint. Once you’ve told Paint that you want to print your image which on multiple pages.
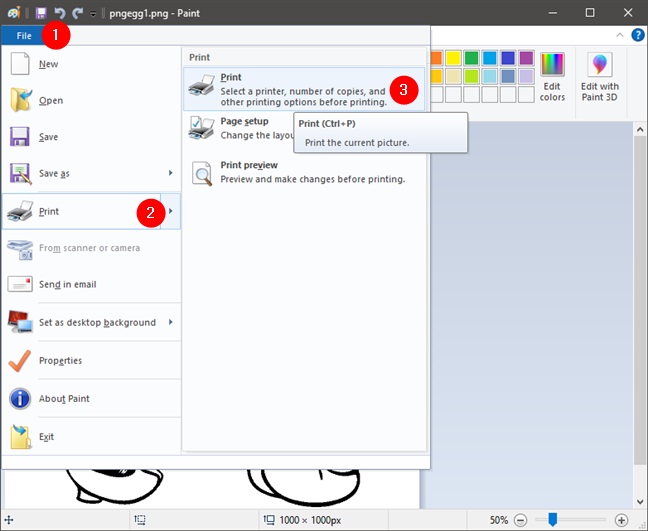
To do so, select Print from the File menu on the toolbar by clicking or tapping on it. You will find the Page Setup under the Print menu, which can be accessed by clicking or tapping it.

In Paint, select Page Setup from the File menu.
The Page Setup pop-up window appears on the screen.

In addition to other printing advanced features such as paper size, alignment, and margins, you will also be able to find a section titled Scaling.

To print a big image on multiple pages, directly ask Paint to scale the image to “Fit to” how pages you need. Put the data 2 by 2 inside the “Fit to” area if you want to print your image on 4 different pages inside a rectangular box.

Selecting to use more than a page to place the picture
You can save the settings by clicking or tapping OK after you’ve determined how several pages you would like the image printed on.

Keeping the picture print scaling configurations saved. Your preferences have been saved.
Step 4: Using a large image to print on multiple pages with the help of Painting
Paint considers that you want to print your image on multiple pages, so it does so. The only thing left to do is to begin the printing process. Print can be accessed by selecting the File tab here on the toolbar and pressing the Print button. Alternatively, you can tap CTRL + P on the keypad.
Paint can be used to print the image.
The printer which you need to use will be selected if there is more than an installed. And after that, you have to simply click on the Print option to start printing.

Choosing the printer that will be used to print your image. Printing this image on multiple pages will indeed start shortly on your printer.
After you’ve printed those, all that would be left is to clip the white boundaries and attach them with tape or whatever method suits your liking. Alternative options include adjusting the page margin of Page setup to meet your specific requirements. The white edge on each page will be smaller if the margin is smaller.
When it comes to scaling, this is not always required to use a square setup. If your actual picture is wide as well as high, you can adjust the width and height accordingly. You can still test with the setup then navigate to Print Preview to see the results till you are completely comfortable with your setup.
Furthermore, it should be noted that you will be using Paint in the guidance rather than Paint 3D. Even when you look for Paint there in your Windows 10/11 start option, you will most likely find Paint 3D appear first, as this is intended to just be the replacement for Paint The paint, is still not removed. You can always open this one in Windows 11/10 if you have that version.
The following are the details of how to print an image that spans multiple pages using Safari:
Step 1: Safari is used to view and print a picture. If this is a local copy, then select File and click on the Open File… from the menu bar. In the alternative, if you have opened the image in Preview, then you can simply drag the emblem for it from the toolbar of its Preview window onto Safari display or even on the Safari emblem in the port. Alternatively, you can load this same image again Online as you normally would.
Step 2: Navigate to the File tab and then, click on Print. Afterward, adjust the Scale (percent) to fit the image inappropriate size. Or sometimes, you will need to click on the Show Details option for seeing the area where you can adjust the scale. So every page of Safari will display a preview of where the picture will show up to every page, allowing you to determine how large the final picture will be. If you look at the image above, you can fit the full width of it on a single sheet, however, the image will take up two pages to cover the entire length.
Step 3: Whenever your printer is capable of fullscreen printing, you might like to consider doing so. To print, press the print button. Remove any unnecessary white space before taping or otherwise combining the various pages.
Conclusion
That’s it. You are done. This is how you can easily print an image on multiple pages whether it is small or large.


