
If you’ve ever wondered why your internet is slow, you’re not alone. Many people face this issue while using Windows 10. A simple solution might be changing your DNS settings. But what does that mean? DNS stands for Domain Name System. It helps your computer find websites. Sometimes, switching DNS can speed up your internet or fix problems with certain sites.
Imagine your favorite game won’t load. Frustrating, right? You might feel like throwing your computer out the window! Before you do anything drastic, consider changing your DNS. It’s easier than you think. You don’t need to be a tech expert to do it.
In this article, we’ll explore how to change DNS for Windows 10. You’ll learn step-by-step instructions to make your internet experience better. Let’s dive in and discover how this small change can make a big difference!

How To Change Dns For Windows 10: A Step-By-Step Guide
Changing DNS settings on Windows 10 can boost your internet speed. Why wait for slow websites? Accessing your DNS settings is simple. Just head to Control Panel, find Network and Sharing Center, and click on your network connection. From there, choose Properties and then Internet Protocol Version 4. Here, you can enter a new DNS address. Consider using Google DNS or OpenDNS for improved reliability. It’s an easy way to enhance your browsing experience!

Understanding DNS and Its Importance
Explanation of DNS and its role in internet connectivity. How DNS affects browsing speed and security.
Many people use the internet daily but don’t know how it really works. DNS, or Domain Name System, helps connect you to your favorite websites. It acts like a phone book for the internet. Instead of remembering numbers, you use easy names. This makes browsing faster and safer.
- Speed: Fast DNS can load websites quicker.
- Security: Better DNS helps protect from harmful sites.
Using good DNS is key. It makes your online experience smoother and safer. Remember, DNS is like a vital bridge to your internet journey!
What is the role of DNS in internet connectivity?
The role of DNS is to translate website names into IP addresses. This allows your device to find the right site easily and quickly.
Accessing DNS Settings in Windows 10
Stepbystep guide on opening Network and Internet settings. Navigating to the Network Adapter properties.
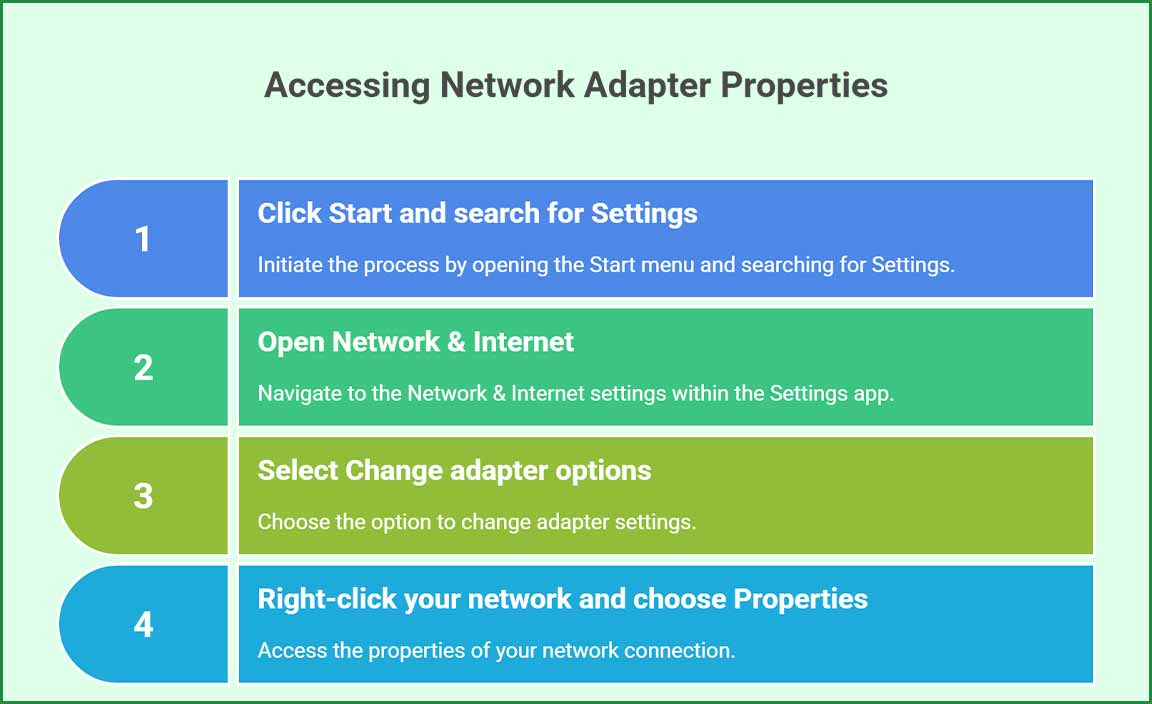
First, click on the Start button and type “Settings.” Open the Settings app that pops up. Next, choose Network & Internet. It’s like picking your favorite candy flavor, but in tech form! Now, find Change adapter options. Click on it, and you’re halfway there! This opens a new window. Find your connection, whether it’s Wi-Fi or Ethernet. Right-click on it, and select Properties. You’re so close you can almost taste it!
| Step | Action |
|---|---|
| 1 | Click Start and search for Settings. |
| 2 | Open Network & Internet. |
| 3 | Select Change adapter options. |
| 4 | Right-click your network and choose Properties. |
Now you’re ready to change the DNS settings. With these simple steps, you’re one step closer to becoming a tech wizard!
Changing DNS Server Addresses
Instructions for entering preferred and alternate DNS server addresses. Tips on finding reliable public DNS servers.
To change DNS server addresses, follow these easy steps. First, open the Control Panel. Click on “Network and Internet,” then “Network and Sharing Center.” Choose your active connection. Next, click on “Properties.” Select “Internet Protocol Version 4” and click “Properties” again. Here, enter your preferred and alternate DNS server addresses. For reliable public DNS servers, consider these options:
- Google DNS: 8.8.8.8 and 8.8.4.4
- Cloudflare DNS: 1.1.1.1 and 1.0.0.1
- OpenDNS: 208.67.222.222 and 208.67.220.220
Testing Your New DNS Settings

Methods to verify DNS changes through command prompt. Importance of flushing the DNS cache.
After changing your DNS settings, it’s time to see if everything works smoothly. You can check it using the Command Prompt. Open it by typing “cmd” in the search bar and hit enter. Then type nslookup followed by a website name, like google.com. This nifty little command helps you verify your new DNS settings, making it easier to navigate the web. Also, don’t forget to flush your DNS cache! Type ipconfig /flushdns in the Command Prompt. This clears old data and ensures your computer uses the new settings. It’s like giving your computer a fresh start with a nice, clean slate!
| Command | Action |
|---|---|
| nslookup google.com | Verify DNS settings |
| ipconfig /flushdns | Clear DNS cache |
Troubleshooting Common DNS Issues
Common problems after changing DNS settings and their fixes. Tools for diagnosing DNSrelated problems.
After changing DNS settings, you might face some issues. Your internet could slow down, or certain sites may not load. To fix these, try restarting your computer and router. If problems continue, check your new DNS settings for mistakes. Use the Command Prompt to help find issues. Type in “ping” followed by a website name to test if it’s reachable.
- Slow internet – Restart your devices.
- Websites not loading – Double-check DNS entries.
- Connection errors – Use Command Prompt.
What tools help diagnose DNS problems?
Tools like Command Prompt and Windows Network Diagnostics help find DNS issues. They can show if your connection is working well.
Benefits of Custom DNS Settings

Advantages of using public DNS services over default ISP DNS. Discussion on speed, security, and privacy enhancements.
Using custom DNS settings can make your internet experience smoother. First, it can make browsing faster—think of it as a race car zooming past a turtle! With public DNS services, your pages load quicker. Plus, these services often offer enhanced security. They help protect you from canny cyber creeps looking to steal your data. And when it comes to privacy, custom DNS can keep your online shoes out of the mud. Here’s a simple comparison:
| Feature | Default ISP DNS | Public DNS |
|---|---|---|
| Speed | Varies | Generally faster! |
| Security | Basic | Enhanced protection |
| Privacy | Limited | More private |
So, changing your DNS could be one smart move! 🚀
Conclusion
In summary, changing DNS settings in Windows 10 is simple. You can do this through the Network settings. Choose a reliable DNS like Google or OpenDNS for better speeds and security. Don’t hesitate to try it out yourself. Explore online guides for detailed steps or tips. Improving your internet experience is just a few clicks away!
FAQs
Sure! Here Are Five Related Questions On The Topic Of Changing Dns For Windows 10:
To change the DNS on Windows 10, you first need to open the Control Panel. Click on “Network and Internet,” then go to “Network and Sharing Center.” Next, select your network and click on “Properties.” Choose “Internet Protocol Version 4” and click “Properties” again. Now you can enter the new DNS numbers. Finally, click “OK” to save your changes!
Sure! Please share the question you’d like me to answer.
What Are The Benefits Of Changing The Dns Settings In Windows 10?
Changing DNS settings in Windows 10 can help us browse the internet faster. We can also get safer connections, which means our information is more protected. Sometimes, it can help us access websites that are blocked. Overall, it makes our online experience better and smoother.
How Can I Access The Dns Settings In Windows 10?
To access DNS settings in Windows 10, start by clicking on the Start menu. Then, type “Control Panel” and press Enter. Once you’re in the Control Panel, click on “Network and Internet.” Next, click on “Network and Sharing Center,” and then choose your network connection. Finally, click on “Properties” and select “Internet Protocol Version 4 (TCP/IPv4)” to see and change your DNS settings.
What Are Some Recommended Public Dns Servers To Use In Windows 10?
You can use several public DNS servers in Windows 10. Google’s public DNS is fast and easy. Their addresses are 8.8.8.8 and 8.8.4.4. Another good choice is Cloudflare, with addresses 1.1.1.1 and 1.0.0.1. These help your internet work better and faster!
How Do I Revert Back To The Default Dns Settings In Windows 10?
To change your DNS back to the default in Windows 10, follow these steps. First, search for “Control Panel” on your computer. Click on “Network and Internet,” then “Network and Sharing Center.” Next, click on “Change adapter settings.” Right-click on your network connection and select “Properties.” Choose “Internet Protocol Version 4 (TCP/IPv4)” and click “Properties” again. Finally, select “Obtain DNS server address automatically” and then click “OK.” Your DNS settings will go back to default!
Can Changing The Dns Settings In Windows Improve Internet Speed And Security?
Yes, changing DNS settings can make your internet faster and safer. DNS stands for Domain Name System. It helps your computer find websites. Using a better DNS can help pages load quicker. Some DNS services also protect you from unsafe websites. So, it’s a good idea to try changing them!
Resource:
-
Microsoft Windows Networking Documentation: https://docs.microsoft.com/en-us/windows-server/networking/
-
Cloudflare DNS Overview: https://www.cloudflare.com/learning/dns/what-is-dns/
-
Google Public DNS: https://developers.google.com/speed/public-dns
-
How-To Geek Networking Basics: https://www.howtogeek.com/66214/htg-explains-what-is-dns/