[Fix] Unable to Start A DCOM Server (100% Working)
You check the Event Viewer after facing unusual happening on your PC, and it is prompting the error message saying unable to start a DCOM (Distributed Component Object Model) server.
Yes, it is unusual, but you are not alone in who gets the error message. Here the good thing is, it is solvable. So don’t panic if you face the issue.

In fact, I am writing this article to assist you to resolve the issue. Hopefully, you will use your PC smoothly after applying the below fixes.
Reasons Behind Arising The Issue
There are a couple of probable reasons for which the issue may arise. These are-
- Sometimes Microsoft Office interrupts in System function. It is one of the identified causes for the issue creation. If it happens with your PC, you will have to repair the Office suite.
- If you use a third-party antivirus, you may suffer from the misjudgment of the antivirus. The issue can be created for so also. In that case, you can get relief from the issue by uninstalling the third-party antivirus.
- System file corruption is one of the common reasons for PC problems. You face the discussed issue for the system file corruption. Here, a clean boot and SFC & DISM scan may help you to resolve the issue.
- The issue can appear for the interference of firewall keys. If you face the issue and want to resolve it, you will have to delete the problematic firewall keys.
5 Fixes of ‘Unable to Start A DCOM Server’ Issue Arise
The issue is not unsolvable. So, don’t be upset when the issue happens to you. Keep up reading the article and resolve the issue. Before jumping into the details, let’s round up the list first-
- Fix 1: Repair Microsoft Office Suit
- Fix 2: Uninstall Third-party Antivirus
- Fix 3: Perform A Clean Boot
- Fix 4: Run SFC and DISM scans
- Fix 5: Delete Related Registry Key
Fix 1: Repair Microsoft Office Suit
Repairing Microsoft Office can be a firsthand solution when you face the discussed issue. The process is simple, and you can do it by following some steps. I will attach the steps below.
Step 1
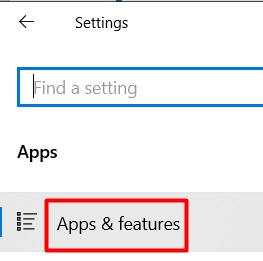
Tap the Windows and ‘I’ keys together. As a result, you will get the ‘Settings’ window access. From here, you have to choose the ‘Apps’ section.

Step 2
After that, select the ‘Apps & features’ section from the left side menu.
Step 3
Then look at the right side portion. You will see the ‘Apps & features’ list. Find and click ‘Microsoft Office’. Accordingly, two options will appear. From here, you have to click on ‘Modify’.

Step 4
Then allow the new interface. From here, select the ‘Quick Repair’ circle. In the end, click on the ‘Repair’ tab. It may take some time to execute.

Finally, check the Event Viewer. If you still find the error message, you will have to apply the following fixes.
Fix 2: Uninstall Third-party Antivirus
When the reason hides behind the third-party antivirus, you will need to uninstall and remove it from your PC to get rid of the issue. I will include the process below.
Step 1
Tap the Windows and ‘R’ keys together. Consequently, the ‘Run’ window will appear on the left bottom of the screen.

Step 2
After that, copy the below text and paste it into the ‘Run’s ‘Open’ bar.
appwiz.cpl
Then click on the ‘Ok’.

Step 3
Accordingly, the ‘Uninstall or change a program’ option will be visible on the interface. You need to find out the antivirus from the appeared program list. While finding it, right-click on it.
As a result, you will get the ‘Uninstall’ option. You have to click on it. The process may take a couple of moments to uninstall the antivirus program successfully. In the end, restart your PC.

Finally, recheck the issue. It will be okay if you don’t find it in the Event Viewer. But, in case, if you find it again, you will have to apply the other fixes.
Fix 3: Perform A Clean Boot
If you still face the issue after applying the upper fixes, you will need to perform a clean boot. It will help you to find out the possible reasons and solve them. The process will be given below.
Step 1
Firstly, you need to tap the Windows key. Then type ‘msconfig’. Accordingly, you will see the ‘System Configuration’ app preface on the right corner of the appeared interface. From here, you have to click on the ‘Run as administrator’ option.
Step 2
After that, you need to tap the ‘Services’ tab from the ‘System Configuration’ window. Mark the ‘Hide all Microsoft services’ box. Then, click on the ‘Disable all’ tab.
Step 3
Next, tap the ‘Startup’ tab from the menu bar. Click on the blue-colored ‘Open Task Manager’ option.
Step 4
When the ‘Task Manager’ window appears, you have to work with the ‘Startup’ tab. Select all the items one by one and disable them. In the end, close the ‘Task Manager’.
Step 5
As a result, you will return back to the ‘Startup’ tab of the ‘System Configuration’ window. Press ‘Ok’ to confirm all the changes you have done recently.
At the end of the fix, you have to restart the PC. Then take a follow on the existence of the issue. If it still appears, probably it will happen for the other system file corruption.
Fix 4: Run SFC and DISM scans
SFC and DISM scans are the most useful steps to recover the PC from probable system file corruption. I will attach the process below.
Step 1
Right-click on the ‘Start’ menu. You have to choose ‘Windows PowerShell (Admin)’ from the appeared list.
Step 2
While the new interface will appear, you need to copy the below text and paste it.
sfc /scannow
Then hit the ‘enter’ key and wait until the scan finishes.
Step 3
Next, you have to reopen the Windows PowerShell (Admin) window. Then copy the below command and paste it.
Dism /Online /Cleanup-Image /RestoreHealth
After that, hit the ‘enter’ key. It may take several seconds to complete the checking process successfully.
Finally, recheck the existence of the issue. If it still appears, you will have one last fix to apply.
Fix 5: Delete Related Registry Key
When none other fixes succeed, you will need to delete the related Registry key. The process is not complex as it sounds. I will discuss the full process below.
Step 1
Tap the Windows key and type ‘regedit’. Accordingly, you will see the preface of ‘Registry Editor. From here, you have to click on the ‘Run as administrator’ option.

Step 2
Consequently, the ‘Registry Editor’ window will appear on the screen. Then copy the below path and paste it into the address bar of the appeared window.
ComputerHKEY_LOCAL_MACHINESYSTEMCurrentControlSetServicesSharedAccessParametersFirewallPolicyFirewallRules
Then hit the ‘enter’.

Step 3
After that, right-click on the ‘Firewall Rules’ and click on the ‘Delete’ from the appeared list.

Step 4
Next, copy the below path and paste it into the address bar of the ‘Registry Editor’ window.
ComputerHKEY_LOCAL_MACHINESYSTEMCurrentControlSetServicesSharedAccessParametersFirewallPolicyRestrictedServicesConfigurableSystem
Then hit the ‘enter’. Right-click on the ‘System’ key and choose ‘Delete’.

Step 5
Next, you have to copy the below path and paste it into the address bar.
ComputerHKEY_LOCAL_MACHINESYSTEMCurrentControlSetServicesSharedAccessParametersFirewallPolicyRestrictedServicesAppIsoFirewallRules
Hit the ‘enter’ and delete the ‘FirewallRules’.

After executing the three consecutive steps, you have to restart the PC.
Final Words
In conclusion, I would like to clarify the probable chances in sense of resolving the ‘unable to start a DCOM server’ issue. Fix no. 1 & 2 could resolve the issue in most cases and fix no. 3 & 4 is helpful for system corruption-related reasons. Lastly, fix no. 5 is a rarely used item.