
Have you ever lost important files or made a mistake on your computer? It can feel like a nightmare! But what if I told you there’s a way to turn back time on your Windows 10 system? You can do this by creating a restore point.
A restore point is like a safety net for your computer. It saves your system files and settings at a specific moment. If something goes wrong later, you can go back to that point and fix the problem. It’s a simple step, yet it can save you hours of frustration.
Imagine playing your favorite game. Suddenly, the system crashes. You feel panicked. But if you’ve created a restore point, you can quickly get your system back to normal. Pretty cool, right?
In this article, we’ll walk you through how to create a restore point for Windows 10. It’s easier than you might think! Keep reading to learn how to protect your precious files and settings with this handy feature.

How To Create A Restore Point For Windows 10 Effectively
Creating a restore point in Windows 10 is like saving a bookmark for your computer’s state. It helps you revert back if something goes wrong. Did you know that many users forget this simple step? By setting a restore point, you can protect your files and settings. It’s quick and easy! Just follow a few clicks, and you’re ready to safeguard your work. Why risk losing your progress when an easy solution is just a few steps away?

What is a Restore Point?
Definition of a restore point. Importance of restore points in system recovery.
A restore point is like a time capsule for your computer. It saves the current state of your system, including settings and files. If something goes wrong, you can return to that saved state. This is important for recovery. With a restore point, you can fix problems without losing personal data.
- Quick Fix: Restore points help solve issues fast.
- Data Safety: They keep your files safe while troubleshooting.
- Easy Solution: Just click to go back to a better time!
Why is a restore point important?
Restore points are key for protecting your computer. They let you recover quickly from issues. This saves time and keeps your data secure.
When to Create a Restore Point
Situations that require a restore point. Recommended frequency for creating restore points.
Knowing when to create a restore point is vital for your computer’s health. Here are some situations where it’s important:
- Before installing new software or updates.
- After setting up hardware like printers or cameras.
- Before making big changes to your system, like editing the registry.
- Regularly, at least once a month, even if nothing changes.
Creating restore points often can save you from headaches. If something goes wrong, you can easily go back to a time when your computer worked well.
How often should you make a restore point?
You should make a restore point at least once a month. If your computer is used heavily, consider doing it even more often.
How to Access System Protection Settings
Steps to navigate to System Properties. Understanding the System Protection tab.
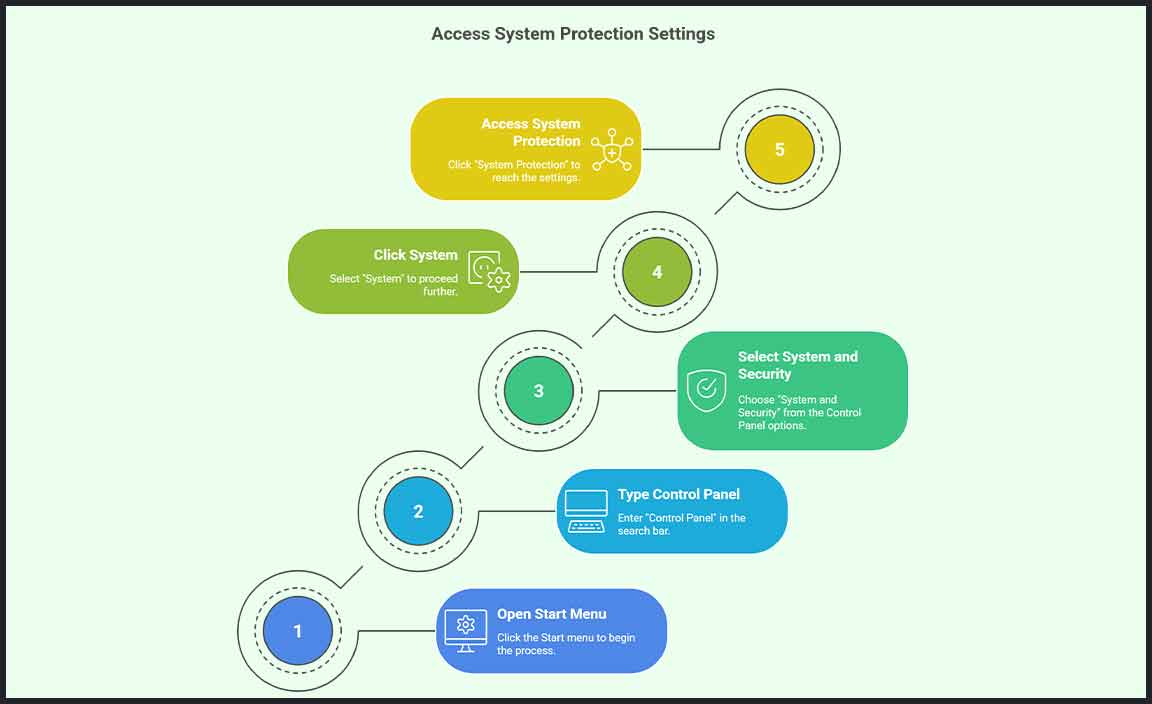
To find the system protection settings, first, click on the Start menu. Type “Control Panel” and hit Enter. Once you’re in the Control Panel, select “System and Security.” Then, click on “System.” Look for “System Protection” on the left side. This will take you to the System Protection tab, where you can see available drives and create restore points. It’s like a safety net for your computer! Don’t worry; if you trip, you will have a way to get up again!
| Step | Action |
|---|---|
| 1 | Click on Start menu |
| 2 | Type “Control Panel” |
| 3 | Select “System and Security” |
| 4 | Click on “System” |
| 5 | Click “System Protection” |
Now you’re on the System Protection tab! Here, you can see which drives are protected. This part helps your computer remember things, like an elephant with a great memory. If trouble strikes, you can easily restore your system to its happy place!
Creating a Restore Point Manually
Stepbystep guide to create a restore point. Tips for naming restore points effectively.
To create a restore point, follow these steps:
- Click the Start menu and search for “Create a restore point.”
- Select the system drive (usually C:) and click “Configure.”
- Turn on system protection and set the maximum space you want to use.
- Afterward, click “Create” and name your restore point.
- Press “Create” again to finish.
For naming, choose clear names. You can include the date and what changes you made. This makes it easy to remember later.
How do I name restore points effectively?
When naming restore points, be specific. For example, use names like “Before Game Install” or “After Windows Update.” This helps you know why you created it.
Enabling Automatic Restore Points
How to set up automatic restoration. Benefits of automatic restore points.
Setting up your Windows 10 to make automatic restore points is like giving your computer a safety net! First, go to the Control Panel and search for “System.” Click on “System Protection,” then select your drive. Now, click “Configure” and enable “Restore settings.” Your computer will now create restore points for updates or new software.
These automatic restore points help you recover your system if something goes wrong. It’s like having an extra set of training wheels for your bike. If you fall, you can just pop back up! Plus, they save time and stress. Who wants to spend hours fixing issues? Not me!
| Benefits of Automatic Restore Points |
|---|
| Quick recovery from errors |
| Protection from faulty updates |
| Saves time and effort |
Checking Existing Restore Points
How to view previously created restore points. What information can be gathered from existing restore points.
To find previously created restore points, follow these steps. First, open the System Restore window. You can do this by typing “Create a restore point” in the search bar. Click on the option that appears. In the System Properties window, look for the “System Restore” button. This will show you the existing restore points.
With these restore points, you can gather important information:
- Date and Time: Know when the restore point was created.
- Description: See what changes it captures, like software installations or updates.
- Status: Check if the point is available for use.
What are restore points used for?
Restore points help you recover your computer to a earlier time. They can fix problems caused by recent changes, like installing a new program or driver.
Restoring Your System from a Restore Point

Detailed steps to restore Windows 10 using a restore point. Precautions to take before restoring.
To restore Windows 10 from a restore point, follow these steps: First, click on the Start menu. Next, search for Control Panel and open it. Find System and Security and click on it. Then, select System. After that, choose System Protection from the left menu. Now, click the System Restore button. Follow the prompts to select the restore point you want. Finally, click Finish to start restoring.
Before restoring, it’s wise to check a few things:
- Backup important files to avoid losing them.
- Ensure your PC is plugged in to prevent power loss.
- Close all open programs to avoid data loss.
What should I do before restoring my system?
Before restoring, backup your files, keep your PC plugged in, and close all programs.
Troubleshooting Restore Point Issues
Common problems and their solutions. How to ensure restore points are being created successfully.
Sometimes, users face issues with restore points in Windows 10. Understanding these issues can help you avoid frustration. Common problems include missing restore points and failed creations. Here are some quick fixes:
- Check if System Protection is enabled.
- Ensure enough disk space is available.
- Run the System File Checker for errors.
To ensure restore points are created successfully, follow these tips:
- Regularly check for updates.
- Manually create restore points periodically.
- Keep your system health in check.
Regular attention helps maintain an effective restore point system!
What to do if restore points are missing?
Check your settings to ensure System Protection is turned on. If it’s on and points are still missing, consider running a disk clean-up.
Quick Tips for Success
- Run Windows Update often.
- Monitor your hard drive space.
Best Practices for Using Restore Points

Tips for maximizing effectiveness of restore points. Integrating restore points with regular system maintenance.
To make the most of restore points, establish a routine. Schedule them alongside other maintenance tasks like updates and virus scans. This helps your computer stay healthy. Remember, more restore points can save you from headaches. But don’t go overboard; having too many can slow things down. It’s like having too many cookies in a jar. Choose wisely!
| Best Practices for Restore Points | Tip |
|---|---|
| Schedule Regularly | Set reminders for system checks! |
| Limit Excess | Don’t hoard them like old candy! |
| Combine with Updates | Sync with system updates for double protection! |
Staying organized makes everything smoother. Think of restore points as your computer’s life jacket. They keep it afloat when things get stormy. So, treat your restore points like a pet: feed them (update regularly), groom them (clean up old points), and they’ll keep your system happy!
Conclusion
Creating a restore point in Windows 10 helps protect your computer. It saves important system settings, so you can fix issues easily. We can do this by going to System Properties. Remember to create restore points regularly before big changes. Check out online guides to learn more. With these steps, you’ll keep your PC safe and running smoothly!
FAQs
What Steps Do I Need To Take To Create A Restore Point In Windows 10?
To create a restore point in Windows 10, first, click on the Start menu. Next, type “Create a restore point” in the search bar. Click on it when it appears. In the window that opens, choose your main drive and click on “Configure.” Then, click on “Create” and give your restore point a name. Finally, click “Create” again to save it. You did it!
How Can I Enable System Protection To Ensure I Can Create Restore Points In Windows 10?
To enable System Protection in Windows 10, start by clicking on the Start menu. Then, type “Control Panel” and open it. Next, go to “System and Security,” then “System.” On the left side, click “System Protection.” Finally, select your main drive, click “Configure,” and choose “Restore system settings and previous versions of files.” Don’t forget to click “OK” to save your changes!
Are There Any Prerequisites For Creating A Restore Point On Windows 10?
Yes, there are a few things to check before making a restore point on Windows 10. First, your computer must be running Windows 10. You also need to have enough free space on your hard drive. Finally, make sure system protection is turned on for your drive. If everything is good, you can create a restore point easily!
How Do I Access And Manage Existing Restore Points In Windows 10?
To access restore points in Windows 10, first click the “Start” button. Then, type “Create a restore point” and select it. In the new window, click the “System Restore” button. This will show you existing restore points. You can pick one to help fix problems on your computer.
What Should I Do If I Encounter An Error While Trying To Create A Restore Point In Windows 10?
If you see an error while making a restore point in Windows 10, try these steps. First, restart your computer. Then, check if the System Protection feature is turned on. You can do this by looking in the System Properties settings. If it’s off, turn it on to create the restore point. If it still does not work, you might need to update Windows or ask for help from an adult.
Resource:
-
Windows 10 Update History: https://support.microsoft.com/en-us/topic/7dd3071a-0978-4e18-817b-7a6d7e49e6d9
-
What is System Restore: https://www.howtogeek.com/howto/windows-vista/what-is-system-restore-and-how-do-i-use-it/
-
Use System Restore on Windows 10: https://www.lifewire.com/how-to-use-system-restore-in-windows-10-5186653
-
Windows 10 Tips and Tricks: https://www.techrepublic.com/article/10-essential-windows-10-tips-and-tricks-you-should-know/