
Have you ever wondered if your computer can run virtual machines? You might be surprised by how important hardware virtualization is for your devices. Checking your Windows 10 settings for this feature can reveal a lot about your computer’s performance.
Imagine wanting to play a cool game or run a special app, but then realizing your computer isn’t ready. That’s where hardware virtualization comes in. It allows your computer to run multiple operating systems at the same time. Knowing how to check Windows 10 for this feature can make your computing experience smoother.
Did you know that many computers today support virtualization? However, some might have it turned off. This means you could be missing out on some fantastic opportunities. Let’s discover how to easily check if your Windows 10 system is set up for hardware virtualization!

How To Check Windows 10 For Hardware Virtualization Support
Understanding Hardware Virtualization
Definition and importance of hardware virtualization. Benefits for users and developers.
Hardware virtualization is a smart way to use computers. It lets one machine act like many by creating virtual copies. This is important because it helps save resources and makes systems run efficiently. For users, it means faster performance and better multitasking. Developers benefit from testing new software quickly without needing extra hardware.
- Better resource management
- Improved testing environments
- Cost efficiency
Why is hardware virtualization useful?
Virtualization saves money, boosts performance, and helps keep computers organized. It allows you to run different operating systems without needing extra computers. Imagine running Windows and Linux at the same time! That’s the power of virtualization.
System Requirements for Hardware Virtualization
Minimum hardware specifications necessary. Compatibility with different versions of processors.
To use hardware virtualization, your system needs to meet certain requirements. First, every computer should have a compatible processor. Here are the minimum hardware specifications:
- 64-bit processor
- At least 4GB of RAM
- 15GB of free storage space
Most modern processors, like Intel and AMD, support virtualization. Always check your processor version for compatibility. This ensures your system can run virtual machines smoothly.
What are the minimum hardware requirements?
The minimum requirements are a 64-bit processor, 4GB of RAM, and 15GB of free storage.
Checking Processor Compatibility
How to identify your processor model. Steps to verify if your processor supports virtualization.
To find your processor model, follow these simple steps. First, click on the Start button. Then, type “System Information” and hit Enter. This opens a window showing details about your computer. Look for “Processor” in the list. This tells you your processor model.
Next, check if your processor supports virtualization. Here’s how:
- Visit the manufacturer’s website.
- Find your processor model.
- Look for details about virtualization support.
Most modern processors do support it, but it’s always good to double-check!
What if I don’t know my processor model?
You can find your processor model by checking the System Information, as explained above.
Enabling Virtualization in BIOS/UEFI
Steps to access BIOS/UEFI settings. How to enable Intel VTx or AMDV.
To change the BIOS/UEFI settings, restart your computer. As it boots up, hit the right key. This key is often F2, Delete, or Esc. Look for the Advanced tab. Then, find Virtualization Technology. You’ll see options like Intel VTx or AMD-V. Enable these settings to allow virtualization. After that, save your changes and exit.
How do I enable Intel VTx or AMDV?
Find the setting in BIOS/UEFI, select it, and change it to Enabled. Restart to apply the changes.
- Restart your computer.
- Press the right key to enter BIOS/UEFI.
- Locate the Advanced section.
- Find Intel VTx or AMD-V.
- Enable the option.
- Save and exit.
Verifying Virtualization in Windows 10
Methods to check virtualization status using Task Manager. Using Command Prompt and PowerShell for verification.
To check if your Windows 10 supports virtualization, you can use different methods. One easy way is through the Task Manager. Follow these steps:
- Right-click on the taskbar and select Task Manager.
- Click on the Performance tab.
- Look for Virtualization on the right. It should say “Enabled” if it’s working.
You can also use Command Prompt or PowerShell. Simply open either and type:
- systeminfo for Command Prompt
- Get-WmiObject -Class Win32_Processor | Select-Object -Property Name, VirtualizationFirmwareEnabled for PowerShell.
Both methods will show if virtualization is ready to use.
What is the command to check virtualization in Windows 10?
The command to check virtualization is systeminfo in Command Prompt. This will give you a summary of your system, including details about virtualization.
Steps for Using Command Prompt
- Open Command Prompt.
- Type systeminfo and press Enter.
- Look for “Virtualization Enabled in Firmware.”
Troubleshooting Common Issues
Common problems preventing virtualization from functioning. Solutions for resolving virtualizationrelated issues.
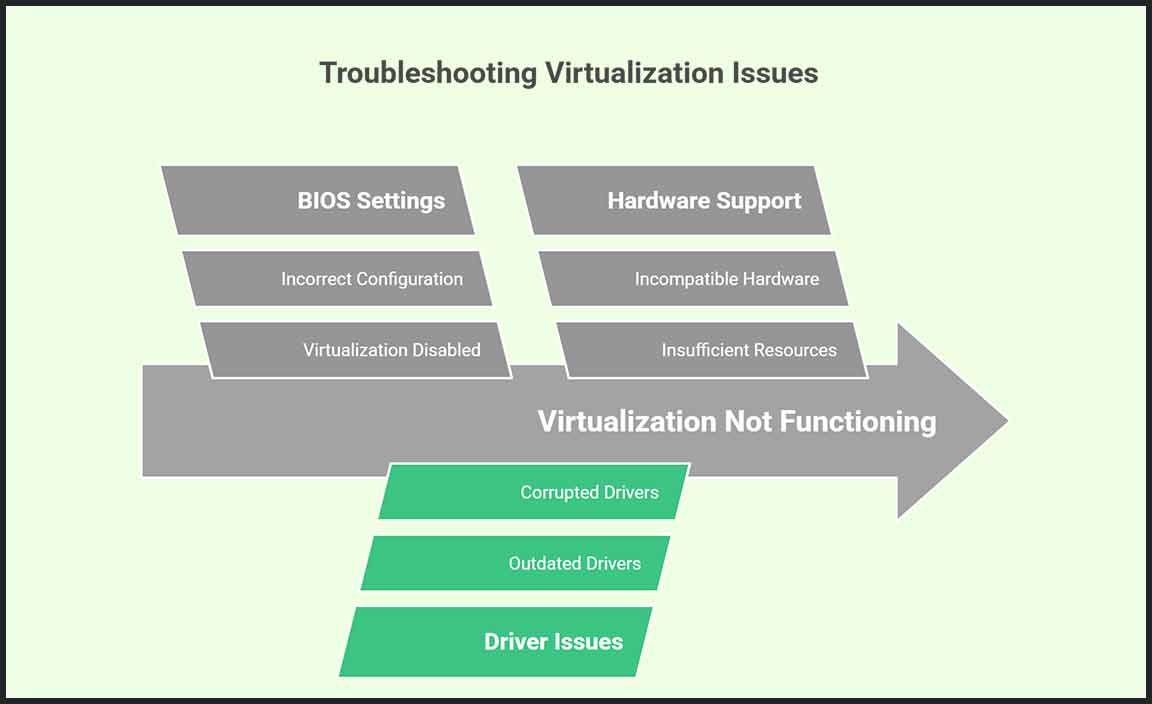
Virtualization issues can feel like trying to catch a slippery fish! Common problems include disabled BIOS settings and lack of proper hardware support. If you find virtualization not working, check if your PC’s BIOS has the virtualization technology enabled. Sometimes, just a quick tweak can fix it! If that doesn’t help, updating your drivers can also do wonders. Don’t forget, some older computers might not support virtualization at all. Here’s a handy table that sums up common issues and fixes:
| Problem | Solution |
|---|---|
| Virtualization Disabled | Enable it in BIOS |
| Outdated Drivers | Update to the latest version |
| Incompatible Hardware | Check your system specs |
Conclusion
In conclusion, checking for hardware virtualization in Windows 10 is easy. You can see if your PC supports it using Task Manager. If it does, you’ll benefit from better performance in virtual machines. Next, try enabling it in your BIOS settings if it’s not already on. For more details, check out helpful guides online. Happy exploring!
FAQs
Here Are Five Related Questions On The Topic Of Checking Windows For Hardware Virtualization:
To check if your Windows computer can use hardware virtualization, you can look in a special program called Task Manager. First, right-click the taskbar at the bottom of the screen and click “Task Manager.” Then, click on the “Performance” tab. You should see a box that says “Virtualization” on the right side. If it says “Enabled,” your computer can use this feature!
Sure! Please provide the question you want me to answer.
How Can I Determine If My Cpu Supports Hardware Virtualization In Windows 10?
To check if your CPU can use hardware virtualization in Windows 10, we can use a tool called “Task Manager.” First, right-click the taskbar at the bottom of your screen. Then, select “Task Manager.” Click on the “Performance” tab. Look for “Virtualization.” If it says “Enabled,” your CPU supports it! If it says “Disabled,” you may need to turn it on in the BIOS settings of your computer.
Which Tools Or Commands Can I Use In Windows To Check If Virtualization Is Enabled In My Bios/Uefi?
You can check if virtualization is enabled using Task Manager. First, right-click on the taskbar and select “Task Manager.” Then, click on the “Performance” tab. Look for “Virtualization” on the right side. If it says “Enabled,” then it’s on! If it says “Disabled,” you need to change it in your BIOS or UEFI settings.
What Are The Steps To Enable Hardware Virtualization In Windows If It Is Not Currently Activated?
To enable hardware virtualization in Windows, start by restarting your computer. While it boots up, press the special key to enter the BIOS (this key might be Delete, F2, or something else). Look for a setting called “Virtualization” or “VT-x” and turn it on. Save your changes and exit the BIOS. Your computer will start again, and hardware virtualization will be enabled!
How Can I Verify If Windows Is Utilizing Hardware Virtualization For Running Virtual Machines?
To check if Windows is using hardware virtualization, you can open the Task Manager. Right-click the taskbar at the bottom of your screen and select “Task Manager.” Next, click on the “Performance” tab. Look for “Virtualization” on the right side. If it says “Enabled,” then your Windows is using hardware virtualization.
What Potential Issues Might Arise If Hardware Virtualization Is Disabled In Windows For Tasks Such As Running Hyper-V Or Other Virtualization Software?
If hardware virtualization is turned off, you might have trouble running programs like Hyper-V. These programs need special help from your computer’s brain to work well. Without it, they can be slow or might not even start. You could also miss out on using cool features that help run different systems safely. So, turning it on is usually a smart choice to enjoy all the fun!
Resource:
-
Windows 10 troubleshooting guide: https://support.microsoft.com/windows
-
Intel CPU compatibility tool: https://www.intel.com/content/www/us/en/support/processors/000005567.html
-
AMD virtualization technology overview: https://www.amd.com/en/technologies/virtualization
-
BIOS and UEFI settings guide: https://www.howtogeek.com/196916/how-to-enter-your-computers-bios/