
Have you ever wanted to play your favorite Android games on your computer? Many people feel the same way. That’s where BlueStacks for Windows 10 comes in. It’s a cool tool that lets you run Android apps right on your PC. Imagine jumping into a game like PUBG Mobile with better graphics and controls!
BlueStacks makes it easy to enjoy mobile apps without needing a phone. You can explore new games or use handy apps all in one place. Plus, it’s free! But how does it work? This article will guide you through the wonderful world of BlueStacks for Windows 10.
Did you know that millions of users around the globe are already using BlueStacks? This program has changed how people play games and use apps. Let’s dive in and discover why BlueStacks is a must-have for anyone wanting to blend the mobile experience with the power of a PC!
Bluestacks For Windows 10: A Comprehensive Guide
What is BlueStacks?
Definition and purpose of BlueStacks. Brief history and evolution of the software.
Imagine running your favorite mobile apps on your computer! That’s what BlueStacks does. It’s a special program that acts like a bridge, letting you use Android apps right on Windows 10. BlueStacks started back in 2011 and has steadily improved. The software went from being slow and clunky to a smooth performer that gamers love. Today, it makes playing mobile games on a bigger screen a piece of cake!
| Year | Key Development |
|---|---|
| 2011 | Launch of BlueStacks |
| 2016 | Introduced BlueStacks 3 with cloud connected features |
| 2020 | Launched BlueStacks 4 with improved performance |
The fun part? You can finally stop squinting at your tiny phone screen and enjoy apps like never before! Who wouldn’t want a little more screen space to crush their opponents?
System Requirements for BlueStacks on Windows 10
Minimum and recommended specifications. Compatibility with different Windows 10 versions.
To use Bluestacks on Windows 10, you’ll need to check your system first. Here are the minimum and recommended specifications:
- Minimum: 4GB of RAM, Intel or AMD processor, Windows 10 (64-bit)
- Recommended: 8GB of RAM, Dual-core processor, Windows 10 Home or Pro (64-bit)
It works well with versions like Windows 10 Home and Pro. Make sure your PC meets these requirements for the best experience with Bluestacks.
What is the minimum RAM needed for Bluestacks?
The minimum RAM needed for Bluestacks is 4GB. This helps it run smoothly on your computer.
How to Download and Install BlueStacks on Windows 10
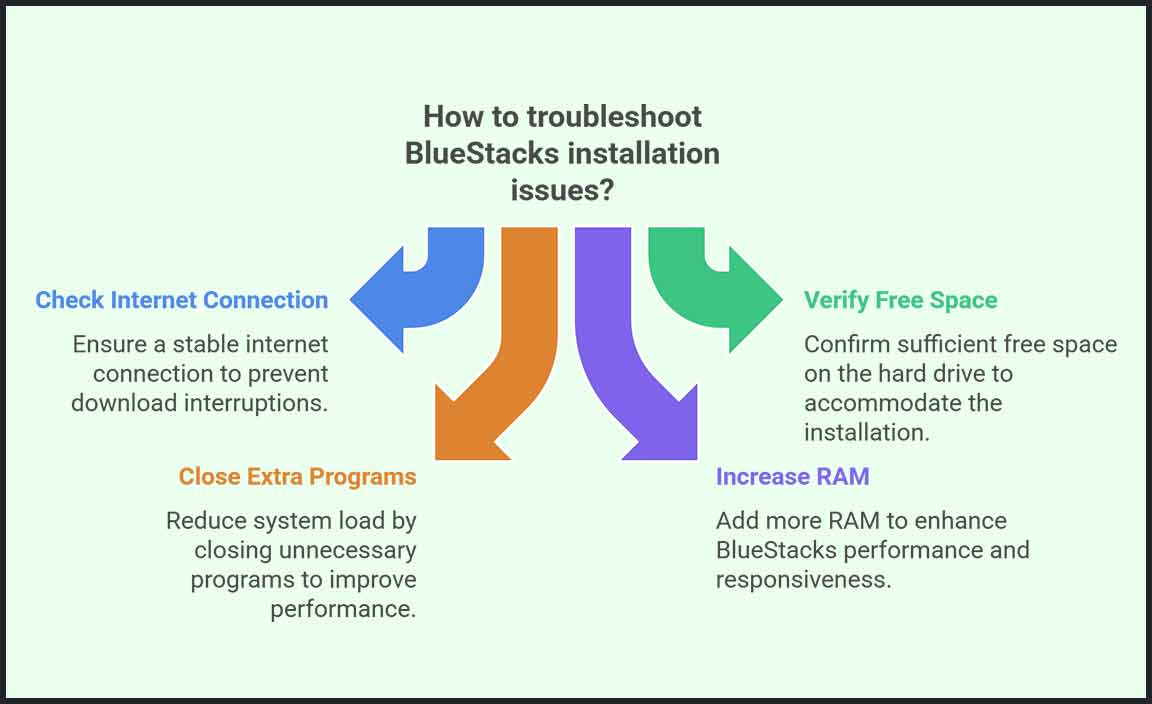
Stepbystep installation guide. Troubleshooting common installation issues.
To download and install BlueStacks on Windows 10, follow these simple steps. First, visit the BlueStacks website and click on the download button. This will start the download. Once finished, open the file to begin installation. Follow the on-screen instructions like a game tutorial—easy as pie! If you hit a snag, check your system requirements and ensure your Windows is updated. If BlueStacks acts like a grumpy cat, consider adding more RAM or checking your antivirus settings.
| Common Issues | Solutions |
|---|---|
| Installation fails | Check your internet connection and free space. |
| Slow performance | Close extra programs and increase RAM. |
With these tips, you’ll be smooth gaming in no time. Who knew installing apps could be this fun?
Setting Up BlueStacks for the First Time
Initial configuration settings. How to link your Google account.
Getting started with Bluestacks is like opening a treasure chest of apps! First, you’ll need to tweak your settings. Just follow the steps and you’ll be gaming in no time. See the table below for the key settings you need:
| Settings | What to Do |
|---|---|
| Device Profile | Select a suitable device model. |
| Performance | Adjust RAM and CPU as needed. |
| Graphics | Choose the best graphics mode. |
Next, it’s time to link your Google account. This step is like giving your Bluestacks a shiny new key to unlock all that app goodness! Simply sign in with your Google account, and voilà! You’re ready to download your favorite games and apps. Don’t worry; it’s easier than pie. And who doesn’t love pie?
Features of BlueStacks for Windows 10
List of key features and functionalities. Comparisons with other Android emulators.
Bluestacks for Windows 10 has many exciting features. It allows you to play mobile games on your computer. You can use your mouse and keyboard for better control. Here are some key features:
- Multi-instance: Run multiple games at once.
- Custom controls: Set your own key settings.
- High-speed performance: Enjoy fast loading times.
- App store access: Download apps directly.
Compared to other Android emulators, Bluestacks stands out. Many users find it easier to use and more reliable. It often has better graphics and smoother gameplay.
What makes Bluestacks different from other emulators?
Bluestacks offers better speed and ease of use compared to other emulators. Players find it runs games more smoothly. Many also like its simple interface.
How to Optimize BlueStacks Performance on Windows 10
Tips for enhancing speed and performance. Configuration settings for optimal user experience.
To make BlueStacks work faster on Windows 10, follow these tips. Start by adjusting the settings for the best experience. Here are some suggestions:
- Increase the RAM for BlueStacks in settings.
- Allocate more CPU cores to boost performance.
- Turn off settings you don’t need, like keyboard mapping.
- Keep your Windows updated for smooth running.
These changes can really help. Enjoy a better playing experience!
What are quick tips for a better BlueStacks experience?
For a better experience with BlueStacks for Windows 10, try clearing the cache and disabling unnecessary apps in the background. This can speed things up a lot!
Installing and Managing Apps on BlueStacks
How to install apps from Google Play Store. Managing app settings and permissions.
To install apps on BlueStacks, start by opening the Google Play Store. Sign in with your Google account. Search for your favorite app and click Install.
Once installed, you can manage app settings. To adjust permissions, go to Settings in BlueStacks. Here, you can allow or deny access to features like camera or location.
This makes it easy to control how apps work.
How do I install apps on BlueStacks?
You can install apps by opening the Google Play Store, signing in, and searching for the app you want.
Quick Tips:
- Make sure your Google account is active.
- Check for updates for a better experience.
- Revisit settings to manage permissions later.
Troubleshooting Common Issues with BlueStacks
Solutions for performance problems. Fixing errors during installation and usage.
If Bluestacks isn’t running smoothly, it can feel like trying to ride a bicycle with square wheels. To boost performance, make sure your computer has enough RAM and free disk space. Clear your cache to help it run better, just like cleaning out a cluttered closet! If installation errors pop up, double-check your system requirements. Sometimes, a simple restart works wonders. If all else fails, re-install Bluestacks, but don’t worry, it’s not as scary as trying to tame a wild dinosaur!
| Problem | Solution |
|---|---|
| Slow Performance | Check RAM and clear cache. |
| Installation Error | Verify system requirements and restart. |
| Usage Problems | Re-install Bluestacks if needed. |
Advanced Tips and Tricks for BlueStacks Users
Customizing controls and settings. Using BlueStacks features for gaming and productivity.
Get the most out of BlueStacks by customizing your controls and settings. You can make your games easier and more fun! Adjust your keyboard shortcuts. It helps you play your favorite games better. Use special features like multi-instance to run several apps at once. Let’s explore some tips:
- Set up custom controls just for you.
- Use the game recorder to save your gameplay.
- Try the Eco Mode for better performance.
With these tips, your experience on BlueStacks will improve. Enjoy gaming or getting things done faster!
How can I customize controls in BlueStacks?
You can click on the keyboard icon to set custom controls easily. Adjust them to fit your style and make gaming smoother!
User Reviews and Experiences with BlueStacks
Summary of common feedback from users. Case studies or examples of use cases.
Many users share their thoughts about BlueStacks. Most say it’s easy to use and runs Android apps well. Some complain about slow performance, especially on older computers. Funny enough, one user joked that BlueStacks is like a turtle on a treadmill—slow but steady! People love playing games like Candy Crush or Clash of Clans on their PCs. Here’s a quick look at some feedback:
| User Feedback | Examples |
|---|---|
| Easy to use | Perfect for gamers! |
| Performance issues | Slower on older systems |
| Great for multitasking | Use several apps at once |
Overall, BlueStacks is fun and helpful for playing mobile games on Windows 10, but performance may vary. It’s like playing hopscotch; easy for some, tricky for others!
Conclusion
In conclusion, BlueStacks for Windows 10 lets you enjoy Android apps on your PC. It’s easy to download and use. You’ll find many fun games and useful apps right on your desktop. Explore its features to enhance your experience. If you want to learn more, check out guides and tutorials online to get the most out of BlueStacks!
FAQs
What Are The System Requirements For Installing Bluestacks On Windows 1
To install BlueStacks on Windows, you need a computer with at least 4 GB of RAM. You also need 5 GB of free space on your hard drive. Your Windows version should be Windows 7 or higher. A good graphics card helps too, so your games run smoothly. That’s it!
How Can I Optimize Bluestacks Performance On My Windows Pc?
To make BlueStacks run better on your Windows PC, you can do a few things. First, close any other programs you aren’t using. This gives more space for BlueStacks. Second, check your PC’s settings. Make sure it has plenty of RAM (this helps your computer remember things). You can also change the BlueStacks settings to use more CPU power. Finally, keep your BlueStacks and Windows updated. This can fix problems and improve speed.
Is It Possible To Run Multiple Instances Of Bluestacks On Windows 1And If So, How?
Yes, you can run multiple instances of BlueStacks on Windows. First, open BlueStacks and go to its settings. Look for something called “Multi-Instance Manager.” You can use this to create new copies of BlueStacks. Just click “New Instance,” and you can start a new game or app in each one!
What Are The Steps To Install Android Apps On Bluestacks For Windows 1
To install Android apps on BlueStacks for Windows, first, you need to download BlueStacks from its website. Then, open BlueStacks and sign in with your Google account. Next, go to the Google Play Store inside BlueStacks. You can search for the app you want, click “Install,” and it will download. Now, you can find the app on your BlueStacks home screen and play it!
How Does Bluestacks Compare To Other Android Emulators Available For Windows 1
BlueStacks is a popular Android emulator, which means it helps you run Android apps on your Windows computer. It is known for being user-friendly and fast. Compared to other emulators, BlueStacks often has better graphics and game support. Some other emulators might not work as well or are harder to set up. Overall, BlueStacks is great if you want to play Android games on your PC.
Resource:
-
How Android emulators work: https://www.howtogeek.com/687664/what-is-an-android-emulator/
-
Tips for optimizing PC performance: https://www.pcworld.com/article/407296/how-to-make-your-windows-10-pc-run-faster.html
-
Introduction to virtualization technology: https://www.vmware.com/topics/glossary/content/virtualization.html
-
Understanding Google Play Store access: https://support.google.com/googleplay/answer/2853570?hl=en