If you want to remove clock from lock screen Windows 10, functionally you won’t able to do that. But you can apply an alternate process that will help you to hide the clock and date from the lock screen.
The process is kind of creating a layer upon the general lock screen. So whenever your PC enters into the lock screen, it will show the layer instead of showing the regular lock screen.

Overall, the process is a part of the fun to apply. And it will help you to hide the clock and date while entering the lock screen. Let’s explore
Remove Clock from Lock Screen Windows 10
The process is easy to apply. It has two parts. You need to follow them one by one. Each part has a couple of steps. Before discussing the steps in detail, let’s have a look at the parts list first.
- Part 1: Customize Screen Saver Settings
- Part 2: Customize MonitorES
Part 1: Customize Screen Saver Settings
You need to customize the Screen Saver settings first. Here you have to follow some steps. I will include the steps below.
Step 1
Tap the Windows key and type ‘screen saver’. Accordingly, you will see the preface of ‘Change screen saver’ on the appeared interface. You have to click on it.

Step 2
Consequently, a related new window will become evident. You need to look at the middle of the interface. Here select ‘Photos’ as a screen saver. Then you have to tap the ‘Settings’ tab.

Step 3
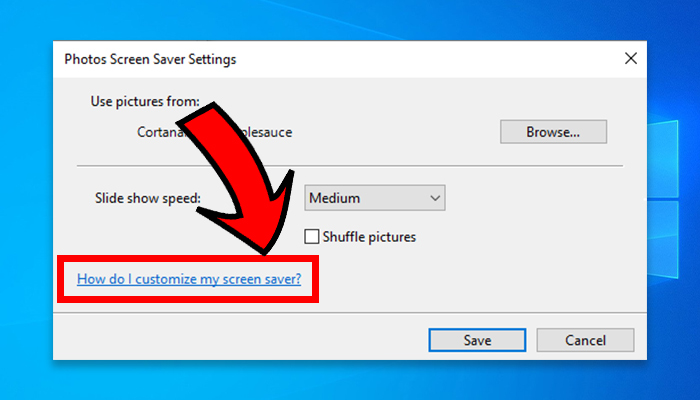
Next, you need to work with the ‘Use pictures from’ option. To do so, click on the ‘Browse’ tab.

Step 4
Choose a folder wherefrom the Screen Saver take photos. Here you may create a new folder or select the older folder location. Then press on ‘Ok’ to confirm the submission.

Step 5
After that, you have to click on the ‘Save’ tab from the ‘Photos Screen Saver Settings’ window.

Step 6
Consequently, you will stay on the ‘Screen Saver’ window. Here, you have to tick mark the ‘On resume, display logon screen’ box and adjust the ‘Wait’ time. Then, click on the ‘Apply’ tab and ‘Ok’ at the end.

Part 2: Customize MonitorES
First, you have to download and install the ‘MonitorES’ app to apply the part. Then, you have to follow the below steps.
Step 1
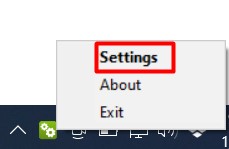
Look at the System Tray. Here you will see a preface of MonitorEs with white-colored double settings icons inside a red background. Right-click on it and select ‘Settings’ from the appeared list.

Step 2
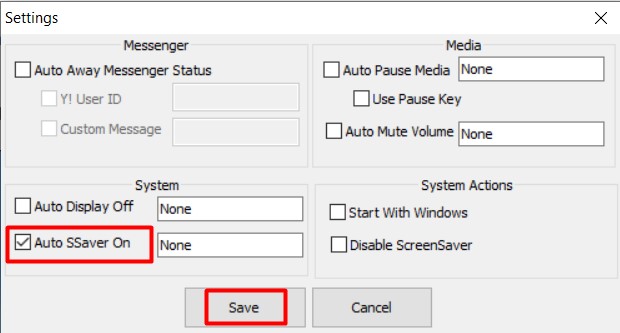
Consequently, the ‘Settings’ window will appear. From here, you need to look at the ‘System’ section. You will see the ‘Auto SSaver On’ box under the section. Tick mark the box. Then press the ‘Save’ tab.

Finally, enter the lock-screen mode by pressing Windows and ‘L’ keys together. You will see the photos on the screen that you would have selected in part 1. And no clock or date will appear on the screen until you press any keyboard key or click the mouse.
Final Words
Furthermore, there is a way to remove clock from lock screen Windows 10 that need administrative power to apply. It has 50-50 chances and is obviously risky too. The process is to rename the below folder-
C:\Windows\SystemApps\Microsoft.LockApp_cw5n1h2txyewy
as the below-
C:\Windows\SystemApps\Microsoft.LockApp_cw5n1h2txyewy.bak
