
Have you ever wished to set up a new computer or fix an old one? Creating installation media for Windows 10 can help you do just that. Imagine being able to install the latest version of Windows on your own. It sounds exciting, right? With just a USB drive and a few simple steps, you can create your own installation media.
Many people don’t know how easy it is to get started. Did you know that making this media can also help you solve pesky computer problems? You can boot from it and install Windows in a flash. It’s like having a magic key for your PC.
In this article, we’ll guide you through creating installation media for Windows 10. With easy instructions and friendly tips, you’ll feel like a tech pro in no time! Let’s dive in and unlock the power of your computer.
Creating Installation Media For Windows 10: A Step-By-Step Guide
Understanding Installation Media
Definition of installation media and its purpose. Types of installation media for Windows 10.
Installation media is like a magical key for your Windows 10 door! It helps you install or repair the operating system on your computer. Think of it as a helpful guide that shows your computer how to wake up and start working. There are a few types of installation media. You can use a USB flash drive, a DVD, or even download an image file. Each type has its own special charm for getting Windows 10 up and running!
| Type | Usage |
|---|---|
| USB Flash Drive | Fast and portable. |
| DVD | Good if you prefer a classic method. |
| ISO File | Downloadable for easy access. |
System Requirements for Windows 10 Installation
Minimum hardware specifications required. Compatibility considerations for different Windows 10 versions.
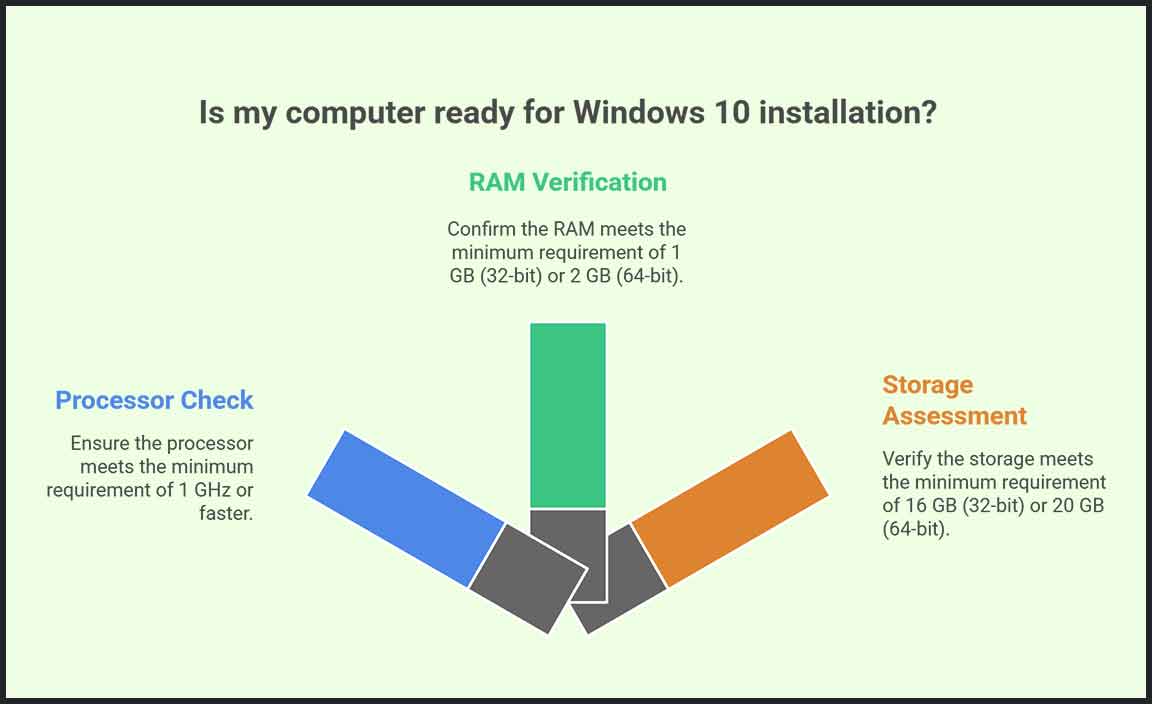
Before diving into the world of Windows 10, let’s check your computer’s readiness! For a smooth ride, you need at least a 1 GHz processor, 1 GB of RAM, and 16 GB of storage. Think of it as making sure your car has enough gas before a road trip. Keep in mind that different versions of Windows 10 may have their own quirks. Want some quick facts? Here’s an easy-to-read table:
| Specifications | Minimum Requirements |
|---|---|
| Processor | 1 GHz or faster |
| RAM | 1 GB (32-bit), 2 GB (64-bit) |
| Storage | 16 GB (32-bit), 20 GB (64-bit) |
Ensure your machine meets these specs to avoid tech tantrums! Remember, a little homework now keeps the headaches away later!
Step-by-Step Guide to Using the Media Creation Tool
Downloading the Media Creation Tool. Creating a bootable USB drive with the tool. Alternative methods for creating a DVD installation disk.
First, download the Media Creation Tool from the official Microsoft website. It’s free and quick—like a ninja in a hurry! Next, plug in a USB drive with at least 8GB. Open the tool and choose “Create installation media”. It’ll do its magic, making your USB bootable. For those who prefer DVDs, you can use the tool to create an installation disk. Choose the DVD option instead! Below is a handy comparison table:
| Method | Requirements |
|---|---|
| Bootable USB Drive | 8GB USB Drive |
| DVD Installation Disk | Blank DVD (4.7GB) |
Follow these steps, and you’ll be ready to install Windows 10 in no time! Just remember, no USB drive, no party!
Preparing Your Computer for Installation
Backing up important files and data. Checking for updates and necessary drivers.
Before you start installing Windows 10, prepare your computer well. First, back up important files and data. You don’t want to lose anything valuable. Use an external hard drive or a cloud service to save your files. Next, check for updates and necessary drivers. This step makes sure your computer runs smoothly.
- Update your operating system.
- Install all important drivers.
- Restart your computer if needed.
Taking these steps will help your installation go much smoother.
Why is backing up important?
Backing up prevents data loss. If something goes wrong, you’ll still have your files safe.
What updates should I check for?
Check for Windows and driver updates. This ensures your computer is ready for new software.
Troubleshooting Common Issues
Problems encountered during media creation. Solutions to fix installation errors.
Problems can pop up during media creation for Windows 10. You might see error messages like “download failed” or “not enough space.” Don’t worry! Here are some quick fixes:
- Check your internet connection. Make sure it’s strong.
- Free up space on your USB drive or PC.
- Turn off your antivirus temporarily. It may block the process.
Following these steps can help you complete the installation without issues!
What should I do if the installation fails?
If the installation fails, restart your computer and try again. Check for any updates that may help, too.
Using the Created Installation Media
Steps to boot from USB/DVD. Installation options: Upgrade vs. Custom install.
After making your installation media, it’s time for the big show! First, you need to boot from your USB or DVD. Here’s the plan: plug in the USB or insert the DVD, then restart your computer. Look for a message that says “Press [key] to boot from USB/DVD.” That’s your cue! Hit the key like it’s a game-winning shot!
Now, you’ll see options for installation. Do you want to upgrade what you already have or go for a custom install? Upgrading keeps your files, but sometimes old software sticks around like a persistent relative. A custom install is like a fresh start, but remember to back up your important stuff first! Choose wisely, my friend!
| Installation Type | Description |
|---|---|
| Upgrade | Keeps your files and apps, but may carry over old issues. |
| Custom Install | Cleans everything. Perfect for a fresh start! |
Post-Installation Setup
Initial setup process for Windows 10. Recommended settings and configurations after installation.
After you install Windows 10, it’s time for the initial setup. This step ensures your new system is ready to use. You’ll select your language and region. Connecting to Wi-Fi is also important. Here are some recommended settings:
- Set up a Microsoft account for easy access to apps and services.
- Adjust privacy settings to keep your data safe.
- Customize the Start Menu to find your favorite apps quickly.
Taking these steps helps your computer run smoothly and makes it feel like home!
What should I do first after installing Windows 10?
First, connect to Wi-Fi, then create your Microsoft account. Next, adjust your privacy settings and personalize your Start Menu for a better experience.
Conclusion
Creating installation media for Windows 10 is simple and useful. You can use a USB drive or DVD to install or repair your system. Make sure to download the Media Creation Tool from Microsoft’s website. Follow the instructions carefully. Now, you’re ready to get started! If you want more details, check out Microsoft’s help page for step-by-step guidance.
FAQs
What Tools Are Needed To Create Installation Media For Windows 1And How Can They Be Obtained?
To create installation media for Windows 11, you need a good USB flash drive with at least 8 GB of space. You also need a computer that can connect to the internet. You can download the Windows 11 installation tool from the Microsoft website. Just go to the site, find the tool, and follow the steps to make your USB ready.
What Are The Required System Specifications And Preparations For A Computer Before Creating Windows Installation Media?
Before we create Windows installation media, we need to check a few things on our computer. First, make sure you have at least 8 gigabytes (GB) of free space. You should also have a good internet connection to download Windows. It’s important to use a USB drive that has at least 8 GB of space too. Lastly, you need to have a computer that can run Windows, which usually means it has a processor, RAM, and a hard drive.
How Do You Properly Format A Usb Drive For Use As Windows Installation Media?
To format a USB drive for Windows installation, start your computer and plug in the USB drive. Open “This PC” or “File Explorer” and find the USB drive. Right-click on it and choose “Format.” Select “FAT32” as the file system, check “Quick Format,” and click “Start.” Now your USB drive is ready to use for Windows installation!
What Are The Steps To Create Windows Installation Media Using The Media Creation Tool?
To create Windows installation media using the Media Creation Tool, start by downloading the tool from the Microsoft website. Open the file you downloaded. Choose “Create installation media” and click “Next.” Select your language and version of Windows, then click “Next” again. Choose whether you want a USB drive or a file on your computer. If you pick a USB drive, plug it in, select it, and click “Next” to start. Wait for the process to finish, and then you are done!
How Can You Verify That Your Windows Installation Media Is Functioning Correctly Before Attempting To Install The Operating System?
To check if your Windows installation media works, you can first look it over for scratches or dirt. If you have a USB drive, plug it into your computer and see if it shows up. You can also try using it on another computer to see if it can start the installation. Finally, you can use special programs to check for errors on the disk or USB drive. This way, you can be sure it’s ready to use!
Resource:
-
Microsoft Windows Support: https://support.microsoft.com/en-us/windows
-
Creating Bootable USB Drives Guide: https://www.howtogeek.com/201972/how-to-create-a-bootable-USB-drive-for-windows-10/
-
Windows 10 Clean Installation Tips: https://www.pcworld.com/article/2951383/how-to-clean-install-windows-10.html
-
Using Windows Media Creation Tool: https://www.techrepublic.com/article/how-to-use-the-windows-10-media-creation-tool/