
Imagine getting a new game you can’t wait to play. The game needs a special disc, but you can’t find it. That’s frustrating, right? Now picture needing to update or fix your computer. You can make everything smooth by creating installation media for Windows 11, just like finding that special disc. Do you want your computer to run the latest and best? It’s like turning on a superpower for your computer.
But how do you create installation media for Windows 11? It’s easier than making a sandwich. You might think, “Isn’t this for tech wizards?” Nope! Even kids can learn how. You’ll need a computer, a big USB stick, and a little know-how. Once you have these tools, you’ll feel like a tech wizard in no time.
Did you know some people call tech help just to install Windows 11? You won’t be one of them after this. Imagine your friends asking you for help because you’re now the expert. Ready to start this fun tech adventure? Let’s dive in!

Creating Installation Media For Windows 11: A Step-By-Step Guide

Imagine your computer needing a fresh start, much like refreshing a sandcastle. Creating installation media for Windows 11 makes this possible. You can build it with a USB drive, making your computer feel brand new. Have you ever wondered how to prepare in case things go wrong with your PC? By making installation media, you hold the power to reinstall Windows 11 easily. This process needs a simple USB drive and some patience, and it’s like having a magic wand for your computer.
Understanding the Need for Installation Media
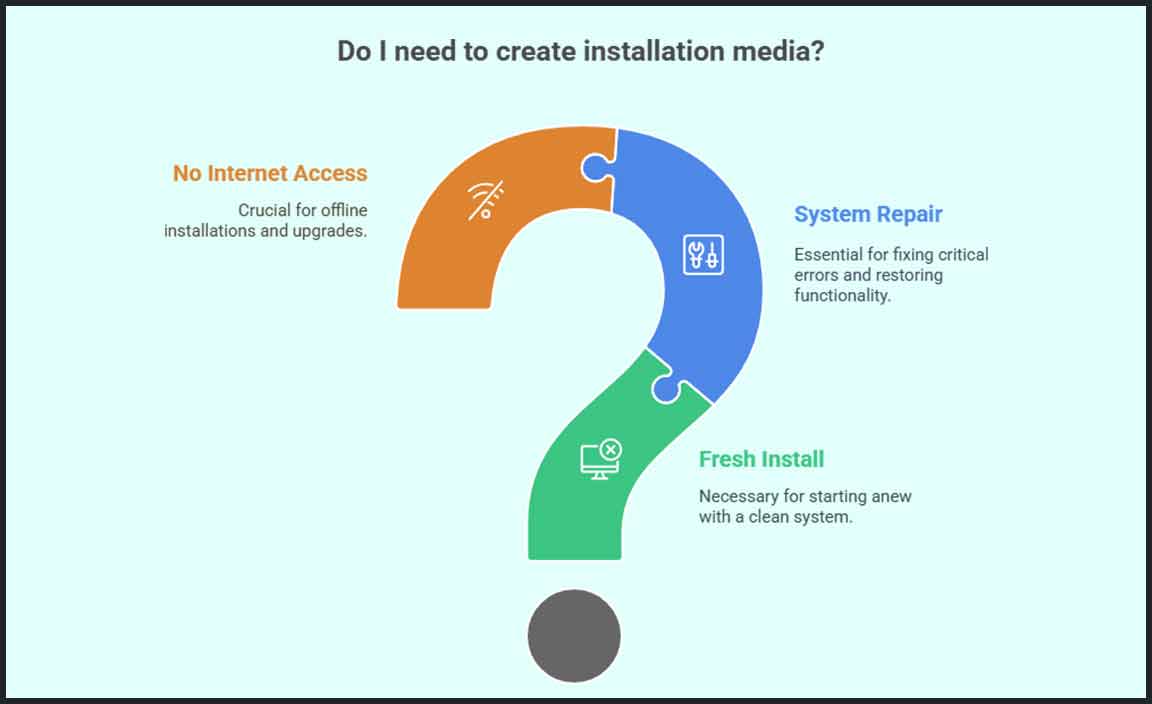
Reasons to create installation media. Scenarios when installation media is necessary.
Sometimes computers act like they forget how to be computers. That’s when installation media can save the day. It’s like having a superhero cape ready when you upgrade, fix errors, or need a clean reset. Imagine your PC saying, “Please rescue me from this bug!” Whether upgrading to the latest Windows 11 or resurrecting your system after a crash, installation media is your magic wand.
| Scenario | Why You Need It |
|---|---|
| Fresh Install | New beginnings need a fresh start. |
| System Repair | Patch up those critical errors. |
| No Internet | Access offline like a secret tech agent. |
Why create installation media? Think of it as a Swiss army knife for tech glitches. It’s handy to ensure you’re always ready, even if your computer feels like staging a surprise drama.
Requirements for Creating Windows 11 Installation Media
Hardware specifications. Necessary software and tools.
Imagine fitting Windows 11 onto a tiny flash drive—it’s like packing a whole movie into a popcorn-sized box! First, your computer needs a brain fast enough and legs sturdy enough, so make sure it has a 64-bit processor and 4GB RAM. You’ll also need at least 8GB storage to hold onto all that software goodness.
| Requirements | Specifications |
|---|---|
| Processor | 64-bit |
| RAM | 4GB |
| Storage | 8GB or more |
Now, here’s where it gets fancy! The Windows Media Creation Tool is like a magic wand. You wave it, and suddenly, your USB turns into a superhero capable of installing Windows 11. Don’t forget a good internet connection. After all, downloading Windows is like pulling a rabbit out of a hat—exciting but it takes a little patience.
Methods to Create Windows 11 Installation Media
Using USB flash drive. Using DVD.
Creating an installation media for Windows 11 is like a magic trick! Imagine turning a USB flash drive or DVD into your trusty helper. You can use a USB flash drive to carry files. This method is quick and simple. Your USB can be reused. Just plug it in and follow the prompts to help install Windows.
For those who like round things, DVDs are another option. The process is slower, but it’s reliable. Once ready, it cannot be changed, making it a permanent keepsake of sorts. Remember to have some popcorn ready for a wait!
| Method | Pros | Cons |
|---|---|---|
| USB Flash Drive | Quick, reusable, portable | Needs a working USB port |
| DVD | Permanent, stable | Slower, non-reusable |
To install Windows 11, both tools work wonders! Choose your sidekick, and you’ll have a fresh setup in no time. Remember, patience is a virtue—even if it means waiting for your turn with the technology wizards (just kidding, it’s worth the wait!).
Step-by-Step Guide: Creating a USB Flash Drive
Downloading the Windows 11 Media Creation Tool. Selecting the appropriate version and settings. Writing the Windows 11 ISO to the USB drive.
So, you’re about to embark on the adventure of creating a USB flash drive for Windows 11. First, you’ll want the Windows 11 Media Creation Tool. This tool helps you download the right Windows 11 version and settings.
| Step | Description |
|---|---|
| 1 | Grab the Windows 11 Media Creation Tool from Microsoft’s website. |
| 2 | Choose the suitable version and settings for your device. |
| 3 | Use the tool to write the Windows 11 ISO to the USB drive. |
Now, get that USB ready, it’s the star of this show! Plug it in and let the magic happen. Remember, patience is key. You can even make a sandwich while you wait. After this, you might realize you’ve turned into a tech wizard overnight, and who knows, maybe toast, too!
Creating Windows 11 Installation Media via DVD
How to download the Windows 11 ISO file. Using software to burn ISO to a DVD.
How do I download the Windows 11 ISO file?
Downloading the Windows 11 ISO is simple. Visit the Microsoft website and search for the Windows 11 download page. Here, choose the option to get the ISO file. After selecting your language and version, the file will start downloading. Make sure there’s enough space on your computer.
How do I create Windows 11 installation media using a DVD?
To make a Windows 11 installation DVD, you’ll need a couple of things:
- A blank DVD.
- A computer with a DVD writer.
- ISO burning software like Rufus or ImgBurn.
First, download the Windows 11 ISO file. Next, open your software and select the ISO file. Insert the blank DVD and choose the DVD option to burn. Start the burning process and wait. Once done, the DVD is ready to install Windows 11 on other computers.
This process ensures you have a backup for installation, just in case. Many people find DVDs reliable for this. Ready to give it a try?
Verifying Installation Media
Checking media functionality. Troubleshooting common issues.
Before you start dancing around your computer, it’s important to make sure your installation media is working. First, plug in your USB drive or insert your DVD. Check if it shows up on your computer. If not, you might be dealing with a mysterious ghost drive!
If you’re facing issues, try these steps:
- Check connections: Sometimes it’s just a loose plug causing the trouble.
- Try another port: USB ports can get a little cranky sometimes.
- Recreate the media: If all else fails, start again but without tears this time.
Most of the time, these steps save the day. Remember, computers have a mind of their own, but luckily, we smart humans always figure it out!
Tips for a Smooth Installation Process
Backing up important data. Ensuring BIOS/UEFI settings compatibility.
Before diving into the world of Windows 11, make sure to back up your precious files. You wouldn’t want to lose those adorable kitten photos! A trusty external drive or cloud service works like magic. Next, check your BIOS/UEFI settings—think of it as ensuring your spaceship is ready for take-off. Ensure they support Secure Boot and TPM 2.0. Follow these steps, and you’ll be windows-ready in no time, like a tech-savvy superhero!
| Step | Action |
|---|---|
| 1 | Back up important data |
| 2 | Check BIOS/UEFI settings |
Frequently Asked Questions (FAQs)
Addressing common user queries. Providing additional resources and support links.
Installing Windows 11? We’ve got answers to your questions! If you’re struggling, don’t worry—you’re not alone. From setup woes to “where did I put my headphones?” moments, everyone has questions. Check out the table below for quick solutions. For more help, click on the support links!
| Question | Answer |
|---|---|
| How do I create installation media for Windows 11? | Use the Media Creation Tool from Microsoft. |
| What if I need technical support? | Visit the official Microsoft support page. |
For any hiccups, like turning your PC into a grumpy turtle that won’t start, our resource links can be lifesavers. Microsoft’s online forums are a great place to meet fellow seekers of knowledge.
Conclusion
Creating installation media for Windows 11 empowers you to install or repair your system easily. By using tools like the Media Creation Tool, you ensure you have the latest version ready to go. Try following simple guides to create your media. Explore more Windows 11 tips online to make your computer experience better and smoother.
FAQs
What Are The System Requirements For Creating Installation Media For Windows 11?
To create Windows 11 installation media, you need a few things. First, you need a computer with a stable internet connection. Next, make sure you have a USB flash drive with at least 8GB of space. Finally, your computer should be using Windows 10 or a recent version. Remember, you’ll need a Microsoft account to do this too!
What Tools Do I Need To Create A Windows Installation Usb Or Dvd?
To make a Windows installation USB or DVD, you need a few things. First, have a blank USB drive or DVD. Then, download the Windows Media Creation Tool from Microsoft’s website. This tool helps put Windows onto your USB or DVD. Finally, make sure you have a computer to run the tool.
How Can I Download The Windows Iso File For Installation Media Creation?
To download a Windows ISO file, go to the Microsoft website. Search for “Windows download” and look for the official site. Click on the “Download tool now” button. Run the tool and follow the steps to get the ISO file. An ISO file is like a container holding all you need to install Windows.
What Are The Step-By-Step Instructions To Create Bootable Installation Media For Windows 11?
First, get a USB flash drive that’s at least 8 GB. This will be our special tool. Next, go to a computer and visit the Microsoft website. Look for “Download Windows 11” and choose “Create Windows 11 Installation Media.” Follow the simple steps the website shows. Finally, put the USB into a computer and let it turn into a Windows 11 bootable tool by following the on-screen instructions. Now, you’re ready to install Windows 11 on another computer!
Are There Any Specific Settings Or Configurations Needed On The Usb Drive To Ensure It Successfully Boots Windows Installation?
To make a USB drive bootable for Windows installation, you need to set it up correctly first. Use a tool like the Windows Media Creation Tool. This tool will help you copy the Windows files onto the USB drive. Make sure the USB drive is empty and has enough space, usually at least 8 GB. Finally, set your computer to start or “boot” from the USB drive when you turn it on.
Resource:
-
Understand Secure Boot Requirements: https://learn.microsoft.com/en-us/windows-hardware/design/minimum/supported/windows-11-secure-boot
-
Explore TPM 2.0 Details for Compatibility: https://www.intel.com/content/www/us/en/support/articles/000088179.html
-
Best Practices for Backing Up Your Data: https://www.backblaze.com/blog/the-3-2-1-backup-strategy/
-
Get Rufus for ISO Burning Made Simple: https://rufus.ie/