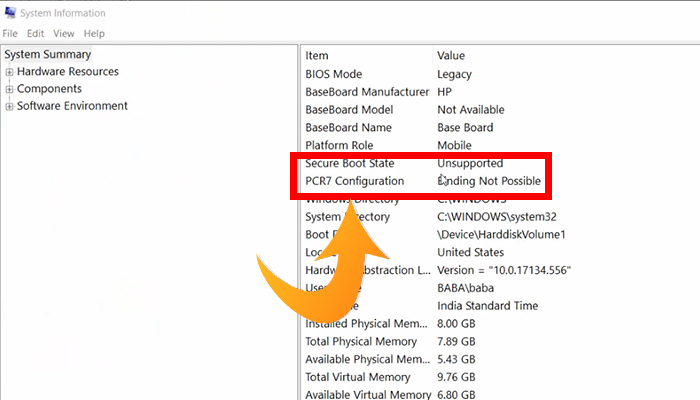
Are you confronting issues like- PCR7 binding is not supported or PCR7 configuration binding not possible while Checking system Information?
Indeed, you are not alone in who faces the issue. You can get rid of this issue using the GPT Partition System or by enabling the TPM.
There are a couple of questions arising according to the issue. What the message means or what to do with the issue, or how to deal with it. Whatever the question is, you will get all the probable answers from the entire article. Let’s explore.

What Does PCR7 Binding Not Supported | Device Encryption Failures Mean?
The message – “PCR7 Binding Is Not Supported | Device Encryption Failures” is related to the motherboard function called Trusted Platform Module (TPM).
It happens because of the absence of TPM. Or if the TPM hasn’t been set up properly.
If your PC has TPM and you found the issue in System Information, you will need to take possible steps to fix it.
How to Fix If PCR7 Binding Is Not Supported
If the message appears on your System Information section and the PC has the TPM chip, you should ensure the proper setup of two things. These help you to get rid of the issue.
- Fix. 1: GPT Partition System
- Fix. 2: Enable TPM
Method 1: GPT Partition System
System Drive must have the GPT partition system to communicate with the TPM. You can check the availability of the GPT partition by following the below steps-
Step 1: Tap the Windows key and type ‘computer management’. Consequently, the app preface will appear. You have to click on the ‘Run as administrator’ option.

Step 2: As a result, you will see the ‘Computer Management’ window on the screen. From here, you have to click on the ‘Disk Management’ section. You will get it at the left side menu under the ‘Storage’ category.

Step 3: Then, you will see the disk options. From here, you have to right-click on the system disc and click on ‘Properties’.
Step 4: After that, a new interface will appear. You have to tap the ‘Volume’ tab.
If the drive has the GPT partition system, it will prompt- ‘GUID partition table (GPT)’.
But, in case it does not have the system, you need to use ‘Windows PowerShell’. To do so, right-click on the ‘Start’ menu and select ‘Windows PowerShell’ from the appeared list. While the window becomes visible, you have to copy the below text and paste it into the app window. Then hit the ‘enter’ key.
‘Convert MBR Disk To GPT’
Method 2: Enable TPM
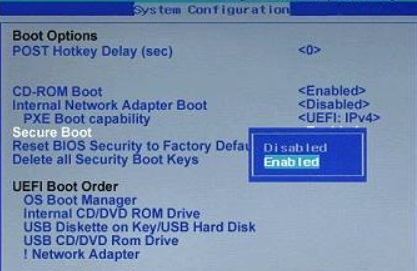
To enable TPM, you need to enable Secure Boot and enter BIOS. You have to follow two parts to execute the total process. I will include them one by one below.
Part 1
Firstly, you have to enable Security Boot. The process may vary according to the manufacturers.
Step 1
Tap the Windows and ‘I’ keys together. You will get the ‘Settings’ window access. You have to select the ‘Update & Security’ category from here.

Step 2
Scroll down the left menu and choose the ‘Recovery’ section.

Step 3
Then look at the right side and find out the ‘Advanced startup’ portion. Here you will see the ‘Restart now’ option. You have to click on it.

Step 4
Consequently, blue-colored ‘Choose an option’ feature will be visible. From here, you have to choose the ‘Troubleshoot’ option.

Step 5
Then you have to select the ‘Advanced options’.

Step 6
After that, you will get several advanced options. ‘UEFI Firmware Settings’ will be one of them. You have to click on it. As a result, the PC will restart automatically. Or you may need to do it manually.

Step 7
Accordingly, the BIOS setup will appear. From here, you can enable ‘Secure Boot’ option.

Part 2:
You will see a couple of tabs on the BIOS interface. These may be kind of Security, Trusted Computing, or Advanced. Whatever the tab will, TPM might stay under the various renamed features like TPM State, AMD fTPM switch, AMD PSP fTPM, Intel PTT, Intel Platform Trust Technology, Security Device, Security Device Support, etc. It will depend on your PC manufacturer.
From here, you have to enable TPM and restart the PC. Finally, check the System Information. Hopefully, you won’t face the issue anymore.
Frequently Asked Questions
How Do I Enable PCR7 Bindings?
You need to enable PCR7 buildings from the System information settings. Press the Win key and type System Information. Then run the System Information app as Administrator. While on the System Information app, scroll down and locate Secure Boot State in the right pane and enable it in the BIOS menu if it was set to Off.
How Do I Check My PCR7 Binding Status?
To check your PCR7 building status, open the command prompt as administrator and run the msinfo32 command. There you can find the BIOS Mode is UEFI and PCR7 Configuration is Bound.
Why Is My TPM Not Usable?
If you received any message that the TPM isn’t usable, then you need to verify that your computer hardware contains a United Extensible Firmware Interface (UEFI) and the TPM isn’t disable or hidden from the operating system under that UEFI settings.
What Does PCR7 Configuration Do?
Platform Configuration Register 7 (PCR7) is a memory location in the TPM that has a unique property. It ensures the use of a TPM-based key to a certain state of the PC.
Final Words
In the end, we can say that ‘PCR7 binding is not supported’ issue may not be a crucial matter that harms your PC. Yes, it has failed automatic device encryption. However, it is easy to solve. To solve the issue yourself, you have to ensure the proper setup of the GPT partition system and enable TPM.
