
Have you ever tried to open a big file and found it takes ages? 7zip might be the superhero you need for your Windows 11 computer. Imagine trying to fit a huge toy into a small box. That’s what 7zip can do with files. It squeezes them down so they fit nicely. You click a file, and it opens quickly like magic.
Here’s a fun fact: a tiny tool like 7zip can turn a giant book into a small booklet. This means more space for games or apps on your computer. Curious about more? What if you could share files faster with friends or family? With 7zip, you can! It makes sharing and storing easy and fun.
Exploring 7Zip For Windows 11: A Comprehensive Guide
Downloading and Installing 7zip on Windows 11
Stepbystep guide for downloading 7zip. Instructions for installing 7zip on Windows 11.
Getting 7zip onto your Windows 11 is easier than winning a game of tic-tac-toe! Let’s jump in. First, visit the official 7zip website. Click the download link. Windows 11 is not a fan of ‘no screaming files’ policy, so make sure you download the correct version. Once the download is complete, click the setup file. Follow the installation wizard steps; it’s like following breadcrumb trails, but a lot more techy. Soon, you’ll be the proud parent of a spanking new file-compressing tool! Quick fact: 7zip gained fame for having a compression ratio that’s like squishing a big fluffy pillow into a teeny tiny box.
| Step | Action |
|---|---|
| 1 | Visit the official 7zip website. |
| 2 | Click on the download link for your Windows version. |
| 3 | Open the downloaded setup file. |
| 4 | Follow the installation prompts. |
With these steps, you’re all set to start compressing files like a pro! Now, your computer can finally breathe easy.
How to Use 7zip on Windows 11
Comprehensive guide for compressing files using 7zip. How to extract files with 7zip.
How can you compress files with 7zip?
To make files smaller, use 7zip on Windows 11. First, install 7zip and open it. Find the files you want to compress. Then, click the Add button. Choose a name and location for the new file. Click OK. Now your files are in a smaller package!
How can you extract files with 7zip?
To open a compressed file, use 7zip. Right-click the file you want to extract. Select 7-Zip. Then choose Extract Here if you want the files in the same place. If you want to choose another location, click Extract to and pick where. Finally, click OK and see your files!
Using 7zip can make handling files easy! It’s quick and helps save space. Many people trust it to share files with friends.
Comparing 7zip with Other File Archivers for Windows 11
Performance comparison with WinRAR and WinZip. Discussion on compression speed and efficiency.
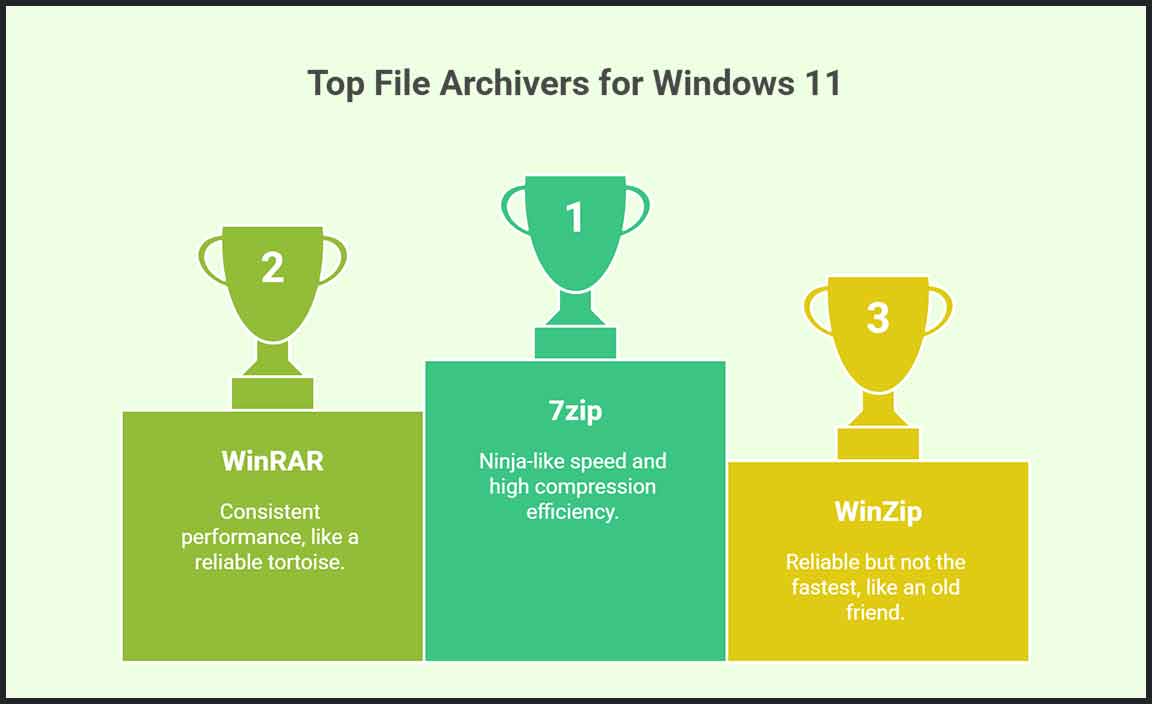
Choosing the best file archiver is like picking snacks for a party; it depends on what you need. 7zip is often celebrated for its high compression efficiency. But how does it stack up against WinRAR and WinZip on Windows 11? Let’s dive in!
In a speed race, 7zip is like a ninja, swiftly compressing files faster than a hiccup. However, when it comes to unzipping, it might make you wait a bit. On the other hand, WinRAR is like the tortoise in a tortoise-and-hare story; it might take its time, but its performance is consistent. WinZip is the reliable old friend—always there but not always the fastest on the block.
| File Archiver | Compression Speed | Efficiency |
|---|---|---|
| 7zip | Fast | Very High |
| WinRAR | Moderate | High |
| WinZip | Moderate | Moderate |
Overall, if you want speed and efficiency, 7zip is a great choice. WinRAR is great if you like steady and reliable software. WinZip, meanwhile, is a good pick if you prefer tradition. As Mark Twain jokingly said, “The secret to getting ahead is getting started,” so start with the one that best meets your needs!
Troubleshooting Common Issues with 7zip on Windows 11

Are you having trouble installing 7zip on your computer? Let’s fix it! First, ensure your Windows 11 is updated. Next, check if you’ve downloaded the right version for your system. If it still doesn’t work, try running the installer as an administrator.
How to Fix Extraction Errors Using 7zip
Struggling with extraction errors? It happens, but it’s easy to solve!
- Make sure the file isn’t corrupted.
- Always download files from trusted sources.
- Check if there’s enough space for extraction.
- Restart your device and try again.
Why is my 7zip not extracting files properly?
This might occur due to insufficient space or a corrupted file. Try cleaning up some space or downloading the file again.
Advanced Usage Tips for 7zip on Windows 11

Customizing 7zip settings for optimal performance. Utilizing command line features for advanced users.
Want to make 7zip work even better on Windows 11? Start by customizing settings. You can change the compression level for faster results. Need more control? Dive into command line features. They help advanced users automate tasks. Here’s how to get started:
- Change Compression Level: Open 7zip, go to settings, and set your desired level.
- Use Command Line: Open Command Prompt. Type “7zip” with your commands.
These tips will save time and boost performance!
How do you customize 7zip settings for optimal performance?
Customizing 7zip settings is simple and boosts speed. Open 7zip, click on settings, and pick your preferred options. Adjust the compression level for faster processes. Now, your tasks will be quick and efficient!
How do you use command line features in 7zip for Windows 11?
Advanced users love the command line features in 7zip. Open Command Prompt. Enter “7zip” with your preferred commands. This makes repetitive tasks easy. It’s a great way to work smart!
With these tips, you’ll turn 7zip into a powerful tool!
Conclusion
7zip is a powerful tool to compress and unzip files on Windows 11. It’s easy to use and saves storage space. You can download it for free and start organizing files efficiently. To learn more, explore tutorials online or try using it with different file types. This will help you become more comfortable with file management.
FAQs
How Do I Download And Install 7Zip On Windows 11?
To download and install 7-Zip on Windows 11, follow these steps. Go to your computer and open a web browser. Type “7-Zip” in the search bar and press “Enter.” Click on the link that says “7-Zip Official Site” to visit the site. Find the download button, click it, and once it’s downloaded, open the file and follow the instructions to install 7-Zip.
What Are The Main Features And Benefits Of Using 7Zip On Windows Compared To Other Compression Tools?
7zip is a tool that helps make files smaller, which saves space on your computer. One big feature is that it can handle lots of different file types. 7zip is free to use, so you don’t have to spend money. It’s also known for making files really small compared to some other tools. Plus, it works fast and is easy to use once you get the hang of it.
How Can I Set 7Zip As The Default Program For Opening Compressed Files In Windows 11?
To make 7-Zip open all your zip files on Windows 11, follow these steps. First, right-click on any zip file. Then, select “Open with” and then “Choose another app.” Next, pick “7-Zip File Manager” and check the box that says “Always use this app.” Finally, click “OK,” and 7-Zip will open your zip files from now on!
Are There Any Known Compatibility Issues Or Limitations When Using 7Zip On Windows 11?
7-Zip works well on Windows 11 for most people. Some users might find it hard to open files with rare formats. Sometimes, the program can crash unexpectedly, but this doesn’t happen often. Make sure to keep your 7-Zip updated to avoid problems.
How Can I Use 7Zip To Encrypt And Protect My Files On Windows 11?
To use 7zip to secure your files, first download and install 7zip on your computer. Find the file you want to protect, and right-click on it. Choose “7-Zip” and then “Add to archive.” In the window that pops up, type a strong password in the ‘Encryption’ section. Click “OK,” and your file will be safely locked. Remember your password, so you can open the file later!
Resource:
-
Official Microsoft Compatibility Details: https://learn.microsoft.com/en-us/windows/whats-new/
-
Understanding File Compression: https://www.howtogeek.com/117081/htg-explains-what-is-file-compression/
-
Tips for Protecting Sensitive Data: https://www.cisa.gov/news-events/news/securing-your-personal-data
-
Beginner’s Guide to Using Command Prompt: https://www.digitalcitizen.life/command-prompt-how-use-basic-commands/