Quick Summary:
Boost your Windows 10 audio quality with a built-in equalizer! This guide shows you how to easily adjust sound levels for music, videos, and calls, making your audio crystal clear and richer without any extra software. Learn to fine-tune your PC’s sound for a better listening experience.
Ever feel like your Windows 10 computer’s sound just isn’t quite right? Maybe music lacks bass, podcasts sound tinny, or movie dialogue is hard to hear. It’s a common frustration, and you’re not alone! The good news is that Windows 10 has a hidden gem that can help: a built-in audio equalizer. This tool lets you tweak the sound frequencies to perfectly match your preferences and your headphones or speakers. You don’t need to be a sound engineer or download complicated apps. In this guide, I’ll walk you through how to unlock and use this powerful feature step-by-step, making your PC sound amazing. Get ready to experience your audio like never before!
Think of an equalizer like the tone controls on a stereo system. It lets you adjust different parts of the sound spectrum – the low frequencies (bass), mid-range, and high frequencies (treble). By boosting or cutting these specific bands, you can shape the overall sound to your liking. For instance, if your music sounds a bit flat, you might want to boost the bass frequencies. If voices in a podcast are hard to understand, you might want to increase the mid-range frequencies. It’s all about making your audio clearer and more enjoyable.
What is an Audio Equalizer for Windows 10?
An audio equalizer, often called an EQ, is a tool that allows you to adjust the volume of specific frequency bands in an audio signal. In simpler terms, it lets you control the bass, midrange, and treble of your computer’s sound. Windows 10 includes a powerful, albeit sometimes overlooked, equalizer that can significantly enhance your audio experience. This built-in tool is perfect for beginners because it’s already part of your operating system, meaning no downloads or complicated installations are required.
Why would you want to use an EQ? Here are a few common reasons:
- Enhance Music: Make your favorite songs sound richer, with more prominent bass or clearer vocals.
- Improve Podcasts and Audiobooks: Boost the intelligibility of spoken word, so you can catch every word.
- Optimize Movies and Games: Create a more immersive sound experience by adjusting for explosions, dialogue, or ambient sounds.
- Adapt to Your Hardware: Compensate for the limitations of your headphones or speakers. Some earbuds might lack bass, while certain speakers might sound too harsh.
- Correct Room Acoustics: In some cases, EQ can help mitigate problems caused by how sound reflects in your room.
Accessing the Windows 10 Audio Enhancements (Where the Equalizer Lives)

The equalizer in Windows 10 is part of a set of “Audio Enhancements.” It’s not a standalone app you’ll find in your Start Menu. Instead, you access it through your playback device’s properties. Don’t worry, it sounds more complicated than it is. We’ll go through it step-by-step.
Step-by-Step Guide to Finding Your Equalizer
Follow these simple steps to access the audio enhancements and the equalizer:
- Right-click the Speaker Icon: Find the speaker icon in your system tray, usually located on the bottom-right corner of your screen. Right-click on it.
- Select “Sounds”: From the context menu that appears, choose “Sounds.” This will open the Sound control panel window.
- Go to the “Playback” Tab: In the Sound window, make sure you are on the “Playback” tab. You’ll see a list of your audio devices (speakers, headphones, etc.).
- Select Your Default Device: Identify the device you are currently using to listen to audio (it will have a green checkmark next to it, indicating it’s the default). Right-click on this device.
- Choose “Properties”: From the context menu, select “Properties.” A new window will open, showing the settings for that specific playback device.
- Navigate to the “Enhancements” Tab: Look for a tab labeled “Enhancements” or sometimes ” Dolby, DTS, or Sonic…” Depending on your audio driver, this tab might have a slightly different name. Click on it.
- Check “Equalizer”: You should see a list of audio enhancements available for your device. Find and check the box next to “Equalizer.” If you specifically want to use the graphic equalizer, this is the option you need.
- Click “Apply” and “OK”: Click the “Apply” button to save your changes, and then click “OK” to close the Properties window.
Once you’ve checked the “Equalizer” box, you’ll notice that the “Equalizer” option itself (underneath the checkbox) becomes active and clickable. This is where you’ll do your actual sound tweaking. Let’s move on to how to use it.
Using the Graphic Equalizer in Windows 10
With the “Equalizer” enhancement enabled, you can now access its settings. This is where the magic happens!
Accessing the Equalizer Settings
After following the steps above, you will still be in the audio device’s Properties window, on the “Enhancements” tab. To access the Equalizer settings:
- Click the “Equalizer” Button: Click the “Equalizer” option itself (not just the checkbox) located directly below the checkbox.
- The Equalizer Window Opens: A new window will pop up, displaying the graphic equalizer interface.
Understanding the Equalizer Interface
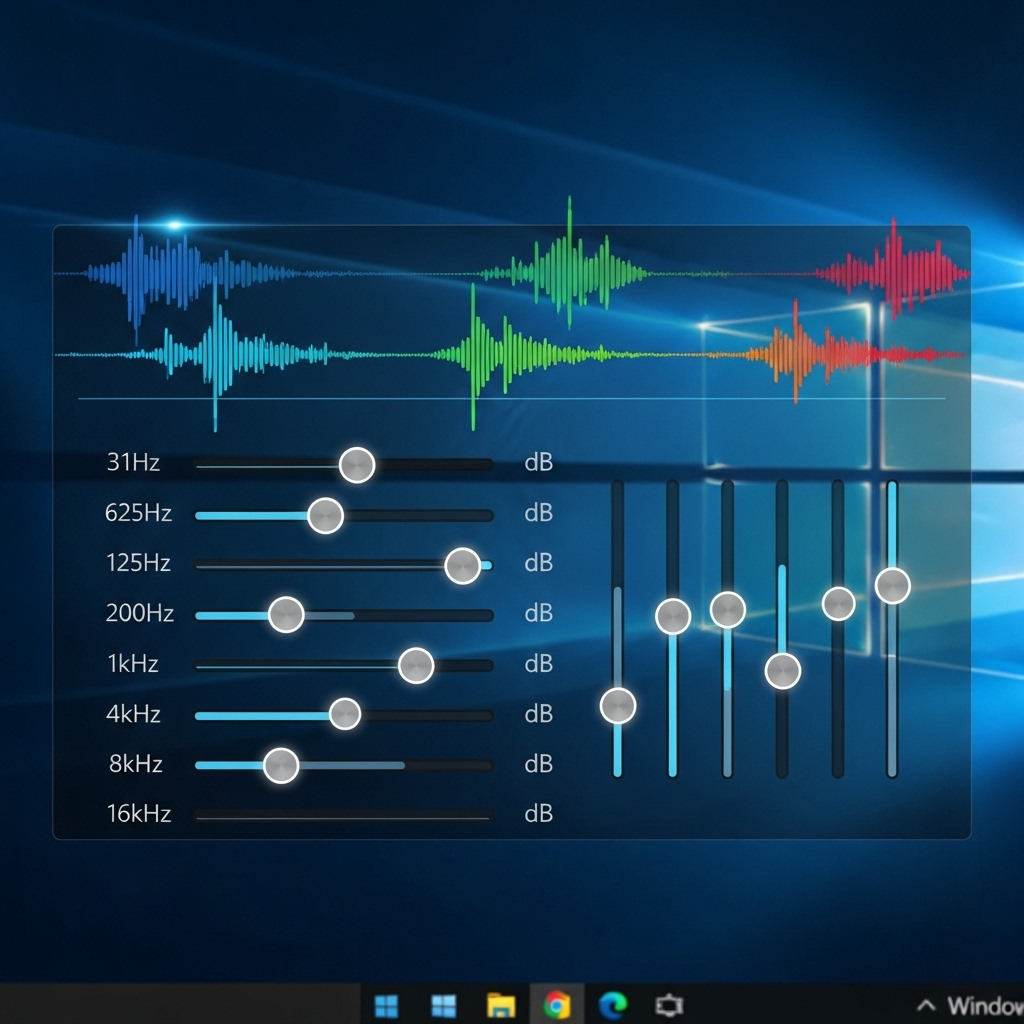
The Equalizer window typically shows a series of vertical sliders. Each slider controls the volume of a specific frequency band. Here’s a breakdown:
- Frequency Bands: The numbers along the bottom of the slider area represent different frequencies, measured in Hertz (Hz).
- Low Frequencies (Bass): Around 60 Hz to 250 Hz. These control the deep rumble, kick drums, and bass guitar.
- Mid-Range Frequencies: Around 250 Hz to 2,000 Hz (2 kHz). This range is crucial for vocals, guitars, and most instruments.
- **High Frequencies (Treble): Around 2,000 Hz (2 kHz) to 16,000 Hz (16 kHz). These influence clarity, brightness, cymbals, and sibilance (sharp ‘s’ sounds).
- Sliders: Moving a slider up boosts the volume for that specific frequency band, making it more prominent. Moving a slider down cuts the volume for that band, reducing its impact.
- Presets: Many equalizers come with pre-set configurations for different types of audio. You’ll usually see a dropdown menu or a button labeled “Presets” or “Settings.”
Making Adjustments (Boosting Your Audio!)
Here’s how you can start shaping your sound:
- Play Some Audio: Have your favorite music, a podcast, or a video playing so you can hear the changes in real-time.
- Experiment with Sliders:
- For more bass: Gently slide the sliders on the left side (lower frequencies) upwards. Be careful not to overdo it, as too much bass can make the sound muddy.
- For clearer vocals: Try slightly boosting the sliders in the mid-range, around 1 kHz to 4 kHz.
- For brighter sound or crisper high-hats: Increase the sliders on the right side (higher frequencies). Again, don’t boost too much, or you might get harsh, tinny sound.
- Use Presets for a Quick Start: If you’re unsure where to begin, try selecting a preset. Common presets include “Rock,” “Pop,” “Jazz,” “Classical,” “Speech,” and “Bass Boost.” These are designed to enhance specific genres or types of audio. You can see a list of common presets and their effect below.
- Customizing Presets: After selecting a preset, you can further fine-tune it using the sliders to your exact liking.
- Resetting: If you mess up or want to start over, look for a “Reset” button or simply select a “Flat” or “Normal” preset.
Common Equalizer Presets and Their Effects
To give you a better idea of what each preset does, here’s a look at some standard options and what they generally aim to achieve.
| Preset Name | Primary Goal | Typical Adjustments | Best For |
|---|---|---|---|
| Flat / Normal | Neutral sound, no artificial boosting. | All sliders at 0 dB (default position). | Accurate audio reproduction, baseline for custom settings. |
| Bass Boost | Increase low-end frequencies. | Significant boost to the lowest sliders (e.g., 60-120 Hz). | Electronic music, hip-hop, movies with strong soundtracks, speakers lacking bass. |
| Treble Boost | Increase high-end frequencies. | Significant boost to the highest sliders (e.g., 8 kHz-16 kHz). | Making vocals and instruments more “airy” or “crisp,” improving clarity in certain recordings. |
| Vocal Boost / Speech | Enhance clarity and presence of vocals. | Boosts mid-range frequencies (e.g., 1 kHz-4 kHz), potentially slight cut at very low or high ends. | Podcasts, audiobooks, video calls, lectures. |
| Rock | Punchy bass and clear guitars/vocals. | Moderate bass boost, slight mid-range cut, moderate treble boost. | Rock music, energetic genres. |
| Pop | Bright and balanced clear sound. | Balanced boost across many frequencies, often forward mids and bright highs. | Pop music, modern chart-toppers. |
| Classical | Balanced, rich sound with natural dynamics. | Often emphasizes natural frequencies, avoid excessive boosting, sometimes a slight boost in mids and highs for detail. | Classical music, orchestral performances. |
Remember, these are general guidelines. The actual effect can vary depending on your audio source, your listening environment, and your personal preferences. The best approach is to try different presets and then fine-tune them.
Other Audio Enhancements in Windows 10
Besides the graphic equalizer, the “Enhancements” tab might offer other features that can improve your audio. These can vary significantly based on your computer’s sound card and installed drivers (like Realtek, Conexant, or others).
Common enhancements include:
- Loudness Equalization: This feature attempts to make quiet sounds louder and loud sounds quieter, providing a more consistent listening experience without having to constantly adjust the volume. It’s particularly useful for watching movies late at night or listening at lower volumes so you don’t miss dialogue.
- Virtual Surround: This aims to simulate a surround sound experience using just your stereo headphones or speakers. It can make music and movies feel more spacious and immersive.
- Bass Boost: While you can achieve this with the graphic equalizer, this is a dedicated option.
- Room Correction: Some drivers offer options to “correct” for the acoustics of your listening room—though often this is more of a marketing feature.
- Voice Clarity / Speech Enhancement: Focused on improving the sound of spoken words.
How to Use Them: Similar to the equalizer, you simply check the box next to the enhancement you want to enable. If an enhancement has its own settings (like “Bass Boost” often does), you’ll be able to click on its name and adjust its specific parameters. Experiment with these alongside the equalizer to find your ideal sound.
Important Note on Drivers: The availability and functionality of these enhancements are heavily dependent on your specific audio drivers. If you don’t see an “Enhancements” tab, or if the tab looks very different, your audio drivers might be basic or have their own control panel. In such cases, you might need to download updated drivers from your PC manufacturer’s website or the website of your sound hardware manufacturer (e.g., Realtek, a very common audio chip maker).
Troubleshooting Common Audio Issues with the Equalizer
Even with the equalizer, you might run into snags. Here are a few common issues and how to fix them.
Issue 1: “Enhancements” Tab is Missing
Cause: Your audio drivers are either basic, outdated, or not configured to show these enhancements. This is common on some very basic PCs or if a generic Windows driver is installed.
Solution:
- Update/Reinstall Audio Drivers: The best solution is to get the correct drivers.
- Visit your PC manufacturer’s support website (e.g., Dell, HP, Lenovo, Asus).
- Find the support/drivers section for your specific model.
- Download the latest audio drivers.
- Install them, following the on-screen instructions. You might need to restart your computer.
- Check Sound Control Panel: If updating drivers doesn’t work, sometimes the enhancements are managed through a separate audio control panel application (e.g., Realtek HD Audio Manager). Search for this application in your Start Menu.
- Enable from Device Manager (Advanced): In Device Manager, under “Sound, video and game controllers,” you can right-click your audio device and select “Properties,” then look for further driver details or software options that might enable enhancements.
Issue 2: Equalizer Settings Don’t Seem to Work
Cause: The enhancement might be turned off at a deeper level, or another application is overriding your settings.
Solution:
- Double-Check the “Enhancements” Tab: Ensure the “Equalizer” box is checked and that the equalizer itself is selected.
- Check App-Specific Settings: Some applications (like media players, communication apps like Zoom, or games) have their own audio settings that might bypass or override Windows settings. Check the audio preferences within the app you’re using.
- Disable Other Enhancements: Sometimes, multiple enhancements can conflict. Try disabling all other enhancements (like Loudness Equalization) to see if the equalizer starts working correctly.
- Test with Different Audio: Play different types of audio files or streams to rule out an issue with a specific file.
Issue 3: Sound Becomes Distorted or Too Loud
Cause: You’ve overdone it with the sliders! Boosting too many frequencies, especially at high levels, can cause distortion and clipping.
Solution:
- Lower the Overall Volume: First, turn down your system volume slightly.
- Reduce Boosted Frequencies: Go back into the equalizer and lower the sliders that you’ve pushed up significantly, particularly those in the bass or treble ranges.
- Use the “Flat” Preset: As a starting point, go back to the “Flat” or “Normal” preset.
- Make Small Adjustments: When customizing, make small boosts or cuts (e.g., 1-3 dB at a time) and listen to the effect.
- Don’t Exceed 0 dB (Generally): While you can push sliders above 0 dB, pushing too many can lead to clipping. If a preset pushes things too high, try a different preset or use a manual method where you mainly cut frequencies that are too loud rather than boost others too much.
Tips for Optimizing Your Windows 10 Audio
Using the equalizer is a great start, but here are a few extra tips to get the best possible sound from your Windows 10 PC:
- Know Your Hardware: Are you using cheap earbuds, high-end headphones, or monitor speakers? Each has different sonic characteristics. Try to EQ your sound to suit your specific device. For example, if your headphones have a natural dip in bass, you might want to boost those frequencies slightly.
- Listen in a Quiet Environment: Minimizing background noise will help you better appreciate fine-tuned audio settings.
- A/B Testing: Toggle the equalizer on and off (by